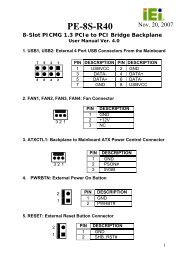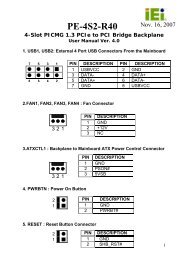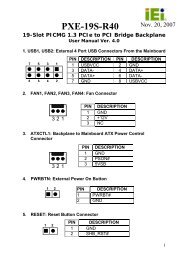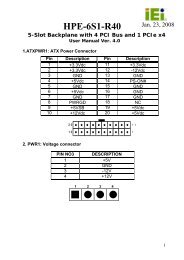
PCIE-G41A2 PICMG 1.3 CPU card - iEi
PCIE-G41A2 PICMG 1.3 CPU card - iEi
PCIE-G41A2 PICMG 1.3 CPU card - iEi

You also want an ePaper? Increase the reach of your titles
YUMPU automatically turns print PDFs into web optimized ePapers that Google loves.
<strong>PCIE</strong>-<strong>G41A2</strong> <strong>PICMG</strong> <strong>1.3</strong> <strong>CPU</strong> <strong>card</strong><br />
Page 41<br />
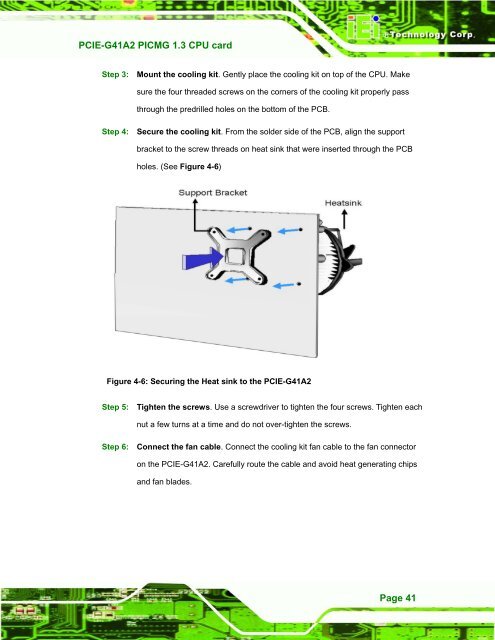
Step 3: Mount the cooling kit. Gently place the cooling kit on top of the <strong>CPU</strong>. Make<br />
sure the four threaded screws on the corners of the cooling kit properly pass<br />
through the predrilled holes on the bottom of the PCB.<br />
Step 4: Secure the cooling kit. From the solder side of the PCB, align the support<br />
bracket to the screw threads on heat sink that were inserted through the PCB<br />
holes. (See Figure 4-6)<br />
Figure 4-6: Securing the Heat sink to the <strong>PCIE</strong>-<strong>G41A2</strong><br />
Step 5: Tighten the screws. Use a screwdriver to tighten the four screws. Tighten each<br />
nut a few turns at a time and do not over-tighten the screws.<br />
Step 6: Connect the fan cable. Connect the cooling kit fan cable to the fan connector<br />
on the <strong>PCIE</strong>-<strong>G41A2</strong>. Carefully route the cable and avoid heat generating chips<br />
and fan blades. Step 0: