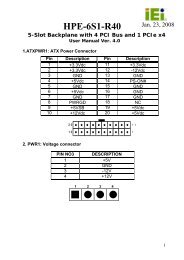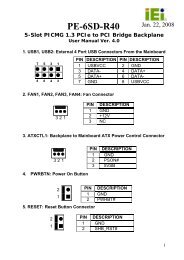
PCIE-G41A2 PICMG 1.3 CPU card - iEi
PCIE-G41A2 PICMG 1.3 CPU card - iEi
PCIE-G41A2 PICMG 1.3 CPU card - iEi

Create successful ePaper yourself
Turn your PDF publications into a flip-book with our unique Google optimized e-Paper software.
<strong>PCIE</strong>-<strong>G41A2</strong> <strong>PICMG</strong> <strong>1.3</strong> <strong>CPU</strong> <strong>card</strong><br />
WARNING:<br />
The installation instructions described in this manual should be<br />
carefully followed in order to prevent damage to the components and<br />
injury to the user.<br />
Before and during the installation please DO the following:<br />
• Read the user manual:<br />
o The user manual provides a complete description of the <strong>PCIE</strong>-<strong>G41A2</strong><br />
installation instructions and configuration options.<br />
• Wear an electrostatic discharge cuff (ESD):<br />
o Electronic components are easily damaged by ESD. Wearing an ESD cuff<br />
removes ESD from the body and helps prevent ESD damage.<br />
• Place the <strong>PCIE</strong>-<strong>G41A2</strong> on an antistatic pad:<br />
o When installing or configuring the motherboard, place it on an antistatic<br />
pad. This helps to prevent potential ESD damage.<br />
• Turn all power to the <strong>PCIE</strong>-<strong>G41A2</strong> off:<br />
o When working with the <strong>PCIE</strong>-<strong>G41A2</strong>, make sure that it is disconnected<br />
from all power supplies and that no electricity is being fed into the system.<br />
Before and during the installation of the <strong>PCIE</strong>-<strong>G41A2</strong> DO NOT:<br />
• Remove any of the stickers on the PCB board. These stickers are required for<br />
warranty validation.<br />
• Use the product before verifying all the cables and power connectors are<br />
properly connected.<br />
• Allow screws to come in contact with the PCB circuit, connector pins, or its<br />
components.<br />
Page 36