

Korg Microkorg Owner's Manual - zZounds.com
Korg Microkorg Owner's Manual - zZounds.com
Korg Microkorg Owner's Manual - zZounds.com

You also want an ePaper? Increase the reach of your titles
YUMPU automatically turns print PDFs into web optimized ePapers that Google loves.
TAP<br />
EM-1<br />
1 2 3 4 5 7 8 9 10 11 12 13 14 15 16<br />
3. OSC1 (Oscillator 1) — SYNTH/VOCODER<br />
WAVE CONTROL 1 CONTROL 2<br />
Audio In ( ):<br />
The waveform of the audio signal<br />
input from the AUDIO IN 1 or 2<br />
jacks will be used instead of an oscillator.<br />
This lets you apply filtering to a<br />
drum phrase, or synthesize a vocal<br />
or guitar sound together with oscillator<br />
2.<br />
The parameters of the PITCH<br />
section have no effect on the<br />
waveform that is input from the<br />
AUDIO IN 1 or 2 jacks.<br />
CONTROL 1 [0...127]:<br />
This adjusts the volume balance<br />
between AUDIO IN 1 and AUDIO<br />
IN 2. With a setting of 127 only AU-<br />
DIO IN 1 will be output. With a setting<br />
of 0, only AUDIO IN 2 will be<br />
output.<br />
CONTROL 2 [0...127]:<br />
LFO1 is used to apply modulation<br />
to the volume balance between<br />
AUDIO IN 1 and AUDIO IN 2 that<br />
you set by "CONTROL 1." The<br />
"CONTROL 2" setting sets the<br />
depth of this modulation produced<br />
by LFO1.<br />
This lets you create effects in which<br />
the AUDIO IN 1 and 2 inputs are<br />
alternated.<br />
Processing an external input audio signal<br />
You can use the filter, amp, EG, and LFO etc. to process the signal from a external<br />
synthesizer, rhythm machine, or audio device in the same way as an oscillator waveform.<br />
Before you connect an external device, turn off the power of the microKORG and of<br />
any external output devices and power amps.<br />
1 Turn the rear panel AUDIO IN 2 VOLUME 2 knob to the MIN position.<br />
2 Connect the output jack of your external device to the AUDIO IN 2 LINE jack.<br />
3 After making connections, turn the power on in the order of your external device, the<br />
microKORG, and finally your powered monitor speaker system.<br />
4 Select a program to initialize, and initialize it.<br />
For this example, select any synth program, and initialize the program as described<br />
on page 59.<br />
5 Turn the EDIT SELECT 1 knob to the OSC 1 position, and turn knob 1 ("WAVE") to<br />
select " " (Audio In).<br />
6 Input an audio signal from your external device, and turn the VOLUME 2 knob<br />
toward MAX as far as possible without allowing the AUDIO IN 2 LED to light red.<br />
7 While inputting an audio signal, play the keyboard.<br />
8 As described in "Basic editing procedure" (➝p.12), edit the FILTER, AMP, EG, LFO,<br />
and effects to modify the sound.<br />
The PITCH-related parameters have no effect on the sound from the AUDIO IN jacks.<br />
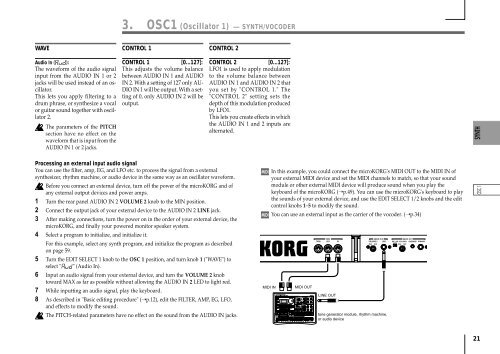
MIDI IN<br />
In this example, you could connect the microKORG's MIDI OUT to the MIDI IN of<br />
your external MIDI device and set the MIDI channels to match, so that your sound<br />
module or other external MIDI device will produce sound when you play the<br />
keyboard of the microKORG (➝p.49). You can use the microKORG's keyboard to play<br />
the sounds of your external device, and use the EDIT SELECT 1/2 knobs and the edit<br />
control knobs 1–5 to modify the sound.<br />
You can use an external input as the carrier of the vocoder. (➝p.34)<br />
MIDI OUT<br />
LINE OUT<br />
tone generator module, rhythm machine,<br />
or audio device<br />
21


