iFix and Terminal Services - ThinManager
iFix and Terminal Services - ThinManager
iFix and Terminal Services - ThinManager

You also want an ePaper? Increase the reach of your titles
YUMPU automatically turns print PDFs into web optimized ePapers that Google loves.
<strong>iFix</strong> <strong>and</strong> <strong>Terminal</strong> <strong>Services</strong><br />
A Deployment Guide<br />
Copyright © 2007-2010<br />
Automation Control Products<br />
Atlanta, Georgia, USA<br />
www.thinmanager.com<br />
Rev. 2 – December 22, 2009
Table of Contents<br />
1. Introduction .......................................................................................... 3<br />
1.1. Topics............................................................................................. 3<br />
2. Network Configuration ............................................................................ 3<br />
3. Deployment Choices............................................................................... 5<br />
4. Microsoft Pre-planning ............................................................................ 6<br />
4.1. Relaxed Security .............................................................................. 6<br />
4.2. Disable DEP ( Data Execution <strong>and</strong> Prevention ....................................... 7<br />
4.3. Application Compatibility Script .......................................................... 7<br />
5. IFix Installation ..................................................................................... 8<br />
5.1. Restart after Installation.................................................................... 9<br />
6. <strong>iFix</strong> Licensing .......................................................................................10<br />
6.1. Virtual Keyboard .............................................................................11<br />
7. <strong>iFix</strong> System Configuration for <strong>Terminal</strong> <strong>Services</strong> ........................................12<br />
7.1. Launch <strong>iFix</strong>.....................................................................................13<br />
7.2. SCADA Configuration .......................................................................17<br />
7.3. Path Configuration...........................................................................18<br />
7.4. Network Configuration .....................................................................19<br />
8. Profile Manager ....................................................................................23<br />
9. Launching from within <strong>ThinManager</strong> ........................................................28<br />
9.1. Hide the Startup Screen ...................................................................30<br />
10. Additional Microsoft Configurations ..........................................................31<br />
10.1. Add Users to Remote Desktop Group..................................................31<br />
10.2. End Disconnected Sessions ...............................................................33<br />
User Account ..........................................................................................33<br />
<strong>Terminal</strong> Server Settings ..........................................................................35<br />
10.3. Set Relaxed Security........................................................................37<br />
10.4. Apply Group Permissions ..................................................................38<br />
<strong>iFix</strong> <strong>and</strong> <strong>Terminal</strong> <strong>Services</strong> Deployment<br />
Page 2
<strong>iFix</strong> <strong>and</strong> <strong>Terminal</strong> <strong>Services</strong><br />
1. Introduction<br />
<strong>iFix</strong> is a SCADA (System Control <strong>and</strong> Data Acquisition) software. It was developed by<br />
Intellution <strong>and</strong> is now part of the GE Fanuc Proficy series of industrial software.<br />
This tech note is a simplified deployment guide for <strong>ThinManager</strong> users. Although it<br />
was prepared with the help of <strong>iFix</strong> users <strong>and</strong> specialists, it is a mere aid <strong>and</strong> not the<br />
definitive source for information. Please refer to official <strong>iFix</strong> documentation for<br />
questions <strong>and</strong> details.<br />
A special thanks goes to Scott Crider of Advantage Industrial Automation.<br />
1.1. Topics<br />
<br />
<br />
<br />
<br />
<br />
<br />
<br />
<br />
<br />
Network Configuration<br />
Deployment Choices<br />
Microsoft Pre-planning<br />
<strong>iFix</strong> Installation<br />
<strong>iFix</strong> Licensing<br />
<strong>iFix</strong> System Configuration<br />
Profile Manager<br />
Launching from within <strong>ThinManager</strong><br />
Additional Microsoft Configurations<br />
2. Network Configuration<br />
IFix is designed to pull data out of PLCs <strong>and</strong> factory-level sensors, present the data<br />
in a form usable by humans, <strong>and</strong> save the data for further usage. <strong>iFix</strong> is designed to<br />
function with a “two-box” system.<br />
<br />
<br />
The first box is a SCADA (Systems Control And Data Acquisition) computer.<br />
This is a PC that gathers the I/O <strong>and</strong> data from the PLCs <strong>and</strong> machinery <strong>and</strong><br />
runs the <strong>iFix</strong> database. This computer provides the data <strong>and</strong> values to the<br />
system.<br />
The second box is a View Node. This is a computer that pulls the data from<br />
the SCADA node <strong>and</strong> displays it on screens for the operator.<br />
In a terminal services environment the terminal server acts as the View node. Each<br />
client that connects to a terminal server will start a session <strong>and</strong> launch a view node<br />
<strong>iFix</strong> <strong>and</strong> <strong>Terminal</strong> <strong>Services</strong> Deployment<br />
Page 3
within the session. The sessions on the terminal server run the operator screens<br />
populated with data from the SCADA node.<br />
Sample <strong>iFix</strong> Network with Thin Clients<br />
In a <strong>ThinManager</strong> system dual terminal servers can be setup to provide redundancy<br />
<strong>and</strong> failover. This allows the operator screens to keep running with current data if a<br />
terminal server fails.<br />
Details about failover can be found on our Failover Tech Note at<br />
http://www.thinmanager.com/TechNotes/Failover/Failover_main.shtml .<br />
<strong>iFix</strong> <strong>and</strong> <strong>Terminal</strong> <strong>Services</strong> Deployment<br />
Page 4
3. Deployment Choices<br />
How <strong>iFix</strong> will be deployed <strong>and</strong> used influences how <strong>iFix</strong> is configured.<br />
Generic Deployment Model– All users use a common SCU file to launch a<br />
commonly configured application.<br />
Specialized Deployment Model – Each user runs a unique environment <strong>and</strong><br />
each user requires a specially configured SCU file.<br />
This article will assume a generic deployment but will point out where changes need<br />
to be made to deploy a specialized configuration.<br />
The generic deployment can be designed to launch a Main Menu with navigational<br />
buttons to allow the user to select the needed screens or the welcome screen can<br />
have scripts added that launch the desired screens based on the node name of the<br />
client.<br />
Consult your <strong>iFix</strong> documentation for details.<br />
<strong>iFix</strong> <strong>and</strong> <strong>Terminal</strong> <strong>Services</strong> Deployment<br />
Page 5
4. Microsoft Pre-planning<br />
There are a few configuration changes that <strong>iFix</strong> may require on the Microsoft<br />
operating system, especially if legacy applications are needed to be upgraded to run<br />
on the new system. Consult your <strong>iFix</strong> documentation for details.<br />
4.1. Relaxed Security<br />
IFix requires the Relaxed Security setting. This can be applied by opening the<br />
<strong>Terminal</strong> <strong>Services</strong> Configuration console by selecting Start> Programs><br />
Administrative Tools> <strong>Terminal</strong> <strong>Services</strong> Configuration. Select the Server<br />
Setting folder <strong>and</strong> change the Permission Compatibility setting to Relaxed<br />
Security.<br />
<strong>Terminal</strong> <strong>Services</strong> Configuration – Server Settings<br />
See<br />
http://www.thinmanager.com/TechNotes/Microsoft/WindowsTips_main.shtml#open<br />
for details.<br />
<strong>iFix</strong> <strong>and</strong> <strong>Terminal</strong> <strong>Services</strong> Deployment<br />
Page 6
4.2. Disable DEP ( Data Execution <strong>and</strong> Prevention<br />
The DEP may need to be disabled for the terminal server to recognize USB license<br />
keys. The <strong>iFix</strong> documentation says:<br />
“iFIX Does Not Start After Install Due to DEP Access Restriction<br />
(Proficy HMI/SCADA – iFIX Release Notes VERSION 4.0)<br />
“When you start iKeyDiag or iFIX 4.0 for the the first time, an access violation<br />
may occur. You will not be able to start iFIX. This can occur due to hardware<br />
enforced DEP (Data Execution Protection) settings within Windows Server 2003<br />
SP1 or Window XP SP2. To remedy this issue, you can selectively add the iFIX<br />
program to the DEP exception list or shut down the feature. iFIX will then run<br />
normally. For more information, refer to "DEP Support Statement For GE<br />
Fanuc Products Using Proficy Common Licensing" article on the GlobalCare site<br />
for more information:<br />
http://globalcare.gefanuc.com/kc/kb/glbCarekbinfo.asp?objid=1553203&id=2<br />
68450132 ”<br />
- <strong>iFix</strong> Documentation<br />
Right Click on the My Computer Icon <strong>and</strong> choose Properties. Select the Advanced<br />
tab, then the Settings button in the Startup <strong>and</strong> Recovery section. Select the<br />
(manual) Edit button on the Startup <strong>and</strong> Recovery Properties Window.<br />
Set the bootloader information to:<br />
[boot loader]<br />
timeout=30<br />
default=multi(0)disk(0)rdisk(0)partition(1)\WINNT<br />
[operating systems]<br />
multi(0)disk(0)rdisk(0)partition(1)\WINNT="Windows Server 2003, St<strong>and</strong>ard"<br />
/fastdetect /NoExecute=alwaysoff<br />
4.3. Application Compatibility Script<br />
The following information is from the <strong>iFix</strong> e-books under Installing <strong>and</strong> Configuring<br />
iFIX with Windows <strong>Terminal</strong> Server. Also as a separate Document, it can be found at<br />
C:\Program Files\GE Fanuc\ProficyDoc\1033\iFIX\TM.CHM<br />
Before you begin installing <strong>and</strong> configuring iFIX on a <strong>Terminal</strong> Server, it is<br />
recommended that you complete the following Windows administrative tasks:<br />
Run chkroot.cmd from the C:\Windows\Application Compatibility Script folder.<br />
This creates the RootDrv2.cmd file.<br />
In Notepad or another text editor, open the RootDrv2.cmd file from the<br />
C:\Windows\Application Compatibility Script folder. At the end of the file, on<br />
the Set RootDrive= line, add a driver letter. For example: Set RootDrive=W:<br />
Save the RootDrv2.cmd file.<br />
Run the RootDrv2.cmd file.<br />
Verify that your <strong>Terminal</strong> Server is set up <strong>and</strong> functioning.<br />
<strong>iFix</strong> <strong>and</strong> <strong>Terminal</strong> <strong>Services</strong> Deployment<br />
Page 7
5. IFix Installation<br />
The <strong>iFix</strong> software, like all software, should be installed on a terminal server in the<br />
Install Mode. Do this by selecting Start > Settings > Control Panel ><br />
Add/Remove Programs > Add New Programs <strong>and</strong> follow the installation wizard.<br />
<strong>Terminal</strong> <strong>Services</strong> Installation Warning<br />
A warning will be displayed if you try to install on a terminal server without using the<br />
Add/Remove Programs function.<br />
Setup Type Window<br />
During the install a Setup Type window will be displayed.<br />
The Complete selection is the normal choice unless the install is going to run Fix32<br />
graphics using the Fix Desktop.<br />
<strong>iFix</strong> <strong>and</strong> <strong>Terminal</strong> <strong>Services</strong> Deployment<br />
Page 8
Proficy <strong>iFix</strong> Configure Wizard<br />
Proficy <strong>iFix</strong> Configure Wizard allows the terminal to be configured as a View Node.<br />
It also will be Networked, as shown in the picture.<br />
The SCADA radio button will be selected when installing the SCADA node of the<br />
system.<br />
The NodeName can be left as the default.<br />
Remote SCADA Node List<br />
The Remote SCADA Node List allows the SCADA nodes to be identified. This can<br />
be done now or later in the SCADA section of the Systems Configuration Utility.<br />
5.1. Restart after Installation<br />
Do not do an automatic restart at the end of the installation on a Windows 2003.<br />
Instead let the installation finish <strong>and</strong> then restart the computer manually. This allows<br />
the completion of the full install.<br />
<strong>iFix</strong> <strong>and</strong> <strong>Terminal</strong> <strong>Services</strong> Deployment<br />
Page 9
6. <strong>iFix</strong> Licensing<br />
The <strong>iFix</strong> installation on the terminal server should be licensed before configuration<br />
begins. Consult your <strong>iFix</strong> documentation for details.<br />
The License Viewer can be launched by selecting Start>Programs > Proficy<br />
Common > License Viewer.<br />
License Viewer<br />
The Proficy License Viewer will display the number of terminal connections that<br />
the license allows along with other details.<br />
<strong>iFix</strong> <strong>and</strong> <strong>Terminal</strong> <strong>Services</strong> Deployment<br />
Page 10
6.1. Virtual Keyboard<br />
iFIX provides a virtual keyboard that allows you to work in touch-screen<br />
environments or to use a mouse to enter passwords <strong>and</strong> other data. Install the<br />
virtual keyboard on the terminal server to make it available to each client licensed<br />
for iFIX.<br />
To install the virtual keyboard:<br />
Double-click the LICENSE.EXE file in the Proficy iFIX directory on your terminal<br />
server. The IMG License Manager dialog box appears.<br />
<br />
<br />
<br />
<br />
<br />
Click Install Service to install the virtual keyboard licenses.<br />
Click Administration Options & Help. The <strong>Terminal</strong> Server Administration Option<br />
dialog box opens.<br />
Click Copy Global Settings to All User Folders, then click Yes to confirm.<br />
Click OK to return to the IMG License Manager dialog box.<br />
Click Start Service to activate the virtual keyboard for all licensed clients.<br />
<strong>iFix</strong> <strong>and</strong> <strong>Terminal</strong> <strong>Services</strong> Deployment<br />
Page 11
7. <strong>iFix</strong> System Configuration for<br />
<strong>Terminal</strong> <strong>Services</strong><br />
<strong>iFix</strong> is configured with the System Configuration Utility (SCU). The SCU tool allows<br />
the selection of startup options <strong>and</strong> file directories.<br />
In <strong>iFix</strong> 3.0 <strong>and</strong> earlier, each terminal server user had to have a separate SCU<br />
(System Configuration Utility) file to allow each user to launch a unique instance of<br />
the program. The System Configuration Utility could be run once, then copied into a<br />
folder for each user. An additional IP address was need per session.<br />
In <strong>iFix</strong> 4.0, a Profile Manager speeds the configuration process by allowing user<br />
settings to be based on the original configuration.<br />
<br />
<br />
If deploying using the Generic Deployment model create one SCU file in the<br />
SCU program <strong>and</strong> then use the Profile Manager to define the additional nodes.<br />
If deploying using the Specialized Deployment model create a SCU file for<br />
each node to define to program.<br />
<strong>iFix</strong> <strong>and</strong> <strong>Terminal</strong> <strong>Services</strong> Deployment<br />
Page 12
7.1. Launch <strong>iFix</strong><br />
The first step to configuration is verifying that <strong>iFix</strong> was installed properly <strong>and</strong> will run.<br />
Launch the <strong>iFix</strong> workspace by selecting Start>Programs > Proficy HMI SCADA –<br />
<strong>iFix</strong> 4.0 > <strong>iFix</strong> 4.0. It will launch the Proficy <strong>iFix</strong> Startup program.<br />
Proficy <strong>iFix</strong> Startup Window<br />
Select the icon in the Proficy <strong>iFix</strong> section to launch the workspace to make sure that<br />
<strong>iFix</strong> will run.<br />
<strong>iFix</strong> <strong>and</strong> <strong>Terminal</strong> <strong>Services</strong> Deployment<br />
Page 13
<strong>iFix</strong> Workspace<br />
Once you have verified that the <strong>iFix</strong> workspace will run it can be closed.<br />
Launch the SCU tool by selecting Start>Programs > Proficy HMI SCADA – <strong>iFix</strong><br />
4.0 > System Configuration. It will launch the Proficy <strong>iFix</strong> Startup program.<br />
<strong>iFix</strong> <strong>and</strong> <strong>Terminal</strong> <strong>Services</strong> Deployment<br />
Page 14
Proficy <strong>iFix</strong> Startup Window<br />
Select the icon in the SCU section to launch the SCU tool.<br />
An <strong>iFix</strong> System Information window will be launched to allow the path to the SCU<br />
files to be chosen.<br />
<strong>iFix</strong> System Information<br />
The default path is normally fine. Select the OK button to proceed.<br />
<strong>iFix</strong> <strong>and</strong> <strong>Terminal</strong> <strong>Services</strong> Deployment<br />
Page 15
System Configuration Utility<br />
The System Configuration Utility (SCU) allows the components of the project to be<br />
defined.<br />
<strong>iFix</strong> <strong>and</strong> <strong>Terminal</strong> <strong>Services</strong> Deployment<br />
Page 16
7.2. SCADA Configuration<br />
SCADA node configuration is managed by selecting Configure > SCADA… in the<br />
System Configuration Utility (SCU) to launch the SCADA Configuration.<br />
SCADA Configuration<br />
The terminal server is not a SCADA node so the SCADA Support should be disabled<br />
on the terminal server. The other features will be grayed out.<br />
When configuring the SCADA node the SCADA Support is enabled <strong>and</strong> the database<br />
<strong>and</strong> I/O drivers can be defined.<br />
Select OK to accept the configuration.<br />
<strong>iFix</strong> <strong>and</strong> <strong>Terminal</strong> <strong>Services</strong> Deployment<br />
Page 17
7.3. Path Configuration<br />
Select Configure > Paths in the System Configuration Utility (SCU) to configure the<br />
file locations.<br />
Path Configuration<br />
The defaults are usually fine for the Generic Deployment Model.<br />
If this system will use the Specialized Deployment Model then the Local path will<br />
need to point to where the SCU file will be stored.<br />
<strong>iFix</strong> <strong>and</strong> <strong>Terminal</strong> <strong>Services</strong> Deployment<br />
Page 18
7.4. Network Configuration<br />
Select Configure > Network in the System Configuration Utility (SCU) to configure<br />
the network.<br />
Network Configuration<br />
The Network configuration window allows the network <strong>and</strong> SCADA nodes to be<br />
defined.<br />
Select the TCP/IP radio button for the Network.<br />
The SCADA servers are defined by entering their name in the Remote Node Name<br />
filed <strong>and</strong> selecting the Add button.<br />
<strong>iFix</strong> <strong>and</strong> <strong>Terminal</strong> <strong>Services</strong> Deployment<br />
Page 19
Defined SCADA Nodes<br />
If a SCADA node has a backup SCADA server it can be defined by highlighting the<br />
SCADA node <strong>and</strong> selecting the Configure button.<br />
<strong>iFix</strong> <strong>and</strong> <strong>Terminal</strong> <strong>Services</strong> Deployment<br />
Page 20
Remote Node Configuration<br />
The Primary <strong>and</strong> Backup SCADA servers that make up the node can be entered to<br />
form a logical node. Select OK to accept changes.<br />
<strong>iFix</strong> <strong>and</strong> <strong>Terminal</strong> <strong>Services</strong> Deployment<br />
Page 21
Configured Remote Nodes<br />
When all the SCADA nodes used by the View nodes are defined select OK to accept<br />
the changes.<br />
Save the SCU file by selecting File > Save or using CTL+S.<br />
Note: Saving the SCU file is important.<br />
<strong>iFix</strong> <strong>and</strong> <strong>Terminal</strong> <strong>Services</strong> Deployment<br />
Page 22
8. Profile Manager<br />
Once a SCU file is created <strong>and</strong> saved it can be applied to many nodes with the Profile<br />
Manager.<br />
Note: The Windows user accounts must be created before configuring users in the Profile<br />
Manager.<br />
<strong>iFix</strong> must be running to launch Profile Mananger. Select Start>Programs > Proficy<br />
HMI SCADA – <strong>iFix</strong> 4.0 > <strong>iFix</strong> 4.0 to launch the Proficy <strong>iFix</strong> workspace.<br />
<strong>iFix</strong> Workspace<br />
Launch Profile Manager by selecting the Profile Manager icon on the menu or by<br />
selecting Start>Programs > Proficy HMI SCADA – <strong>iFix</strong> 4.0 > Startup Profile<br />
Manager.<br />
Profile Manager Button<br />
The Profile Manager button shows two heads in profile against a monitor.<br />
<strong>iFix</strong> <strong>and</strong> <strong>Terminal</strong> <strong>Services</strong> Deployment<br />
Page 23
Startup Profile Manager<br />
The Startup Profile Manager lists the defined profiles. Select the Add button to<br />
configure a profile.<br />
<strong>iFix</strong> <strong>and</strong> <strong>Terminal</strong> <strong>Services</strong> Deployment<br />
Page 24
Add Startup Profile<br />
Enter the user information in the Add Startup Profile window.<br />
<strong>iFix</strong> <strong>and</strong> <strong>Terminal</strong> <strong>Services</strong> Deployment<br />
Page 25
Configured User<br />
Enter the Windows user account that the node will use in the Window User field.<br />
Enter the <strong>iFix</strong> node name in the <strong>iFix</strong> Nodename field. This can be the ACP<br />
<strong>ThinManager</strong> thin client’s name.<br />
Select the SCU file that the user will use by selecting the button with three periods.<br />
The same SCU file will be used if using the Generic Deployment Model while a<br />
different SCU file will be used for each user when using the Specialized Deployment<br />
Model.<br />
Unselect the Allow user to run Sample System <strong>and</strong> the Allow User to Modify<br />
Nodename <strong>and</strong> SCU checkboxes.<br />
Select Add Profile to accept the changes.<br />
Create a profile for each terminal.<br />
<strong>iFix</strong> <strong>and</strong> <strong>Terminal</strong> <strong>Services</strong> Deployment<br />
Page 26
Profile Manager<br />
The Profile Manager will list the configured nodes with their Windows user name<br />
when finished.<br />
<strong>iFix</strong> <strong>and</strong> <strong>Terminal</strong> <strong>Services</strong> Deployment<br />
Page 27
9. Launching from within <strong>ThinManager</strong><br />
<strong>ThinManager</strong> can be configured to launch the <strong>iFix</strong> program automatically. Full details<br />
are available in the Tech Notes section of The <strong>ThinManager</strong> web site at<br />
www.thinmanager.com.<br />
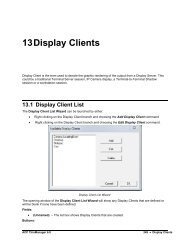
First create an AppLink Display Client for the <strong>iFix</strong> Launch program.<br />
<br />
Second, add the <strong>iFix</strong> Display Client to the terminal <strong>and</strong> enter a username <strong>and</strong><br />
password on the Login Information page.<br />
Configuring a Display Client with <strong>iFix</strong><br />
Right click on the <strong>Terminal</strong> <strong>Services</strong> branch of the Display Clients in the <strong>ThinManager</strong><br />
tree <strong>and</strong> select Add Display Client.<br />
Name the Display Client.<br />
<br />
<br />
<br />
Select the Application Link checkbox on the <strong>Terminal</strong> <strong>Services</strong> Display<br />
Client Options page.<br />
Add the terminal servers with <strong>iFix</strong> installed on the Display Client Members<br />
page.<br />
Add the path to the <strong>iFix</strong> Launch program in the Program Path <strong>and</strong><br />
Filename field of the AppLink page.<br />
The default path is C:\Program File\GEFanuc\Proficy <strong>iFix</strong>\launch.exe.<br />
<strong>iFix</strong> <strong>and</strong> <strong>Terminal</strong> <strong>Services</strong> Deployment<br />
Page 28
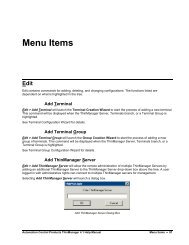
AppLink Page with <strong>iFix</strong> Launch in Path<br />
This configures <strong>iFix</strong> to run when the Display Client is launched.<br />
Configuring a <strong>Terminal</strong> to use the <strong>iFix</strong> Display Client<br />
The terminal needs to be configured to automatically login <strong>and</strong> use the <strong>iFix</strong> Display<br />
Client.<br />
Open the <strong>Terminal</strong> Configuration Wizard for the desired terminal by<br />
double-clicking on it in the <strong>ThinManager</strong> tree.<br />
Select the Use Display Clients checkbox on the <strong>Terminal</strong> Mode Selection<br />
page.<br />
Add the <strong>iFix</strong> display client to the Selected Display Client List on the<br />
Display Client Selection page.<br />
Add a valid user name <strong>and</strong> password on the the Log in Information page of<br />
the wizard.<br />
Select Finish <strong>and</strong> turn on the terminal.<br />
When the thin client boots it will automatically login to the terminal server <strong>and</strong><br />
launch <strong>iFix</strong> with the configuration that was defined by the SCU specified in the Profile<br />
Manager for that user.<br />
<strong>iFix</strong> <strong>and</strong> <strong>Terminal</strong> <strong>Services</strong> Deployment<br />
Page 29
9.1. Hide the Startup Screen<br />
Once the system is setup <strong>and</strong> the users <strong>and</strong> node are configured the Proficy Startup<br />
screen can be turned off so that <strong>iFix</strong> launches without displaying this window <strong>and</strong><br />
making the user select <strong>iFix</strong> from the Startup window.<br />
Open the Startup windows by selecting Start>Programs > Proficy HMI SCADA –<br />
<strong>iFix</strong> 4.0 > <strong>iFix</strong> 4.0. It will launch the Proficy <strong>iFix</strong> Startup program.<br />
Proficy <strong>iFix</strong> Startup<br />
Check the Don’t show this dialog box again; always start Proficy <strong>iFix</strong><br />
checkbox. This will launch <strong>iFix</strong> without requiring the user select <strong>iFix</strong> from the Startup<br />
window.<br />
<strong>iFix</strong> <strong>and</strong> <strong>Terminal</strong> <strong>Services</strong> Deployment<br />
Page 30
10. Additional Microsoft Configurations<br />
There are a few Microsoft tweaks that will make the system more efficient. This is a<br />
guide. Please refer to <strong>iFix</strong> <strong>and</strong> Microsoft documentation for details.<br />
10.1. Add Users to Remote Desktop Group<br />
User accounts for terminal servers need to be added to the Remote Desktop Users<br />
group in Windows. Open the Computer Management console by selecting Start ><br />
Programs > Administrative Tools > Computer Management.<br />
Computer Management Console<br />
Highlight System Tools > Groups <strong>and</strong> double-click on the Remote Desktop Users<br />
group to launch the properties window.<br />
<strong>iFix</strong> <strong>and</strong> <strong>Terminal</strong> <strong>Services</strong> Deployment<br />
Page 31
Remote Desktop Users Properties Window<br />
Add all the users who will be logging onto the terminal server <strong>and</strong> select OK.<br />
<strong>iFix</strong> <strong>and</strong> <strong>Terminal</strong> <strong>Services</strong> Deployment<br />
Page 32
10.2. End Disconnected Sessions<br />
Sessions that are disconnected <strong>and</strong> left on the terminal server should be configured<br />
to be logged off when they are disconnected. This can be done by user account or by<br />
terminal server.<br />
User Account<br />
Configure the desired user accounts by opening the Computer Management console<br />
by selecting Start > Programs > Administrative Tools > Computer<br />
Management.<br />
Computer Management<br />
Highlight System Tools > Users <strong>and</strong> double-click on the desired user to launch the<br />
user properties.<br />
<strong>iFix</strong> <strong>and</strong> <strong>Terminal</strong> <strong>Services</strong> Deployment<br />
Page 33
User Properties – Sessions Tab<br />
Select the Sessions tab. Set the End a disconnected session to 1 minute.<br />
Set the When a sessions limit is reached or connection is broken setting to<br />
End Session.<br />
Select OK to save the changes.<br />
<strong>iFix</strong> <strong>and</strong> <strong>Terminal</strong> <strong>Services</strong> Deployment<br />
Page 34
<strong>Terminal</strong> Server Settings<br />
The terminal server can be configured to have all the sessions logged off after a<br />
disconnect in the RDP-tcp properties. Open the <strong>Terminal</strong> <strong>Services</strong> Configuration<br />
console by selecting Start > Programs > Administrative Tools > <strong>Terminal</strong><br />
<strong>Services</strong> Configuration.<br />
<strong>Terminal</strong> <strong>Services</strong> Configuration Console<br />
Highlight Connections <strong>and</strong> double-click on RDP-tcp to launch the RDP-tcp<br />
Properties window.<br />
<strong>iFix</strong> <strong>and</strong> <strong>Terminal</strong> <strong>Services</strong> Deployment<br />
Page 35
RDP-tcp Properties<br />
Select the Sessions tab. Check the Override user settings checkbox <strong>and</strong> set the<br />
End a disconnected session to 1 minute.<br />
Check the Override user settings checkbox <strong>and</strong> set the When a sessions limit is<br />
reached or connection is broken setting to End Session.<br />
Select OK to save the changes.<br />
This will make every remote RDP user logoff when they disconnect.<br />
<strong>iFix</strong> <strong>and</strong> <strong>Terminal</strong> <strong>Services</strong> Deployment<br />
Page 36
10.3. Set Relaxed Security<br />
Windows 2000 <strong>and</strong> Windows 2003 have a Full Security option that can interfere with<br />
HMI/SCADA operation. When the 200/2003 Full Security model is used all HMI users<br />
will need to be administrators. To allow users to run without being an administrator,<br />
set the terminal server to the Relaxed Security based on the NT 4.0 security model.<br />
Open the <strong>Terminal</strong> <strong>Services</strong> Configuration console by selecting Start > Programs ><br />
Administrative Tools > <strong>Terminal</strong> <strong>Services</strong> Configuration.<br />
<strong>Terminal</strong> <strong>Services</strong> Configuration Console<br />
Highlight the Server Settings on the left <strong>and</strong> double-click the Permission<br />
Compatibility on the right.<br />
Select the Relaxed Security radio button <strong>and</strong> select OK.<br />
<strong>iFix</strong> <strong>and</strong> <strong>Terminal</strong> <strong>Services</strong> Deployment<br />
Page 37
10.4. Apply Group Permissions<br />
An <strong>iFix</strong> Users group must be created <strong>and</strong> the <strong>iFix</strong> users must be added <strong>and</strong> be<br />
granted access permission. It is recommended that <strong>iFix</strong> users be members of the<br />
Power User group.<br />
Open the Computer Management console by selecting Start > Programs ><br />
Administrative Tools > Computer Management.<br />
Computer Management<br />
Right-click on Groups <strong>and</strong> select New Group.<br />
<strong>iFix</strong> <strong>and</strong> <strong>Terminal</strong> <strong>Services</strong> Deployment<br />
Page 38
Add New Group<br />
Name the group <strong>and</strong> add members.<br />
<strong>iFix</strong> <strong>and</strong> <strong>Terminal</strong> <strong>Services</strong> Deployment<br />
Page 39
Group Membership<br />
Use the Add button to add users.<br />
Add the group to the RDP settings in the <strong>Terminal</strong> <strong>Services</strong> Configuration<br />
console.<br />
Open the <strong>Terminal</strong> <strong>Services</strong> Configuration console by selecting Start > Programs ><br />
Administrative Tools > <strong>Terminal</strong> <strong>Services</strong> Configuration.<br />
<strong>iFix</strong> <strong>and</strong> <strong>Terminal</strong> <strong>Services</strong> Deployment<br />
Page 40
<strong>Terminal</strong> <strong>Services</strong> Configuration<br />
Double-click on RDP-tcp to open the RDP-tcp Properties.<br />
<strong>iFix</strong> <strong>and</strong> <strong>Terminal</strong> <strong>Services</strong> Deployment<br />
Page 41
TCP-rdp Properties<br />
Select the Permissions tab. Add the new group by selecting the Add button.<br />
Highlight the new group <strong>and</strong> set the Full Control, User Access, <strong>and</strong> Guest Access<br />
to Allow.<br />
Select OK to accept changes.<br />
<strong>iFix</strong> <strong>and</strong> <strong>Terminal</strong> <strong>Services</strong> Deployment<br />
Page 42