Application Note AN-1150 - International Rectifier
Application Note AN-1150 - International Rectifier
Application Note AN-1150 - International Rectifier

Create successful ePaper yourself
Turn your PDF publications into a flip-book with our unique Google optimized e-Paper software.
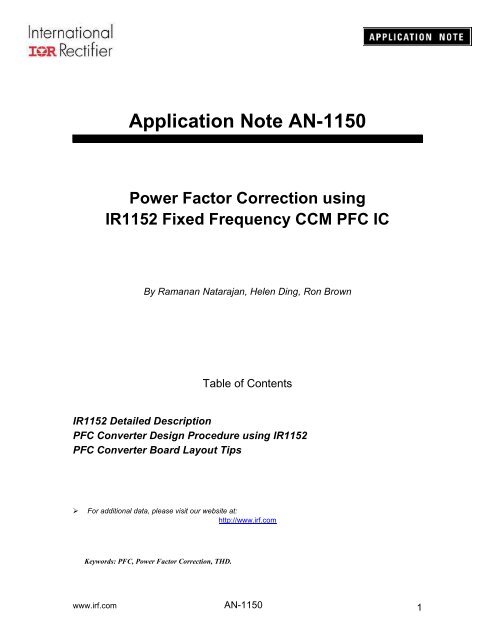
<strong>Application</strong> <strong>Note</strong> <strong>AN</strong>-<strong>1150</strong><br />
Power Factor Correction using<br />
IR1152 Fixed Frequency CCM PFC IC<br />
By Ramanan Natarajan, Helen Ding, Ron Brown<br />
Table of Contents<br />
IR1152 Detailed Description<br />
PFC Converter Design Procedure using IR1152<br />
PFC Converter Board Layout Tips<br />
<br />
For additional data, please visit our website at:<br />
http://www.irf.com<br />
Keywords: PFC, Power Factor Correction, THD.<br />
www.irf.com <strong>AN</strong>-<strong>1150</strong><br />
1
1. Introduction<br />
The IR1152 IC is a fixed 66kHz frequency PFC IC designed to operate in<br />
continuous conduction mode Boost converters with average current mode<br />
control. The IC is packed with an impressive array of advanced features such as<br />
programmable soft-start, micro-power startup current, user initiated micro-power<br />
Sleep mode for compliance with stand-by energy standards, ultra low bias<br />
currents for sensing pins. The fixed internal oscillator ensures stable operation at<br />
66kHz switching frequency with very low gate jitter thus eliminating audible noise<br />
in PFC magnetics. In addition, the IC offers input-line sensed brown-out<br />
protection (BOP), “dual & dedicated” overvoltage protection, cycle-by-cycle peak<br />
current limit, open loop protection (OLP) and VCC under voltage lock-out<br />
(UVLO). All these features are offered in a compact 8-pin package making<br />
IR1152 the most feature-intensive IC for PFC applications. This application note<br />
provides an overview of IR1152 and demonstrates the design of a universal input<br />
350W AC-DC Boost PFC Converter. Design & layout tips are also included.<br />
2. IR1152 – Detailed Description<br />
2.1 Overview of IR1152<br />
AC Line<br />
Bridge<br />
- +<br />
AC Neutral<br />
L BST<br />
D BST<br />
V OUT<br />
C IN<br />
R gm C BOP C P<br />
C VCC<br />
R VFB3<br />
R BOP3<br />
R VFB1<br />
R BOP1<br />
IR1152<br />
IR1145<br />
R BOP2<br />
1<br />
COM<br />
GATE 8<br />
R G<br />
C OUT<br />
R VFB2<br />
2<br />
COMP<br />
VCC 7<br />
V CC<br />
M BST<br />
3<br />
ISNS<br />
VFB 6<br />
4<br />
BOP<br />
OVP/EN 5<br />
R OVP1<br />
R OVP2<br />
R OVP3<br />
R SF<br />
C SF<br />
C Z<br />
COM<br />
R SNS<br />
GND<br />
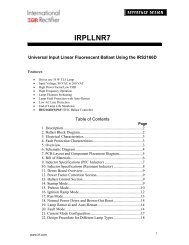
Fig.1: Typical application diagram of IR1152 based PFC converter<br />
Fig.1 shows the system application diagram of the IR1152 based PFC converter.<br />
Only 3 pin functionalities - VFB, COMP & ISNS – are actually needed to obtain<br />
the necessary diagnostic signals to achieve power factor correction and maintain<br />
output voltage regulation. The functions of the abovementioned 3 pins are as<br />
follows:<br />
www.irf.com <strong>AN</strong>-<strong>1150</strong><br />
2
• VFB – provides DC bus voltage sensing for voltage regulation<br />
• COMP – used for compensating the voltage feedback loop to set the correct<br />
transient response characteristics<br />
• ISNS – provides sensing of the inductor current, which is used to determine<br />
the PFC switch duty cycle<br />
Essentially, there are 2 control loops in the PFC algorithm:<br />
• a slow, outer voltage loop whose function is to simply maintain output voltage<br />
regulation<br />
• a fast inner current loop whose function is to determine the instantaneous<br />
duty cycle every switching cycle<br />
The current shaping function i.e. power factor correction is achieved primarily by<br />
the current loop. The voltage loop is responsible only for controlling the<br />
magnitude of the input current in order to maintain DC bus voltage regulation.<br />
2.2 Key Features of IR1152<br />
Fixed 66kHz Frequency Internal Oscillator<br />
IR1152 features a fixed frequency internal oscillator running at 66kHz. The gate<br />
drive pulse is completely free of jitter and this greatly enables elimination of<br />
audible noise in PFC magnetics due to magnetostriction. Also internalization of<br />
the oscillator greatly improves noise immunity of the IC.<br />
Programmable soft-start<br />
IR1152 facilitates programmability of system soft-start time thus allowing the<br />
designer enough freedom to choose the converter start-up times appropriate for<br />
the application. The soft start time is the time required for the V COMP voltage to<br />
charge through its entire dynamic range i.e. 0V through V COMP,EFF . As a result,<br />
the soft-start time is dependent upon the component values selected for<br />
compensation of the voltage loop on the COMP pin – primarily the C Z capacitor<br />
(described in detail in Soft-Start Design section of PFC Converter Design portion<br />
of this document). As VCOMP voltage rises gradually, the IC allows a higher and<br />
higher RMS current into the PFC converter. This controlled increase of the input<br />
current contributes to reducing system component stress during start-up. It is<br />
clarified that, during soft-start, the IC is capable of full duty cycle modulation<br />
(from 0% to MAX DUTY), based on the instantaneous ISNS signal from system<br />
current sensing. Furthermore, the internal logic of the IC is designed to ensure<br />
that the soft-start capacitor is discharged when the IC enters the Sleep or Standby<br />
modes in order to facilitate soft-start upon restart.<br />
User initiated micro-power sleep mode<br />
The IR1152 has an ENABLE function embedded in the OVP/EN pin. When this<br />
pin voltage is actively pulled below V SLEEP threshold, the IC is pushed into the<br />
www.irf.com <strong>AN</strong>-<strong>1150</strong><br />
3
Sleep mode where the current consumption is less than 75uA even when V CC is<br />
above V CC,ON threshold. The system designer can use an external logic level<br />
signal to access the ENABLE feature since V SLEEP threshold is so low. The<br />
IR1152 internal logic ensures that V COMP is discharged before the IC enters Sleep<br />
mode in order to enable soft-start upon resumption of operation.<br />
Protection features<br />
The IR1152 features a comprehensive array of protection features to safeguard<br />
the system. These are explained below.<br />
1. “Dual & Dedicated” Overvoltage protection (OVP)<br />
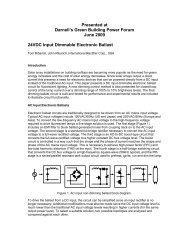
Fig.2: IR1152 Overvoltage Protection Scheme (dual & dedicated)<br />
There are 2 overvoltage comparators in IR1152 – the OVP(OVP) and OVP(VFB)<br />
comparators. Both are identical in operation and also in terms of the overvoltage<br />
trigger and release thresholds. The OVP(OVP) tracks the OVP/EN pin while the<br />
OVP(VFB) tracks the VFB pin for output voltage information.<br />
An overvoltage fault is triggered when either one or both of the pin voltage<br />
exceeds the V OVP threshold of 106%V REF . The IC gate drive is immediately<br />
disabled and held in that state. The overvoltage fault is removed and gate drive<br />
re-enabled only when both pin voltages are below the V OVP,RST threshold of 103%<br />
V REF . The tandem operation of the 2 comparators lends 2 important aspects to<br />
the overvoltage protection feature in IR1152 that is not afforded by any<br />
competitor, 8-pin PFC ICs:<br />
• Dedicated OVP protection- The OVP pin is a dedicated pin for overvoltage<br />
protection that safeguards the system even if there is a break in the VFB<br />
feedback loop due to resistor divider failure etc.<br />
• Dual OVP Protection- Each comparator acts as a watchdog for the other.<br />
Under abnormal failure situations such as pin-to-pin shorts, if for any reason<br />
www.irf.com <strong>AN</strong>-<strong>1150</strong><br />
4
one of the comparator misbehaves, the other comparator still provides<br />
overvoltage protection.<br />
Since the VFB pin which programs the DC bus regulation voltage through the<br />
voltage error amplifier also features an overvoltage comparator with 106%V REF<br />
threshold, this effectively fixes the system maximum overvoltage protection level<br />
at 106% of the nominal regulation voltage level. Though a lower level of<br />
overvoltage protection can be set through the dedicated OVP pin, care must be<br />
taken to avoid setting the protection threshold too low. A lower overvoltage<br />
protection threshold could cause the OVP reset threshold lower than 100% of the<br />
nominal output voltage, which may trigger multi OVP protections during startup.<br />
Thus it is recommended to set the overvoltage protection threshold to the default<br />
106%V REF. In another word, the voltage divider that connected to OVP pin should<br />
use the same value as the VFB voltage divider.<br />
2. Open-Loop protection (OLP)<br />
The open-loop protection ensures that the IC is restrained in the Stand-by mode<br />
if the VFB pin voltage has not exceeded or has dropped below V OLP threshold of<br />
19%V REF . In the Stand-by mode, all internal circuitry of the IC are biased, the<br />
gate drive is disabled and current consumption is a few milliamps. During startup,<br />
if for some reason the voltage feedback loop is open then IC will remain in<br />
Stand-by and not start thus avoiding a potentially catastrophic failure.<br />
3. Brown-Out protection (BOP)<br />
IR1152 provides brown-out protection based on direct sensing of AC input line.<br />
Information about the rectified AC input voltage is communicated to the BOP pin<br />
after scaling it down using a resistor divider network and filtering using a<br />
capacitor on BOP pin. During start-up, the IC is held in Stand-by mode when<br />
BOP pin voltage is less than V BOP(EN) threshold of 1.56V. When the pin voltage<br />
exceeds this threshold, the IC enters normal operation (assuming no OLP<br />
condition exists). Subsequently, if the pin voltage falls below V BOP threshold of<br />
0.76V during normal operation, then a brown-out fault is detected and IC is<br />
pushed into Stand-by mode. For the IC to exit Stand-by, the pin voltage has to<br />
exceed V BOP(EN) threshold again. In the Stand-by mode, all internal circuitry of the<br />
IC are biased, the gate drive is disabled and current consumption is a few<br />
milliamps.<br />
4. Cycle-by-cycle peak current limit protection (IPK LIMIT)<br />
The cycle-by-cycle peak current limit is encountered when V ISNS pin voltage<br />
exceeds V ISNS(PK) threshold of -0.75V (in magnitude). When this condition is<br />
encountered, the IC gate drive is immediately disabled and held in that state until<br />
the ISNS pin voltage falls below V ISNS(PK) . Even though the IR1152 operates<br />
based on average current mode control, the input to the peak current limit<br />
www.irf.com <strong>AN</strong>-<strong>1150</strong><br />
5
comparator is decoupled from the averaging circuit thus enabling instantaneous<br />
cycle-by-cycle protection for peak current limitation.<br />
5. V CC UVLO<br />
In the event that the voltage at the V CC pin should drop below that of the VCC<br />
UVLO turn-off threshold, V CC(UVLO) the IC is pushed into the UVLO mode, the gate<br />
drive is terminated, and the turn on threshold, V CC, ON must again be exceeded in<br />
order to re start the process. In the UVLO mode, the current consumption is less<br />
than 75uA.<br />
3. PFC Converter Design Procedure<br />
3.1 PFC Converter Specifications<br />
AC Input Voltage Range<br />
Input Line Frequency<br />
Nominal DC Output Voltage<br />
Maximum Output Power<br />
Power Factor<br />
85-264VAC<br />
47-63Hz<br />
385V<br />
350W<br />
0.99 @ 115VAC/350W<br />
0.99 @ 230VAC/350W<br />
Minimum Output Holdup Time 25ms @ V OUT,MIN =285V<br />
Maximum Soft Start Time<br />
60msec<br />
Table 1: Design Specifications for PFC Converter<br />
www.irf.com <strong>AN</strong>-<strong>1150</strong><br />
6
3.2 Power Circuit Design<br />
AC Line<br />
Bridge<br />
- +<br />
AC Neutral<br />
L BST<br />
D BST<br />
V OUT<br />
C IN<br />
R VFB1<br />
R BOP1<br />
IR1152<br />
IR1145<br />
R R G<br />
VFB2<br />
R BOP2<br />
1<br />
C<br />
COM GATE 8<br />
OUT<br />
2<br />
M COMP VCC 7<br />
V BST<br />
CC<br />
3<br />
ISNS<br />
VFB 6<br />
4<br />
BOP<br />
OVP/EN 5<br />
R BOP3<br />
R gm C VCC<br />
R C C VFB3<br />
BOP P<br />
R OVP1<br />
R OVP2<br />
R OVP3<br />
R SF<br />
C SF<br />
C Z<br />
COM<br />
R SNS<br />
GND<br />
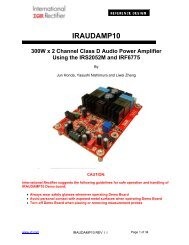
Fig.3: IR1152 based PFC Boost Converter<br />
Peak Input Current<br />
It is necessary to determine the maximum input currents (RMS & peak) from the<br />
specifications in Table 1 before proceeding with detailed design of the PFC boost<br />
converter. The maximum input current is typically encountered at highest load &<br />
lowest input line situation (350W, 85VAC). Assuming a nominal efficiency of 92%<br />
at this situation, the maximum input power can be calculated:<br />
PO<br />
( MAX ) 350W<br />
PIN ( MAX )<br />
= = = 380W<br />
η 0.92<br />
From this, the maximum RMS AC line current is then calculated:<br />
I<br />
I<br />
IN ( RMS ) MAX<br />
IN ( RMS ) MAX<br />
MIN<br />
= η<br />
MIN<br />
( V<br />
P<br />
O ( MAX )<br />
IN ( RMS ) MIN<br />
) PF<br />
350W<br />
=<br />
= 4.5A<br />
0.92(85V<br />
)0.998<br />
The selection of the semiconductor components (bridge rectifier, boost switch &<br />
boost diode) is based on I IN(RMS)MAX =4.5A.<br />
Assuming a pure sinusoidal input, the maximum peak AC line current can then<br />
be calculated:<br />
I<br />
I<br />
IN ( PK ) MAX<br />
IN ( PK ) MAX<br />
=<br />
2( P<br />
V<br />
IN ( MAX )<br />
IN ( RMS ) MIN<br />
1.414(380W<br />
)<br />
=<br />
= 6.3A<br />
85V<br />
)<br />
www.irf.com <strong>AN</strong>-<strong>1150</strong><br />
7
Boost Inductance (L BST )<br />
IR1152 IC is an average current mode controller. An on-chip RC filter is sized to<br />
effectively filter the boost inductor current ripple to generate a clean average<br />
current signal for the IC. The averaging function in the IC can accommodate a<br />
maximum limit of 40% inductor current ripple factor at maximum input current.<br />
The boost inductance has to be sized so that the inductor ripple current factor is<br />
not more than 40% at maximum input current condition (at peak of AC sinusoid).<br />
This is because:<br />
• Higher ripple current factors will interfere with the Average Current Mode<br />
operation of One Cycle Control algorithm in IR1152 leading to duty cycle<br />
instabilities and pulse skipping which results in current distortion and<br />
sometimes even audible noise<br />
• power devices are stressed more with higher ripple currents as the peak<br />
inductor current (I L(PK)MAX ) also increases proportionately<br />
In this calculation, an inductor current ripple factor of 35% is selected (typical<br />
ripple factor is ~20% for most PFC designs). The ripple current at peak of AC<br />
sinusoid at maximum input current is:<br />
∆I<br />
= .35×<br />
I<br />
And, peak inductor current is:<br />
I<br />
I<br />
∆I<br />
L<br />
L<br />
L(<br />
PK ) MAX<br />
L(<br />
PK ) MAX<br />
0<br />
IN ( PK ) MAX<br />
= 0.35×<br />
6.3A<br />
= 2.2A<br />
I<br />
∆I<br />
= I<br />
IN ( PK ) MAX<br />
+<br />
2<br />
2.2A<br />
= 6.3A<br />
+<br />
2<br />
L( PK ) MAX<br />
= 7. 4<br />
In order to determine the boost inductance, the power switch duty cycle at peak<br />
of AC sinusoid (at lowest input line of 85VAC) is required.<br />
VIN ( PK )MIN<br />
= 2 × VIN(<br />
RMS ) MIN<br />
= 120V<br />
Based on the boost converter voltage conversion ratio,<br />
V<br />
D =<br />
O<br />
385V<br />
− 120V<br />
D =<br />
385V<br />
A<br />
V<br />
IN ( PK ) MIN<br />
V<br />
O<br />
= 0.69<br />
The boost inductance is then given by:<br />
VIN<br />
( PEAK ) MIN<br />
× D 120V<br />
× 0.69<br />
LBST<br />
=<br />
=<br />
f × ∆I<br />
66kHz<br />
× 2.2A<br />
SW<br />
L<br />
L BST<br />
= 570µH<br />
A convenient value of 600µH is selected for L BST for this converter which will<br />
result in an inductor ripple current factor between 30-35%.<br />
L<br />
www.irf.com <strong>AN</strong>-<strong>1150</strong><br />
8
High Frequency Input Capacitor (C IN )<br />
The purpose of the high-frequency capacitor is to supply the high-frequency<br />
component of the inductor current (the ripple component) via the shortest<br />
possible loop. This has the advantage of acting like an EMI filter, since it<br />
minimizes the high-frequency current requirement from the AC line. Typically a<br />
high-frequency, film type capacitor with low ESL and high-voltage rating (630V) is<br />
used.<br />
High-frequency input capacitor design is essentially a trade-off between:<br />
• sizing it big enough to minimize the noise injected back into the AC line<br />
• sizing it small enough to avoid line current zero-crossing distortion (flattening)<br />
The high-frequency input capacitor is determined as follows:<br />
C<br />
C<br />
C<br />
IN<br />
IN<br />
IN<br />
= k ∆ I<br />
L<br />
I<br />
IN ( RMS ) MAX<br />
2 π × f<br />
SW<br />
× r × VIN<br />
( RMS )<br />
MIN<br />
4.5A<br />
= 0.35<br />
2π<br />
× 66kHz<br />
× 0.09 × 85V<br />
= 0.496µ<br />
F<br />
where:<br />
k ∆IL = inductor current ripple factor, of 35% as mentioned earlier<br />
r = maximum high frequency input voltage ripple factor (∆V IN /V IN ), assumed 9%<br />
A standard 0.470µF, 630V capacitor is selected for C IN for this converter.<br />
Output Capacitor (C OUT )<br />
Output Capacitor design is based on hold-up time requirement<br />
For 25ms hold-up time and minimum output voltage of 285V the output<br />
capacitance is first calculated:<br />
2 ⋅ PO<br />
⋅ ∆t<br />
COUT<br />
( MIN )<br />
=<br />
2<br />
2<br />
V −V<br />
C<br />
OUT ( MIN )<br />
C<br />
O<br />
O(<br />
MIN )<br />
2 ⋅ 350W<br />
⋅ 25ms<br />
=<br />
2<br />
(385V<br />
) − (285V<br />
)<br />
OUT ( MIN)<br />
= 261µ<br />
Minimum capacitor value must be de-rated for capacitor tolerance (20%) to<br />
guarantee minimum hold-up time.<br />
C<br />
COUT<br />
(<br />
=<br />
1− ∆C<br />
F<br />
261µ<br />
F<br />
=<br />
1−<br />
0.2<br />
MIN )<br />
OUT<br />
= 326µ<br />
TOL<br />
A standard 330µF, 450V capacitor is selected for C OUT for this converter.<br />
2<br />
F<br />
www.irf.com <strong>AN</strong>-<strong>1150</strong><br />
9
3.3 IR1152 Control Circuit Design<br />
3.3.1 Current Sense Resistor Design (ISNS pin)<br />
In IR1152, there are two levels of current limitation:<br />
- a “soft” current limit, which limits the duty-cycle and causes the DC bus<br />
voltage to fold-back i.e. droop<br />
- a cycle-by-cycle “peak” current limit feature which immediately terminates<br />
gate drive pulse once the ISNS pin voltage exceeds V ISNS,PEAK<br />
“Soft” Current Limit<br />
In IR1152 the COMP pin voltage is directly proportional to the RMS input current<br />
into the PFC converter i.e. V COMP is higher at higher RMS current. Clearly its<br />
magnitude is highest at maximum load P MAX & minimum AC input voltage, V IN,MIN .<br />
The dynamic range of V COMP in the IC is defined by V COMP,EFF parameter in the<br />
IR1152 datasheet. Once V COMP signal saturated (reaches V COMP,EFF ), any system<br />
requirement causing an additional increase in current will cause the IC to<br />
respond by limiting the duty cycle and thereby causing the output voltage to<br />
droop. This is called “soft” current limit protection. The selection of R SNS must<br />
ensure that “soft” current limit is not encountered at any of the allowable line and<br />
load conditions.<br />
R SNS Design<br />
The design of R SNS is performed at the system condition when the inductor<br />
current is highest at lowest input line (V IN,MIN ) and highest load (P MAX ). Further,<br />
the inductor current is highest at the peak of the AC sinusoid. The duty cycle<br />
required at peak of AC sinusoid at V IN,MIN =85VAC in order to regulate V OUT =385V<br />
is:<br />
D<br />
PEAK<br />
V<br />
=<br />
OUT<br />
−<br />
2V<br />
V<br />
OUT<br />
IN ( RMS ) MIN<br />
385V<br />
− 2.85V<br />
DPEAK =<br />
= 0.69<br />
385V<br />
R SNS design should guarantee that<br />
i. PFC algorithm can deliver this duty cycle at peak of AC sinusoid at V IN,MIN &<br />
P MAX condition<br />
ii. soft current limit is encountered whenever there is a further increase in<br />
demand for current while operating at V IN,MIN & P MAX condition<br />
To do this, the V ISNS is calculated below.<br />
V<br />
ISNS ( MAX )<br />
V<br />
=<br />
COMP ( EFF )( MIN )<br />
g<br />
DC<br />
⋅ (1 − D)<br />
www.irf.com <strong>AN</strong>-<strong>1150</strong><br />
10
V<br />
4.7V<br />
⋅<br />
=<br />
3.1<br />
( 1−<br />
0.69)<br />
ISNS ( MAX )<br />
= 0. 47<br />
<strong>Note</strong>: if the calculated V ISNS(MAX) is higher than the cycle-by-cycle peak<br />
overcurrent limit specification of the IC, the V ISNS(PK) value should be used to<br />
determine R SNS . In this example, V ISNS(MAX) is lower than 0.68V V ISNS(PK)(MIN) thus<br />
0.47V is used for R SNS calculation.<br />
V<br />
Next the peak inductor current at maximum peak AC line current, derated with an<br />
overload factor (K OVL =10%), is calculated.<br />
I<br />
IN PK ) OVL<br />
= I<br />
L(<br />
PK ) max.(1 + K<br />
I<br />
( OVL<br />
IN ( PK ) OVL<br />
= 7.4×<br />
1.1 = 8. 2<br />
From this maximum current level and the required voltage on the current sense<br />
pin, we now calculate the maximum resistor value that can be used for the PFC<br />
converter.<br />
R<br />
R<br />
SNS , MAX<br />
SNS , MAX<br />
V<br />
=<br />
I<br />
SNS (max)<br />
IN ( PK ) OVL<br />
= 0.057Ω<br />
A<br />
0.47V<br />
=<br />
8.2A<br />
It is noted that even though IR1152 operates in average current mode it is still<br />
safer to use the peak inductor current for current sense resistor design to<br />
guarantee avoiding premature fold-back.<br />
Power dissipation in the resistor is now calculated based on worst case RMS<br />
input current at minimum input voltage:<br />
)<br />
PR<br />
S<br />
= I<br />
IN ( RMS )MAX<br />
2<br />
⋅ R<br />
S<br />
PR S<br />
= 4.5<br />
2 (0.057Ω)<br />
= 1. 2<br />
A standard 50mΩ resistor can be selected for R SNS for the PFC converter.<br />
W<br />
Peak Current Limit<br />
The cycle-by-cycle peak current limit is encountered when V ISNS pin voltage<br />
exceeds V ISNS,PEAK . For the PFC converter, this limit is encountered whenever the<br />
inductor current exceeds the following:<br />
www.irf.com <strong>AN</strong>-<strong>1150</strong><br />
11
I<br />
− .75V<br />
PK _ LMT<br />
= = 15<br />
0.05Ω<br />
It is clarified that even though the IR1152 operates based on average current<br />
mode control, the input to the peak current limit comparator is decoupled from<br />
the averaging circuit thus enabling instantaneous cycle-by-cycle protection for<br />
peak overcurrent.<br />
A<br />
R BOP2<br />
R BOP3<br />
IR1152<br />
IR1145<br />
C BOP R gm 1<br />
COM<br />
2<br />
COMP<br />
3<br />
ISNS<br />
4<br />
BOP<br />
C P<br />
C C Z SF R SF<br />
COM<br />
GATE 8<br />
VCC 7<br />
VFB 6<br />
OVP/EN 5<br />
R<br />
V<br />
C VCC<br />
R SNS<br />
GND<br />
Fig 4: Current Sense Resistor and Filtering<br />
The current sense signal is communicated to the ISNS pin of the IC using a<br />
current limiting series resistor, R SF . An external RC filtering for ISNS pin can be<br />
realized (though not necessary for IR1152) by adding a filter capacitor, C SF<br />
between the ISNS pin and COM as shown in Fig.4. A corner frequency around 1-<br />
1.5MHz will offer a safe compromise in terms of filtering, while maintaining the<br />
integrity of the current sense signal for cycle-by-cycle peak overcurrent<br />
protection.<br />
1<br />
f<br />
PSF<br />
= 2π ⋅ R ⋅C<br />
With R SF =100Ω, we can use C SF =1000pF to obtain a cross-over frequency of<br />
1.6MHz. The input impedance of the current sense amplifier is approximately<br />
25KΩ. The R SF resistor will form a divider with this 25KΩ resistor. For R SF =100Ω<br />
it is noted that the accuracy of the current sense voltage signal communicated to<br />
the IC is more than 99.5%.<br />
3.3.2 Output Regulation Voltage Divider (VFB pin)<br />
The output regulation voltage of the PFC converter is set by voltage divider on<br />
VFB pin - R FB1 , R FB2 , and R FB3 . The total impedance of this divider network must<br />
be high enough to reduce power dissipation, but low enough to keep the<br />
feedback voltage error (due to finite bias currents into the voltage error amplifier<br />
which is less than 0.2uA) negligible. Around 2MΩ is an acceptable value for the<br />
total resistor divider impedance.<br />
SF<br />
SF<br />
www.irf.com <strong>AN</strong>-<strong>1150</strong><br />
12
A standard 1MΩ, 1% tolerance resistor is selected for R FB1 & R FB2 for this<br />
converter. Then, R FB3 is determined based on error amplifier V REF (Typ)=5V and<br />
V OUT =385V converter specification.<br />
R<br />
FB3<br />
V<br />
=<br />
REF<br />
( RFB1<br />
+ RFB<br />
2<br />
( V<br />
out<br />
V<br />
REF<br />
5.0V<br />
(2000k)<br />
R FB 3<br />
= = 26. 3kΩ<br />
(385V - 5.0V)<br />
A standard resistor, R FB3 = 26.1kΩ, 1% tolerance, is selected for this converter.<br />
The new regulation V OUT value based on actual resistor values is then calculated.<br />
V<br />
OUT<br />
( R<br />
=<br />
FB1<br />
+ RFB<br />
2<br />
+ R<br />
R<br />
FB3<br />
)<br />
FB3<br />
)<br />
) ⋅V<br />
( 2000k<br />
+ 26.1k)<br />
⋅ 5.<br />
0V<br />
V OUT<br />
=<br />
= 388. 1V<br />
26.1k<br />
Power dissipation of divider resistors is given by the following.<br />
P<br />
= P<br />
=<br />
2<br />
( Vout<br />
−VREF<br />
)<br />
( R R )<br />
RFB 1 RFB<br />
2<br />
2<br />
FB1<br />
+<br />
( 388.1V<br />
− 5V<br />
)<br />
FB 2<br />
REF<br />
PR = P<br />
mW<br />
FB R FB<br />
=<br />
= 37<br />
1<br />
2<br />
4 × 1000k<br />
VFB is a multi-function pin with the following functionalities:<br />
• The VFB pin is an input to the open-loop comparator that references a V OLP<br />
threshold of 19% of V REF . The IC is restrained in the Stand-by Mode<br />
whenever VFB pin is less than V OLP .<br />
• The VFB pin is also non-inverting input to the overvoltage comparator. This<br />
comparator is designated the OVP(VFB) comparator in the IC Block diagram<br />
in the datasheet. The typical overvoltage set-point is V OVP =106%V REF and the<br />
re-enable set-point is V OVP(RST) =103%V REF .<br />
VOVP = 1 .06⋅VREF<br />
= 5. 30V<br />
VOVP RST<br />
= 1.03 ⋅VREF<br />
5. 15V<br />
( )<br />
=<br />
Using the resister divider determined earlier, it is a straightforward calculation<br />
to obtain the overvoltage trigger/re-enable set-points.<br />
V<br />
V<br />
V<br />
V<br />
OVP<br />
OVP<br />
OVP ( RST )<br />
OVP ( RST )<br />
= 1.06 ⋅V<br />
Out<br />
= 1.06 × 388.1 = 412V<br />
= 1.03 ⋅V<br />
Out<br />
= 1.03 × 388 .1 = 400 V<br />
2<br />
www.irf.com <strong>AN</strong>-<strong>1150</strong><br />
13
3.3.3 Dedicated Overvoltage Protection Divider (OVP/EN pin)<br />
In addition to the overvoltage comparator on VFB pin, IR1152 features a 2nd<br />
overvoltage comparator (designated the OVP(OVP) in the IC block diagram)<br />
which is connected to the OVP/EN pin. The OVP(OVP) comparator is identical in<br />
design to the OVP(VFB) comparator and also references the same trigger and<br />
re-enable thresholds of 106% and 103% of V REF respectively. The VFB pin<br />
resistor divider calculated earlier is applicable for the OVP/EN pin also. Hence,<br />
for this converter, 1Mohm, 1% tolerance resistor is selected for R OVP1 & R OVP2<br />
and 26.1kΩ, 1% tolerance resistor is selected for R OVP3 . The trigger and reenable<br />
set-points calculated earlier are likewise applicable here too.<br />
3.3.4 Brown-Out Protection R/C Circuit (BOP pin)<br />
IR1152 provides brown-out protection based on direct sensing of rectified AC<br />
input line. Information about the rectified AC input voltage is communicated to the<br />
BOP pin after scaling it down using a resistor divider network and filtering using a<br />
capacitor on BOP pin as shown below. This R/C network is essentially a voltagedivision/averaging<br />
network. The sinusoidally varying rectified AC voltage is<br />
divided by the resistor divider and averaged by the capacitor and presented at<br />
the BOP pin as a DC level, V BOP, AVG along with some ripple, ∆V BOP . The BOP pin<br />
R/C circuit is illustrated in Fig.5. The BOP pin voltage is illustrated in Fig.6.<br />
Bridge<br />
+<br />
L BST<br />
R BOP1<br />
C IN<br />
R BOP2<br />
R BOP3<br />
IR1152<br />
IR1145<br />
C BOP R gm 1<br />
COM<br />
GATE 8<br />
2<br />
COMP<br />
VCC 7<br />
3<br />
ISNS<br />
VFB 6<br />
4<br />
BOP<br />
OVP/EN 5<br />
C P<br />
C<br />
R SF<br />
C SF<br />
C Z<br />
COM<br />
R SNS<br />
GND<br />
Fig 5: Brown-out protection circuit for IR1152<br />
www.irf.com <strong>AN</strong>-<strong>1150</strong><br />
14
900mV<br />
V BOP<br />
750mV<br />
∆V BOP<br />
V BOP,AVG<br />
SEL>><br />
600mV<br />
80V<br />
V(R2:2)<br />
V IN<br />
40V<br />
0V<br />
1/2f AC<br />
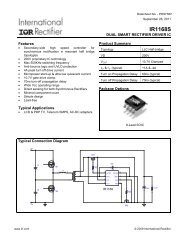
Fig 6: Voltage waveform on the BOP pin is comprises a DC level (V BOP,AVG ) and a<br />
ripple voltage (∆V BOP )<br />
The DC level V BOP,AVG is given by:<br />
where<br />
V<br />
BOP,<br />
AVG<br />
=<br />
R<br />
BOP3<br />
R<br />
TOT<br />
⋅V<br />
ACAVG<br />
Hence:<br />
R TOT = R BOP1 +R BOP2 +R BOP3<br />
2<br />
VAC, AVG<br />
= 2 ⋅VIN<br />
( RMS)<br />
π<br />
V<br />
R<br />
2<br />
BOP3<br />
BOP, AVG<br />
= ⋅ 2<br />
RTOT<br />
π<br />
⋅V<br />
IN ( RMS )<br />
Thus V BOP,AVG depends only on the resistor divider and the AC input voltage.<br />
The ripple ∆V BOP is given by the transfer function represented by the resistor<br />
divider and the capacitor:<br />
Thus:<br />
where:<br />
∆V<br />
T ( s)<br />
=<br />
V<br />
R<br />
=<br />
⋅<br />
BOP BOP3<br />
AC , PK<br />
R<br />
( R<br />
TOT<br />
BOP1<br />
+ RBOP<br />
2<br />
)<br />
1 + sC<br />
BOP<br />
⋅<br />
RTOT<br />
∆ V<br />
BOP<br />
=<br />
ω<br />
O<br />
=<br />
( R<br />
2 ⋅V<br />
IN ( RMS )<br />
R<br />
⋅<br />
R<br />
BOP3<br />
TOT<br />
ω = 2π<br />
⋅ (2 ⋅ f<br />
AC<br />
)<br />
R<br />
TOT<br />
BOP1 + RBOP<br />
2<br />
) ⋅<br />
R<br />
⋅<br />
BOP3<br />
1<br />
1<br />
ω<br />
1 + ( )<br />
ω<br />
⋅ C<br />
BOP<br />
O<br />
2<br />
R<br />
BOP3<br />
www.irf.com <strong>AN</strong>-<strong>1150</strong><br />
15
∆V BOP magnitude is related to C BOP – bigger the capacitor, smaller the ripple.<br />
During start-up, the IC is held in Stand-by mode when the BOP pin voltage, V BOP<br />
is less than V BOP(EN) =1.56V. Next, when the AC voltage is applied and the BOP<br />
pin voltage exceeds this threshold, the IC enters normal operation (assuming all<br />
other conditions for normal operation are satisfied). If it is assumed that the<br />
system is starting under no load, then the rectified AC voltage is essentially a DC<br />
voltage and the BOP pin voltage is also DC.<br />
V<br />
BOP<br />
R<br />
=<br />
R<br />
BOP3<br />
TOT<br />
⋅V<br />
AC , PK<br />
R<br />
=<br />
R<br />
BOP3<br />
TOT<br />
⋅<br />
2 ⋅VIN<br />
( RMS )<br />
Under this condition, the AC voltage at which the IC becomes operational is<br />
given by:<br />
R<br />
R<br />
BOP3<br />
TOT<br />
⋅<br />
2 ⋅VIN<br />
, ON ( RMS )<br />
> 1.56V<br />
However, if the system is starting up under a loaded condition, then the rectified<br />
AC voltage is a varying sinusoidal function. In this case, the BOP pin voltage is<br />
as described before (DC level + superimposed ripple). In this case, the IC<br />
becomes operational when the maxima of V BOP exceeds V BOP(EN) =1.56V.<br />
V BOP,MAX = V BOP,AVG + ∆V BOP /2 > 1.56V<br />
Hence the exact AC voltage at which the IC becomes operational depends on<br />
the load condition at start-up. C BOP must be big enough to ensure that ∆V BOP is<br />
greater than the BOP hysteresis (1.56-0.76=0.8V) at the required minimum AC<br />
input voltage, should the system start-up under a loaded condition.<br />
Once the IC becomes operational and starts boosting the DC voltage, then the<br />
rectified AC voltage will show sinusoidal variation. Subsequently, if the AC<br />
voltage is reduced then V BOP,AVG & ∆V BOP both decrease in magnitude. When the<br />
minima of the BOP pin voltage encounters the Brown-out trip threshold<br />
V BOP =0.76V then the IC enters brown-out fault mode.<br />
V BOP,MIN = V BOP,AVG - ∆V BOP /2<br />
When a Brown-out fault is encountered, the gate pulse is immediately<br />
terminated, the COMP pin is actively discharged, ICC current consumption falls<br />
to a few milli-amperes and the BOP pin voltage has to exceed V BOP,EN once again<br />
for the IC to restart.<br />
The condition at which IC enters Brown-Out fault is then given by:<br />
V BOP,MIN < 0.76V<br />
The high input impedance and low bias current (
at which the converter is expected to start-up. Assuming V AC,ON =65VAC and noload<br />
condition at start-up,<br />
VBOP(<br />
HI )<br />
( RBOP<br />
1<br />
+ RBOP2<br />
)<br />
RBOP3<br />
=<br />
( 2. V V −V<br />
)<br />
R<br />
R<br />
BOP3<br />
BOP3<br />
AC,<br />
ON<br />
1.56V<br />
(3MΩ + 3MΩ)<br />
=<br />
( 2.65VAC<br />
−1.56V - 2V)<br />
= 105.9kΩ<br />
BOP(<br />
HI )<br />
Bridge<br />
Next, assuming a target V AC,OFF =55VAC, C BOP has to be selected. First V BOP,AVG<br />
is calculated at V AC,OFF :<br />
V<br />
V<br />
BOP,<br />
AVG<br />
BOP,<br />
AVG<br />
= 2. VAC,<br />
OFF<br />
( RBOP3<br />
)<br />
( π / 2).( RBOP<br />
1<br />
+ RBOP2<br />
+ RBOP3<br />
)<br />
2.55V<br />
AC<br />
.105.9kΩ<br />
=<br />
( π / 2).(3MΩ + 3MΩ + 105.9kΩ<br />
)<br />
V<br />
BOP, AVG<br />
= 0. 86<br />
V<br />
Then, forcing V BOP,MIN (=V BOP,AVG - ∆V BOP /2) = 0.76V, we can calculate the<br />
required ∆V BOP at V AC,OFF . At V AC,OFF =55VAC, this yields<br />
∆V BOP = 2*(0.86-0.76) = 0.2V<br />
In order to calculate C BOP , we just have to force the magnitude of the transferfunction<br />
at f=2*f AC =126Hz to be equal to 0.2V calculated above (maximum f AC is<br />
the design condition that needs to be considered to ensure that the IC is<br />
guaranteed to terminate operation at V AC,OFF . At a lower f AC , when there is higher<br />
ripple, the IC will cease operation at a higher V AC ). Thus:<br />
where:<br />
1<br />
ω<br />
1+<br />
( )<br />
ω O<br />
2<br />
R<br />
= 0.2V<br />
×<br />
R<br />
RBOP3<br />
1<br />
∆VBOP = 2 ⋅V<br />
AC , OFF<br />
⋅ ⋅<br />
= 0. 2V<br />
RTOT<br />
ω 2<br />
1 + ( )<br />
ω<br />
ω<br />
O<br />
=<br />
( R<br />
TOT<br />
BOP3<br />
ω o is then calculated to be:<br />
×<br />
ω = 2π<br />
⋅ (2 ⋅ f<br />
AC<br />
)<br />
R<br />
TOT<br />
BOP1 + RBOP<br />
2<br />
) ⋅<br />
1<br />
2 ⋅V<br />
AC,<br />
OFF<br />
R<br />
BOP3<br />
O<br />
⋅ C<br />
BOP<br />
6.1059MΩ<br />
= 0.2V<br />
× ×<br />
0.1059MΩ<br />
ω = 2 π ⋅ (2 ⋅ f ) = 2π<br />
⋅ (2 ⋅ 63) = 791.68<br />
AC<br />
1<br />
= 0.148<br />
2 ⋅55Vac<br />
www.irf.com <strong>AN</strong>-<strong>1150</strong><br />
17
ω o = 118<br />
From ω o , C BOP is calculated:<br />
C<br />
RTOT<br />
=<br />
( RBOP<br />
1<br />
+ RBOP<br />
2<br />
) ⋅ RBOP3<br />
⋅ωO<br />
6.1059MΩ<br />
=<br />
=<br />
6MΩ×<br />
0.1059MΩ×<br />
118<br />
BOP<br />
81<br />
nF<br />
For the converter, we can choose the following:<br />
R BOP1 = R BOP2 = 3Mohm<br />
R BOP3 = 100kohm<br />
C BOP =100nF<br />
Since selected R BOP3 is slightly less than what was calculated, V AC,ON will be<br />
slightly higher than 65VAC. Since selected C BOP is slightly higher than what was<br />
calculated, V AC,OFF will be slightly lower than 55VAC.<br />
3.3.5 Voltage Loop Compensation (COMP pin)<br />
The voltage feedback loop monitors the DC bus voltage (V OUT ) via the V FB<br />
resistor divider whose transfer function is H 1 (s). Comparison of the V FB pin<br />
voltage and internal reference voltage of the IC by voltage error amplifier yields a<br />
control signal (V m = V COMP -V COMP,START ). The transfer function of the error<br />
amplifier and compensation network is H 2 (s). The IR1152 output voltage error<br />
amplifier is a trans-conductance type amplifier and output of the error amplifier is<br />
connected to the COMP pin. The control signal directly controls the magnitude of<br />
the boost inductor current (I L ), which is also the input current of the PFC<br />
converter. The transfer function between I L and control signal V m is given by<br />
H 3 (s). The power stage of the PFC converter along with DC bus capacitor,<br />
maintains a constant voltage (V OUT ) at the converter output where the system<br />
load draws energy from the converter. The power stage + DC bus capacitor +<br />
system load transfer function is given by G(s). The small-signal model of the<br />
voltage feedback loop is depicted below in Fig.7. The overall loop gain transfer<br />
function T(s) is given by:<br />
T(s) = H 1 (s).H 2 (s).H 3 (s).G(s)<br />
v IN<br />
+<br />
_<br />
∆<br />
Error Amplifier +<br />
Compensator<br />
H 2 (s)<br />
v REF Output Divider<br />
v FB<br />
v m<br />
OCC PFC<br />
Modulator<br />
H 3 (s)<br />
i L<br />
Plant<br />
G(s)<br />
v OUT<br />
H 1 (s)<br />
Fig.7: Small-signal modeling of the PFC voltage feedback loop<br />
www.irf.com <strong>AN</strong>-<strong>1150</strong><br />
18
i chg +<br />
Voltage loop compensation is performed by adding R/C components between<br />
COMP and COM pins in order to:<br />
i. Achieve the appropriate dynamic response characteristics during load/line<br />
fluctuations<br />
ii. Ensure that the 2*f AC ripple in V OUT at steady state conditions, does not<br />
cause too much current distortion<br />
In order to evaluate the overall loop gain transfer function T(s), the small-signal<br />
transfer function of each of the blocks has to be evaluated first.<br />
Plant Gain, G(s)<br />
The plant gain G(s) models the small signal variation in the DC bus voltage when<br />
a small perturbation occurs in the boost inductor current.<br />
G(s) = v OUT /i L = (v OUT /i CHG ).(i CHG /i L )<br />
where the small signal parameters are italicized and i L is the boost inductor<br />
current, v OUT is the bus voltage and i CHG is the current sourced at the output of<br />
the boost converter power stage (i.e. boost diode current).<br />
(2MI OUT /V OUT ).v i<br />
(V IN /kM).v m<br />
V OUT /I OUT<br />
C OUT<br />
SYSTEM<br />
LOAD<br />
R L<br />
_<br />
v OUT<br />
Fig.8: Small-signal model of PFC converter power stage<br />
If the system load is a Resistive Load, the transfer function is:<br />
vout<br />
RL<br />
/ 2<br />
=<br />
i<br />
R<br />
chg<br />
L<br />
1 + sCout<br />
2<br />
In the power stage transfer function, this is represented by a pole:<br />
1<br />
f<br />
PS<br />
=<br />
RL<br />
2π<br />
⋅Cout<br />
2<br />
www.irf.com <strong>AN</strong>-<strong>1150</strong><br />
19
For a Constant Power Load, the shunt impedance and the system load cancel<br />
each other out and the equivalent impedance is infinite, in which case the<br />
transfer function reduces to:<br />
vout<br />
1<br />
=<br />
i sC<br />
chg<br />
In the power stage transfer function, this is represented by a pole at the origin.<br />
Under a Constant Current Load, since the impedance of a current source is<br />
infinitely high, the equivalent impedance is effectively just the shunt impedance:<br />
vout<br />
RL<br />
=<br />
i 1 + sC RL<br />
In the power stage transfer function, this is represented by a pole:<br />
1<br />
f<br />
PS<br />
= 2π<br />
⋅C<br />
R<br />
chg<br />
Next (i CHG /i L ) transfer function has to be evaluated. Assuming 100% efficiency,<br />
recognize that:<br />
V IN .I L = V OUT I OUT<br />
I OUT is same as the DC component of the boost diode current (I CHG ). Hence<br />
V IN .I L = V OUT I CHG<br />
Applying linearization and small-signal analysis, for a given DC operating point<br />
defined by V IN & V OUT yields the relationship between i CHG & i L :<br />
i CHG /i L = V IN /V OUT<br />
Assuming a resistive load, the overall power stage transfer function can now be<br />
written as:<br />
V<br />
G(<br />
s)<br />
=<br />
V<br />
IN<br />
OUT<br />
out<br />
out<br />
out<br />
RL<br />
×<br />
1+<br />
sC<br />
L<br />
/ 2<br />
out<br />
R<br />
2<br />
L<br />
OCC PFC Modulator, H 3 (s)<br />
In order to derive i L /v m , the One Cycle Control PWM modulator control law is<br />
employed:<br />
v<br />
m<br />
G<br />
DC<br />
⋅ RS<br />
⋅iL<br />
=<br />
M (d)<br />
where M(d) = V OUT /V IN for a given DC operating point defined by the DC bus<br />
voltage V OUT and RMS input voltage V IN . This ultimately yields<br />
L<br />
H<br />
3<br />
( s)<br />
= =<br />
vm<br />
i<br />
V<br />
OUT<br />
V<br />
R<br />
in<br />
S<br />
G<br />
DC<br />
www.irf.com <strong>AN</strong>-<strong>1150</strong><br />
20
Output voltage sensor Resistor-Divider, H 1 (s)<br />
The output divider scales the output voltage to be compared with the reference<br />
voltage in the error amplifier.<br />
Therefore:<br />
V<br />
OUT<br />
( R<br />
=<br />
FB1 + RFB2<br />
+ RFB3)<br />
VREF<br />
R<br />
V<br />
H<br />
1<br />
( s)<br />
=<br />
V<br />
The uncompensated loop gain and phase is shown in Fig.9 for 85-264VAC at<br />
350W load condition (assuming resistive load). This is simply the H 1 (s).H 3 (s).G(s)<br />
transfer function product illustrating the pole due to the plant gain.<br />
FB3<br />
REF<br />
OUT<br />
90<br />
60<br />
30<br />
0<br />
Gain 85VAC Uncompensated<br />
Gain 264VAC Uncompensated<br />
Phase 85VAC Uncompensated<br />
Phase 264VAC Uncompensated<br />
90<br />
60<br />
30<br />
0<br />
Gain (dB)<br />
-30<br />
-60<br />
-90<br />
-120<br />
-150<br />
-30<br />
-60<br />
-90<br />
-120<br />
-150<br />
Phase (deg)<br />
-180<br />
-180<br />
0.01 0.1 1 10 100 1000 10000 100000<br />
f (Hz)<br />
Fig.9 The uncompensated transfer function [=H 1 (s).H 3 (s).G(s)]<br />
Error Amplifier & Compensation, H 2 (S)<br />
The compensation scheme typically employed for a first-order, single-pole<br />
system aims to:<br />
• add a pole at the origin in order to increase the low frequency gain and<br />
improve DC regulation<br />
• add a low-frequency zero to boost phase margin near cross-over frequency<br />
and partially compensate the pole<br />
• add a high-frequency pole to attenuate switching frequency noise and ripple<br />
effects<br />
The above 3 requirements can be achieved in case of the transconductance type<br />
voltage error amplifier with the compensation scheme shown in Fig.10. However,<br />
www.irf.com <strong>AN</strong>-<strong>1150</strong><br />
21
as mentioned earlier, for the PFC converter, the most important criterion for<br />
basing the selection of the compensation component values is the voltage loop<br />
bandwidth.<br />
Fig10: Voltage Loop error amplifier compensation network<br />
The error amplifier transfer function is given by:<br />
gm<br />
⋅(<br />
1+<br />
sRgmCZ<br />
)<br />
H<br />
2<br />
( s ) =<br />
s( C + C + sR C C<br />
Z<br />
where g m is the transconductance of the voltage error amplifier. The<br />
compensation network adds a zero and a pole in the transfer function at:<br />
f<br />
f<br />
P0<br />
Z 0<br />
= π ⋅<br />
P<br />
1<br />
2 R<br />
=<br />
2π ⋅ R<br />
gm<br />
⋅ C<br />
gm<br />
Z<br />
1<br />
Cz ⋅Cp<br />
Cz + Cp<br />
The gain and phase of the error amplifier + compensation transfer function is<br />
illustrated in Fig.11.<br />
gm<br />
Z<br />
P<br />
)<br />
90<br />
60<br />
30<br />
0<br />
EA Gain<br />
EA Phase<br />
90<br />
60<br />
30<br />
0<br />
Gain (dB)<br />
-30<br />
-60<br />
-90<br />
-120<br />
-150<br />
-30<br />
-60<br />
-90<br />
-120<br />
-150<br />
Phase (deg)<br />
-180<br />
-180<br />
0.01 0.1 1 10 100 1000 10000 100000<br />
f (Hz)<br />
Fig.11: Error Amplifier + compensation transfer function characteristics<br />
www.irf.com <strong>AN</strong>-<strong>1150</strong><br />
22
Voltage Loop Compensation procedure<br />
Step 1: Choose C z based on soft-start time:<br />
A soft-start time of 60ms is selected. Typical values range from 50ms to a few<br />
hundred ms, depending upon the application. The soft-start time represents the<br />
time needed by the controller to ramp V COMP from zero to the maximum value.<br />
The system will take no more than 60ms to achieve near-regulation.<br />
C<br />
Z<br />
=<br />
V<br />
t<br />
COMP<br />
SS<br />
⋅ i<br />
OVEA<br />
( EFF )( MIN )<br />
i OVEA and V COMP(EFF) (MIN) are taken from the datasheet.<br />
60ms<br />
× 44µ<br />
A<br />
C Z<br />
=<br />
= 0.56µ<br />
F<br />
4.7V<br />
A standard value of 0.56uF can be selected for the converter for C Z .<br />
Step 2: Choose R gm to ensure that H 1 (s).H 2 (s) attenuation at 2xf AC frequency is<br />
small enough to avoid current distortion:<br />
The amount of 2xf AC ripple on the output capacitor is calculated first. The<br />
minimum f AC of 47Hz is considered here, since the ripple is the maximum at the<br />
lowest AC frequency. The peak-to-zero ripple V OPK is given by:<br />
V<br />
V<br />
V<br />
OPK<br />
OPK<br />
OPK<br />
P<br />
=<br />
2π<br />
⋅ 2 ⋅ f<br />
= 5.1V<br />
in,<br />
MAX<br />
AC<br />
⋅ C<br />
O<br />
⋅V<br />
out<br />
380W<br />
=<br />
2π<br />
⋅ 2 ⋅ 47 ⋅ 330µ<br />
F ⋅385V<br />
The peak-to-peak ripple in V OUT is 2xV OPK . This ripple in V OUT is reflected in the<br />
V COMP voltage based on the attenuation provided by the resistor divider and error<br />
amplifier compensation network combined i.e. H 1 (s).H 2 (s) at 2xf AC . The ripple in<br />
V COMP i.e. ∆V COMP has to be small compared with the value of the error amplifier<br />
output voltage swing (V COMP,EFF ). Typical values for ∆V COMP /V COMP range from<br />
0.5% to 1%. 0.5% is recommended if current shaping has to be excellent while<br />
1% is recommended for higher phase margin and low-oscillation response to<br />
load steps. 0.5% attenuation demands a (G VA ) of:<br />
G<br />
VA<br />
V<br />
=<br />
COMP(<br />
EFF )<br />
2 ⋅V<br />
⋅ 0.005<br />
OPK<br />
www.irf.com <strong>AN</strong>-<strong>1150</strong><br />
23
G<br />
G<br />
VA<br />
VA<br />
4.7V<br />
⋅ 0.005<br />
=<br />
= 0.0023<br />
2 ⋅5.1V<br />
= −52.7dB<br />
This is the required attenuation in H 1 (s).H 2 (s) at 2xf AC frequency.<br />
H 1 (s), given by V REF /V OUT, is next calculated:<br />
5V<br />
H1 = = 0.013 = −37.<br />
7dB<br />
385V<br />
The required attenuation from H 2 (s) alone at 2x47Hz is then given by:<br />
G VA<br />
− H = 15dB<br />
1<br />
−<br />
Since the error amplifier pole will be set at a much higher frequency than 2xf AC<br />
(and consequently C z >> C p ), the error amplifier transfer function at 2xf AC can be<br />
approximated to:<br />
H<br />
2<br />
(<br />
s )<br />
g<br />
≅<br />
m<br />
⋅(<br />
1+<br />
sR<br />
Since C Z has already been determined, only R gm needs to be calculated:<br />
sC<br />
H<br />
2<br />
( j2π<br />
⋅ f<br />
AC<br />
) = GVA<br />
− H<br />
1<br />
= −15dB<br />
= 0.177<br />
R<br />
gm<br />
=<br />
⎛ G<br />
⎜<br />
⎝<br />
VA<br />
− H<br />
g<br />
m<br />
1<br />
2<br />
Z<br />
gm<br />
C<br />
Z<br />
⎞ ⎛ 1<br />
⎟ −<br />
⎜<br />
⎠ ⎝ 2π<br />
⋅ 2 ⋅ f<br />
Substituting f AC =47Hz, g m =49µS, C Z =0.56µF yields<br />
R gm<br />
= 2 kΩ<br />
The location of the zero in the compensation scheme can now be estimated:<br />
f z = 1/(2*π*R gm .C z ) = 1/(2*π*2kohm*0.56µF) = 142Hz<br />
The location of the pole in the power stage transfer function (assuming a resistive<br />
load) is:<br />
f PS = 1/(2*π*C OUT *R L /2) = 1/[2*π*330uF*(385V*385V/350W)/2] = 2.3Hz<br />
Since the location of zero is more than a decade away from that of the pole, it is<br />
likely that this compensation scheme may result in low phase margin. This is<br />
discussed more in “Phase Margin Discussion” in step 4.<br />
Step 3: Choose Cp based on high-frequency pole location<br />
The pole frequency should be chosen higher than the cross over frequency and<br />
significantly lower than the switching frequency in order to attenuate switching<br />
noise and switching frequency ripple in the output capacitor: typical value is 1/6<br />
to 1/10 of the switching frequency. Choosing 1/6xf SW (=0.166*66kHz=11kHz) for<br />
this converter:<br />
)<br />
AC<br />
⋅C<br />
Z<br />
2<br />
⎞<br />
⎟<br />
⎠<br />
www.irf.com <strong>AN</strong>-<strong>1150</strong><br />
24
1<br />
1<br />
f<br />
P0<br />
=<br />
≅<br />
Cz ⋅Cp<br />
2π<br />
⋅ R<br />
2π<br />
⋅ Rgm<br />
⋅Cp<br />
gm<br />
Cz + Cp<br />
C = 1<br />
= 7. nF<br />
p<br />
2 ⋅ 2kΩ ⋅ 66kHz<br />
⋅ 0.166<br />
32<br />
π<br />
Step 4: Estimate bandwidth & phase margin<br />
The voltage loop response for 85VAC and 264VAC is plotted at full output power<br />
condition of 350W in Fig.12. At 85VAC/350W the cross-over frequency is 5Hz<br />
and phase margin is about 27°. At 264VAC/350W the cross-over frequency is<br />
16Hz and phase margin is about 15°. This was anticipated considering the wide<br />
separation between the zero and the pole locations. In this converter, due to the<br />
low phase margin, the response to a load step can be oscillatory and may not be<br />
acceptable in some applications. At lighter load conditions, the phase margin will<br />
drop even further. However, there will be fast transient response. In the end the<br />
trade-off between transient response and phase margin should be considered.<br />
90<br />
60<br />
30<br />
0<br />
Gain 85VAC Uncompensated<br />
Gain 85VAC Compensated<br />
EA Gain<br />
Phase 85VAC Uncompensated<br />
Phase 85VAC Compensated<br />
EA Phase<br />
90<br />
60<br />
30<br />
0<br />
Gain (dB)<br />
-30<br />
-60<br />
-90<br />
-120<br />
-150<br />
-30<br />
-60<br />
-90<br />
-120<br />
-150<br />
Phase (deg)<br />
-180<br />
-180<br />
0.01<br />
90<br />
0.1 1 10 100 1000 10000 100000<br />
90<br />
f (Hz) Gain 264VAC Uncompensated<br />
60<br />
Gain 264VAC Compensated<br />
60<br />
EA Gain<br />
30<br />
EA Phase<br />
Phase 264VAC Uncompensated<br />
30<br />
Phase 264VAC Compensated<br />
0<br />
0<br />
Gain (dB)<br />
-30<br />
-60<br />
-90<br />
-120<br />
-150<br />
-30<br />
-60<br />
-90<br />
-120<br />
-150<br />
Phase (deg)<br />
-180<br />
-180<br />
0.01 0.1 1 10 100 1000 10000 100000<br />
f (Hz)<br />
Fig.12: Overall Loop Gain at 85/264VAC & 350W (fast loop + low phase margin)<br />
www.irf.com <strong>AN</strong>-<strong>1150</strong><br />
25
Phase Margin Discussion:<br />
The zero in the error amplifier compensation can provide phase boost to<br />
compensate the phase lag due to the power stage pole. If the zero is more than a<br />
decade away from the power stage pole there is minimal phase boost. The<br />
location of the zero can be brought closer to the power stage pole by increasing<br />
the value of C z or R gm or both. However, the trade-offs are as follows:<br />
• Increasing C z reduces the DC gain of the transfer function and slows<br />
down the loop response (more sluggish response to a load step)<br />
• Increasing R gm increases the low frequency gain of the error amplifier<br />
transfer function and hence the attenuation at 2xf AC may be insufficient to<br />
meet the 0.5% requirement described earlier.<br />
To illustrate the trade-offs, the following examples are presented with the goal of<br />
improving the phase margin:<br />
• Option 1: Increase the soft-start time. For example, if the soft-start time is<br />
increased to 180ms (3x), then Cz=1.69uF, Rgm=3.49kohm, Cp=4.2nF. The<br />
cross-over frequency and phase margin are 2.6Hz & 47° at 85VAC and 9.5Hz<br />
and 33° at 264VAC as seen in Fig.13. Due to the higher C z capacitor, the<br />
transient response behavior is likely to be more sluggish for this<br />
compensation arrangement.<br />
90<br />
60<br />
30<br />
0<br />
Gain 85VAC Uncompensated<br />
Gain 85VAC Compensated<br />
EA Gain<br />
Phase 85VAC Uncompensated<br />
Phase 85VAC Compensated<br />
EA Phase<br />
90<br />
60<br />
30<br />
0<br />
Gain (dB)<br />
-30<br />
-60<br />
-90<br />
-120<br />
-150<br />
-30<br />
-60<br />
-90<br />
-120<br />
-150<br />
Phase (deg)<br />
-180<br />
-180<br />
0.01<br />
90<br />
0.1 1 10 100 1000 10000 100000<br />
90<br />
f (Hz) Gain 264VAC Uncompensated<br />
60<br />
Gain 264VAC Compensated<br />
60<br />
EA Gain<br />
30<br />
EA Phase<br />
Phase 264VAC Uncompensated<br />
30<br />
Phase 264VAC Compensated<br />
0<br />
0<br />
Gain (dB)<br />
-30<br />
-60<br />
-90<br />
-120<br />
-150<br />
-30<br />
-60<br />
-90<br />
-120<br />
-150<br />
Phase (deg)<br />
-180<br />
-180<br />
0.01 0.1 1 10 100 1000 10000 100000<br />
f (Hz)<br />
Fig.13: Overall Loop Gain at 85/264VAC, 350W (slow loop + high phase margin)<br />
www.irf.com <strong>AN</strong>-<strong>1150</strong><br />
26
• Option 2: At the expense of current distortion due to increased 2*f AC ripple in<br />
V OUT , increase only the R gm resistor while retaining the same soft-start time.<br />
This has the effect of placing the zero closer to the pole in the power stage.<br />
For example if H1(s).H2(s) attenuation at 2xfAC can be set at 1.5% instead of<br />
0.5%. Then retaining C z =0.56uF, we can recalculate R gm =10kohm and<br />
recalculate Cp=1.4nF. The cross-over frequency and phase margin are 5Hz &<br />
35° at 85VAC and 20Hz and 42° at 264VAC as seen in Fig.14. While this may<br />
cause some distortion (increased 3 rd harmonic current), the EN61000-3-2<br />
harmonic standards will still easily be met.<br />
90<br />
60<br />
30<br />
0<br />
Gain 85VAC Uncompensated<br />
Gain 85VAC Compensated<br />
EA Gain<br />
Phase 85VAC Uncompensated<br />
Phase 85VAC Compensated<br />
EA Phase<br />
90<br />
60<br />
30<br />
0<br />
Gain (dB)<br />
-30<br />
-60<br />
-90<br />
-120<br />
-150<br />
-30<br />
-60<br />
-90<br />
-120<br />
-150<br />
Phase (deg)<br />
-180<br />
-180<br />
0.01 0.1 1 10 100 1000 10000 100000<br />
f (Hz)<br />
90<br />
60<br />
30<br />
0<br />
Gain 264VAC Uncompensated<br />
Gain 264VAC Compensated<br />
EA Gain<br />
EA Phase<br />
Phase 264VAC Uncompensated<br />
Phase 264VAC Compensated<br />
90<br />
60<br />
30<br />
0<br />
Gain (dB)<br />
-30<br />
-60<br />
-90<br />
-120<br />
-150<br />
-30<br />
-60<br />
-90<br />
-120<br />
-150<br />
Phase (deg)<br />
-180<br />
-180<br />
0.01 0.1 1 10 100 1000 10000 100000<br />
f (Hz)<br />
Fig.14: Overall Loop Gain at 85/264VAC, 350W (fast loop + high phase margin,<br />
but possibly increased current distortion)<br />
www.irf.com <strong>AN</strong>-<strong>1150</strong><br />
27
• Option 3: This is the compromise approach between option 1 & 2 and is left to<br />
the user to pursue (for example using soft-start time=100ms & H1(s).H2(s)<br />
attenuation at 2xf AC = 1%).<br />
4. PFC Converter Physical Design & Layout Tips<br />
4.1 Pin COM<br />
Grounding is the most important layout consideration for PFC ICs. Some ICs<br />
even have separate power ground and signal ground pins for better noise<br />
immunity. Since IR1152 has only one ground pin, additional care is required<br />
during board layout. The parasitic inductance and capacitance in the power<br />
ground trace usually generates a lot of noise because of high RMS currents and<br />
‘dV/dt’s & ‘dI/dt’s from switching loops. There is also the possibility of high<br />
common-mode currents that is to be considered for certain types of loads (such<br />
as motor drive inverters). This is illustrated in Fig.15. The control circuitry of the<br />
IC has to be shielded from this noise as much as possible.<br />
- +<br />
1<br />
2<br />
3<br />
4<br />
COM GATE 8<br />
COMP VCC 7<br />
ISNS VFB 6<br />
BOPOVP/EN 5<br />
These traces carry high frequency current<br />
Easy to generate noise with parasitic inductance<br />
Fig.15: – Noise in power ground (BAD connection practice)<br />
A few rules are listed below which can improve the system noise immunity.<br />
• COM Rule 1: A STAR-connection is highly recommended in PFC converter<br />
layout for the power GND, IC COM & MOSFET source nodes. In the starconnection,<br />
the IC COM pin, the current sense resistor and source of PFC<br />
switch are connected at one single point as illustrated in Fig.16. If a ground<br />
plane is used, it is important to ensure that the ground plane does not conduct<br />
currents. So the ground plane is also connected to the STAR-connection<br />
point only.<br />
In terms of the control circuitry, the best approach is to provide each control loop<br />
of the IC with a dedicated return path and have an independent star-connection<br />
www.irf.com <strong>AN</strong>-<strong>1150</strong><br />
28
to IC COM pin. However, in reality, sometimes it is difficult to do so due to the<br />
limitation of PCB space and hence it is useful to apply some rules:<br />
• COM Rule 2: Separate the VCC and Gate-drive loop return paths to COM<br />
from all other control circuit loops (The gate drive loop and VCC loop are the<br />
noisiest of all control circuit loops. Both carry high-frequency switching<br />
currents for turning the PFC switch on/off).<br />
• COM Rule 3: V COMP voltage is the control voltage for the feedback loop from<br />
which the oscillator of the IC is also derived. Hence the return path of the<br />
COMP loop is very important in IR1152. It is recommended to provide the<br />
COMP control loop with a dedicated return path to COM pin (as shown in<br />
Fig.18 in “Pin COMP” rules section next).<br />
• COM Rule 4: VFB, OVP & BOP control loops can share the same return path<br />
to COM.<br />
• COM Rule 5: The star connection point must be as close to the IC as<br />
physically possible.<br />
These rules are illustrated in Fig.17.<br />
AC Line<br />
Bridge<br />
- +<br />
AC Neutral<br />
L BST<br />
D BST<br />
R VFB1<br />
R OVP1<br />
C IN<br />
R BOP1<br />
C Z<br />
C VCC<br />
R VFB2<br />
R OVP2<br />
R BOP2<br />
C P R gm<br />
C BOP<br />
1<br />
2<br />
3<br />
4<br />
COM<br />
GATE 8<br />
COMP<br />
VCC 7<br />
ISNS<br />
VFB 6<br />
BOP<br />
OVP/EN 5<br />
R G<br />
M BST<br />
R VFB3<br />
R OVP3<br />
C OUT<br />
R BOP3<br />
C SF<br />
R SF<br />
IC COM, PFC switch SOURCE<br />
& RSNS Star Connection<br />
R SNS<br />
GND<br />
Fig.16: STAR-Connection for system ground, GND<br />
www.irf.com <strong>AN</strong>-<strong>1150</strong><br />
29
AC Line<br />
Bridge<br />
- +<br />
AC Neutral<br />
COMP Loop<br />
Return trace<br />
L BST<br />
VCC Loop<br />
Return trace<br />
D BST<br />
R VFB1<br />
R OVP1<br />
C IN<br />
R BOP1<br />
C Z<br />
C VCC<br />
R VFB2<br />
R OVP2<br />
STAR<br />
CONNECTION<br />
R BOP2<br />
R BOP3<br />
C SF<br />
C P R gm<br />
C BOP<br />
1<br />
8<br />
COM<br />
GATE<br />
2<br />
COMP<br />
VCC 7<br />
3<br />
6<br />
ISNS<br />
VFB<br />
4<br />
BOP<br />
OVP/EN 5<br />
VFB, OVP & BOP<br />
Loop Return trace<br />
R G<br />
M BST<br />
R VFB3<br />
R OVP3<br />
C OUT<br />
R SF<br />
Gate Loop<br />
Return trace<br />
R SNS<br />
GND<br />
Fig.17: 3 IC control loops with STAR connection to COM<br />
4.2 Pin COMP<br />
The COMP pin is the most important control pin in IR1152. V COMP voltage is the<br />
control voltage for the feedback loop from which the oscillator of the IC is also<br />
derived. It is very important to follow the 2 rules below to maintain a stable<br />
feedback loop and stable oscillator.<br />
COMP RULE 1: Place the C Z , C P & R gm components close to COMP pin.<br />
COMP RULE 2: Keep the compensation loop of IR1152 fully independent from<br />
all other control circuit loops (don’t share ground return race of COMP loop with<br />
other control loops)<br />
It is for these reasons that the COMP is located right next to the COM pin to<br />
facilitate easy, isolated routing of the COMP control loop. These rules are<br />
illustrated in Fig.18 below.<br />
C VCC<br />
C Z<br />
C P R gm<br />
C BOP<br />
1<br />
2<br />
3<br />
4<br />
COM<br />
GATE<br />
COMP<br />
VCC<br />
ISNS<br />
VFB<br />
BOP<br />
OVP/EN<br />
Fig. 18: Fully isolated COMP control loop<br />
www.irf.com <strong>AN</strong>-<strong>1150</strong><br />
30
4.3 Pin ISNS<br />
Current sensing is always tough in PFC converters, because the signal level is<br />
low while environment is noisy. Further, common mode currents tend to<br />
preferentially flow through the current sense line rather than the boost inductor<br />
line, because of the high-frequency impedance offered by the boost inductor. The<br />
ISNS pin also needs one-point connection to the negative side of current sense<br />
resistor through a current-limiting series resistor. If RC filtering is to be performed<br />
for VISNS, place the filter capacitor C SF close to the current sense resistor (rather<br />
than close to the IC) as shown Fig.19 in order to filter the noise at the source.<br />
R SF R BOP1<br />
R BOP2<br />
R BOP3<br />
C SF C Z<br />
C P R gm<br />
C BOP<br />
1<br />
C VCC<br />
COM<br />
GATE 8<br />
2<br />
COMP<br />
VCC 7<br />
3<br />
ISNS<br />
VFB 6<br />
4<br />
BOP<br />
OVP/EN 5<br />
RC filtering close to the<br />
current sense resistor<br />
R SNS<br />
GND<br />
Fig.19: ISNS connection with RC filter close to the RSNS resistor<br />
Use non-inductive resistor (metal strip or film type) for current sensing to avoid<br />
high di/dt transient noise. Do not use wirewound type resistor.<br />
4.4 Pins BOP, OVP/EN & VFB<br />
BOP pin will have a capacitor (100nF or so) tied between the pin & COM. So this<br />
pin is relatively noise immune. The OVP and VFB loops are very similar with<br />
option of using a stabilization capacitor of few hundred pF, if needed. These two<br />
pins will sense output voltage through resistor divider whose high side resistance<br />
is about 1-2Mohm & low side resistance is around few tens of kohm. This high<br />
impedance between these pins and COM makes them less immune to noise. So<br />
it is very important to route the VFB & OVP/EN traces & place the resistor divider<br />
components away from high dV/dt or high dI/dt power traces like Drain of<br />
MOSFET, Gate driver loop, current sense trace & boost inductor. As mentioned<br />
earlier, it is ok for VFB, OVP & BOP control loop return paths (to COM) to share<br />
the same trace, since the signals are near-DC on all these pins.<br />
Recall that OVP pin also performs enable function which must be protected from<br />
spurious trigger. Adding a small capacitor to OVP pin is recommended. The<br />
capacitance cannot be too high since it will affect OVP response time. Normally a<br />
50-100pF cap is good enough to reduce noise while not affecting OVP transient<br />
response.<br />
4.5 Pin VCC<br />
A 1uF V CC decoupling capacitor (ceramic SMT capacitor with low ESR) should be<br />
placed between VCC & COM pins as close as possible to the IC to minimize the<br />
www.irf.com <strong>AN</strong>-<strong>1150</strong><br />
31
loop inductance. The ideal location is right on top of the IC as shown in Fig.20.<br />
As long as this decoupling capacitor is placed close to the IC, the other bulk VCC<br />
capacitor (tens of uF, not shown in Fig.20) which is usually provided can be<br />
connected anywhere near the IC. Remember to separate the VCC loop return<br />
path (to COM) from the other control loops as it carries the high-frequency<br />
current supplying gate charge to drive the PFC switch.<br />
SMD capacitor placed<br />
C VCC very close to IC<br />
C Z<br />
R C G<br />
P 1<br />
COM<br />
GATE R 8<br />
gm 2<br />
COMP<br />
VCC 7<br />
3<br />
ISNS<br />
VFB 6<br />
4<br />
BOP<br />
OVP/EN 5<br />
Fig. 20: Vcc decoupling capacitor placed right on top of the IC with tight routing<br />
4.6 Pin Gate<br />
IR1152 GATE output can drive the PFC switch directly or be used with a gate<br />
drive buffer. Minimize the length of gate drive loop to reduce the parasitic<br />
inductance, that can limit the peak current otherwise place the gate drive buffer<br />
close to the switching MOSFETs to achieve fast switching. Also, it’s a good<br />
practice to choose a bigger gate turn-on resistor and slow down the turning-on<br />
speed of MOSFET in order to limit dI/dt & reverse recovery current peaks. Of<br />
course, the trade-off with turn-on switching losses must be considered.<br />
www.irf.com <strong>AN</strong>-<strong>1150</strong><br />
32