T A B L E O F C O N T E N T S - Panasonic Electric Works Europe AG
T A B L E O F C O N T E N T S - Panasonic Electric Works Europe AG
T A B L E O F C O N T E N T S - Panasonic Electric Works Europe AG

You also want an ePaper? Increase the reach of your titles
YUMPU automatically turns print PDFs into web optimized ePapers that Google loves.
Cautions For Use of the ND Series (22 dia.)<br />
Cautions For Use of the ND Series (22 dia.)<br />
Cautions For Use<br />
1. Mounting and removing the color<br />
cap and inscribed plate<br />
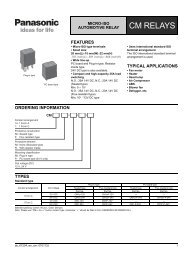
1) Removing the cap and plate<br />
(1) Insert a small screwdriver or similar<br />
tool into the grooved part of the color cap<br />
(the concave part of the flange), and twist<br />
it lightly to remove the operating parts<br />
(the color cap, inscribed plate and<br />
holder).<br />
Removing the operating parts<br />
(2) When the color cap has been<br />
removed from the holder, the inscribed<br />
plate can be removed. Remove the color<br />
cap by pushing from the back on the<br />
section that joins the color cap and the<br />
holder, in the direction of the color cap.<br />
Removing the color cap<br />
Note) The filter inside the holder is waterproof and<br />
cannot be removed.<br />
2) Mounting the cap and plate<br />
(1) Place the inscribed plate in the color<br />
cap, line it up with the section joining the<br />
color cap and the holder, and press them<br />
together. When doing this, if using the<br />
25.8 dia. type, make sure you align the<br />
whirl-stop projection on the inscribed<br />
plate with the grooved part of the holder<br />
before inserting the plate.<br />
(2) At this point, make sure the inscribed<br />
plate is facing the correct direction.<br />
3) When using the 25.8 dia. type<br />
2. Panel mounting<br />
Separate the operation block and switch<br />
block and attach the operation block to<br />
the panel hole from the front of the panel.<br />
Then mount the switch block.<br />
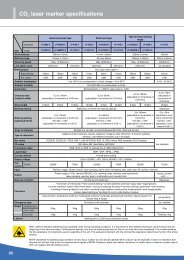
1) Mounting and removing the switch<br />
block<br />
(1) Move the lock lever of the switch block<br />
in the direction opposite the arrow to pull<br />
the switch block off of the operation block.<br />
(2) When mounting the switch block, align<br />
the TOP marks on the operation block<br />
and the switch block, and move the lever<br />
in the direction of the arrow to lock the<br />
switch block in place.<br />
TOP mark<br />
Lock lever<br />
Switch block<br />
Lock side<br />
TOP mark side<br />
Operation block<br />
2) Precautions when mounting the panel<br />
To tighten the ring when mounting the<br />
operation block panel, use the special<br />
tool (ring tightener, Part No. ACDL1801,<br />
sold separately), and tighten the ring to a<br />
torque of between 1.0 N·m and 1.2 N·m.<br />
Using radio pliers to tighten the ring, or<br />
tightening it beyond the required torque,<br />
can damage the ring, so be careful to<br />
tighten it correctly.<br />
3) Collective mounting<br />
The ND Series with a 22 dia. mounting<br />
hole can be installed and removed using<br />
a lock lever. The lock lever can be easily<br />
locked and released from the back side,<br />
using a screwdriver or similar tool. This<br />
enables collective mounting, and also<br />
makes it possible to remove any of the<br />
units.<br />
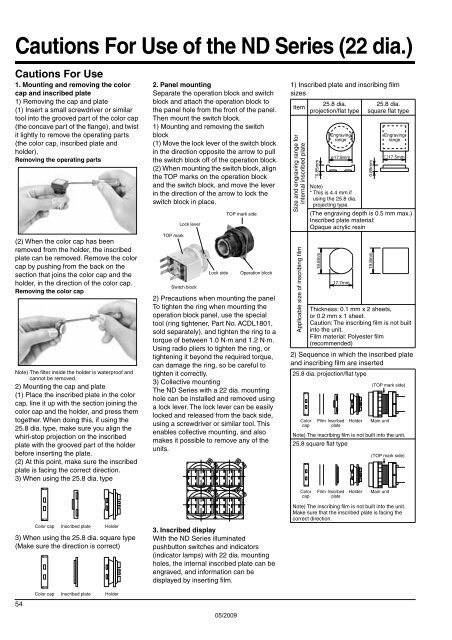
1) Inscribed plate and inscribing film<br />
sizes<br />
Item<br />
Size and engraving range for<br />
internal inscribed plate<br />
Applicable size of inscribing film<br />
25.8 dia.<br />
projection/flat type<br />
25.8 dia.<br />
square flat type<br />
2) Sequence in which the inscribed plate<br />
and inscribing film are inserted<br />
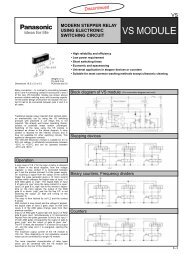
25.8 dia. projection/flat type<br />
Color<br />
cap<br />
*0.85mm<br />
Note)<br />
* This is 4.4 mm if<br />
using the 25.8 dia.<br />
projecting type.<br />
(The engraving depth is 0.5 mm max.)<br />
Inscribed plate material:<br />
Opaque acrylic resin<br />
19.8mm<br />
Thickness: 0.1 mm x 2 sheets,<br />
or 0.2 mm x 1 sheet.<br />
Caution: The inscribing film is not built<br />
into the unit.<br />
Film material: Polyester film<br />
(recommended)<br />
Film<br />
Engraving<br />
range<br />
ø17.8mm<br />
17.7mm<br />
Inscribed<br />
plate<br />
Holder<br />
0.85mm<br />
19.8mm<br />
Engraving<br />
range<br />
17.5mm<br />
(TOP mark side)<br />
Main unit<br />
Note) The inscribing film is not built into the unit.<br />
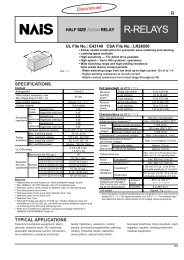
25.8 square flat type<br />
(TOP mark side)<br />
Color<br />
cap<br />
Film<br />
Inscribed<br />
plate<br />
Holder<br />
Main unit<br />
Color cap Inscribed plate Holder<br />
3) When using the 25.8 dia. square type<br />
(Make sure the direction is correct)<br />
3. Inscribed display<br />
With the ND Series illuminated<br />
pushbutton switches and indicators<br />
(indicator lamps) with 22 dia. mounting<br />
holes, the internal inscribed plate can be<br />
engraved, and information can be<br />
displayed by inserting film.<br />
Note) The inscribing film is not built into the unit.<br />
Make sure that the inscribed plate is facing the<br />
correct direction.<br />
54<br />
Color cap Inscribed plate Holder<br />
05/2009