W2-880 Tjd, Thd, Th - Repair - Wisconsin Motors
W2-880 Tjd, Thd, Th - Repair - Wisconsin Motors
W2-880 Tjd, Thd, Th - Repair - Wisconsin Motors

You also want an ePaper? Increase the reach of your titles
YUMPU automatically turns print PDFs into web optimized ePapers that Google loves.
Y-80 Series<br />
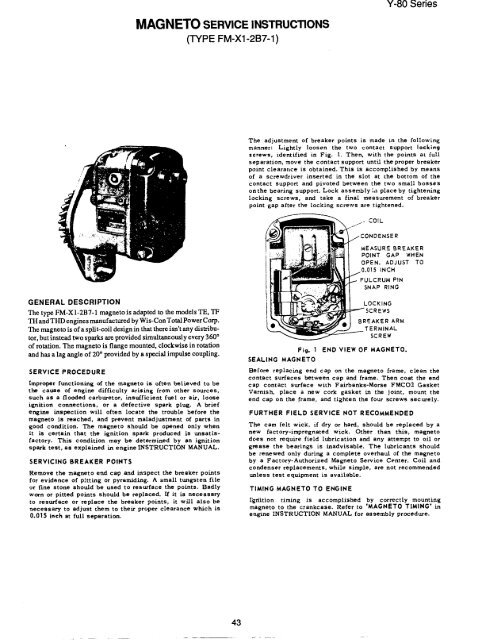
MAGNETO SERVICE INSTRUCTIONS<br />
(TYPE FM-X1-2B7-1)<br />
<strong>Th</strong>e adjustment of breaker points is made in the following<br />
manner: Lightly loosen the two contact support locking<br />
screws, identified in Fig. 1. <strong>Th</strong>en. with the points at full<br />
separation, move the contact support until the proper breaker<br />
point clearance is obtained. <strong>Th</strong>is is accomplished by means<br />
of a screwdriver inserted in the slot at the bottom of the<br />
contact support and pivoted between the two small bosses<br />
onthe bearing support. Lock assembly ’~,a place by tightening<br />
locking screws, and take a final measurement of breaker<br />
point gap after the locking screws are tightened.<br />
//j-<br />
COIL<br />
../CONDENSER<br />
MEASURE BREAKER<br />
POINT GAP WHEN<br />
OPEN. ADJUST TO<br />
j0.0’( 5 INCH<br />
~. FULCRUM PIN<br />
SNAP RING<br />
GENERAL DESCRIPTION<br />
<strong>Th</strong>e type FM-XI-2B7-1 magneto is adapted to the models TE, TF<br />
TH and THD engines manufactured by Wis-Con Total Power Corp.<br />
<strong>Th</strong>e magneto is of a split-coil design in that there isn’t any distributor,<br />
°<br />
but instead two sparks are provided simultaneously every 360<br />
of rotation. <strong>Th</strong>e magneto is flange mounted, clockwise in rotation<br />
and has a lag angle of 20 ° provided by a special impulse coupling.<br />
SERVICE<br />
PROCEDURE<br />
Improper functioning of the magneto is often believed to be<br />
the cause of engine difficulty arising from other sources,<br />
such as a flooded carburetor, insufficient fuel or air, loose<br />
ignition connections, or a defective spark plug. A brief<br />
engine inspection will often locate the trouble before the<br />
magneto is reached, and prevent maladjustment of parts in<br />
good condition. <strong>Th</strong>e magneto should be opened only when<br />
it is certain that the ignition spark produced is unsatisfactory.<br />
<strong>Th</strong>is condition may be determined by an ignition<br />
spark test, as explained in engine INSTRUCTION MANUAL.<br />
SERVICING BREAKER POINTS<br />
Remove the magneto end cap and inspect the breaker points<br />
for evidence of pitting or pyramiding. A small tungsten file<br />
or fine stone should be used to resurface the points. Badly<br />
worn or pitted points should be replaced. If it is necessary<br />
to restlrface or replace the breaker points, it will also be<br />
necessary to adjust them to their proper clearance which is<br />
0.015 inch at full separation,<br />
SEALING<br />
LOCKING<br />
==’"’SCREWS<br />
BREAKER ARM<br />
___.__TERMINAL<br />
SCREW<br />
Fig. I END VIEW OF MAGNETO.<br />
MAGNETO<br />
Before replacing end cap on the magneto frame, clean the<br />
contact surfaces between cap and frame. <strong>Th</strong>en coat the end<br />
cap contact surface with Fairbanks-Morse FMCO2 Gasket<br />
Varnish, place a new cork gasket in the joint, mount the<br />
end cap on the frame, and tighten the four screws securely.<br />
FURTHER FIELD SERVICE NOT RECOMMENDED<br />
<strong>Th</strong>e cam felt wick, if dry or hard, should be replaced by a<br />
new factory-impregnated wick. Other than this, magneto<br />
does not require field lubrication and any attempt to oil or<br />
grease the bearings is inadvisable. <strong>Th</strong>e lubricants should<br />
be renewed only during a comptete overhaul of the magneto<br />
by a Factory-Authorized Magneto Service Center. Coil and<br />
condenser replacements, while simple, are not recommended<br />
unless test equipment is avaitable.<br />
TIMING<br />
MAGNETO TO ENGINE<br />
I~dition timing is accomplished by correctly mounting<br />
magneto to the crankcase. Refer to ’MAGNETO TIMING’ in<br />
engine INSTRUCTION MANUAL for assembly procedure.<br />
43