MODEL NO: GPS NAVIGATION SYSTEM - Zenec
MODEL NO: GPS NAVIGATION SYSTEM - Zenec
MODEL NO: GPS NAVIGATION SYSTEM - Zenec

You also want an ePaper? Increase the reach of your titles
YUMPU automatically turns print PDFs into web optimized ePapers that Google loves.
3 Navigating with ZENEC Navigation Software<br />
You can set up your route in ZENEC Navigation Software in several ways:<br />
<br />
<br />
<br />
if you need a simple route (a route with only one destination, without any intermediate via<br />
points), you can select the destination and start navigating to it right away<br />
you can plan a multi-point route<br />
you can also plan a route independently of your current <strong>GPS</strong> position or even without <strong>GPS</strong><br />
reception<br />
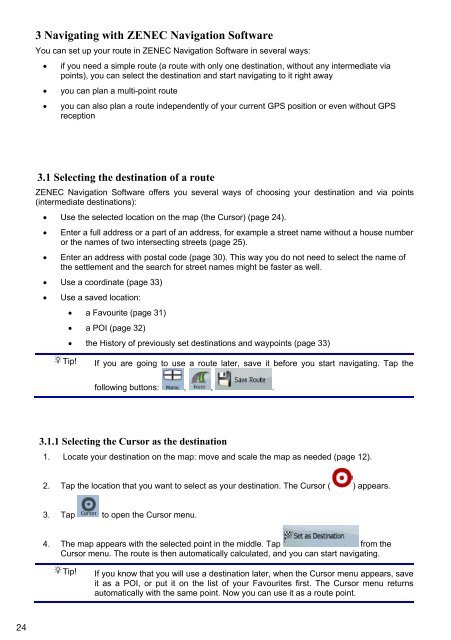
3.1 Selecting the destination of a route<br />
ZENEC Navigation Software offers you several ways of choosing your destination and via points<br />
(intermediate destinations):<br />
Use the selected location on the map (the Cursor) (page 24).<br />
<br />
<br />
Enter a full address or a part of an address, for example a street name without a house number<br />
or the names of two intersecting streets (page 25).<br />
Enter an address with postal code (page 30). This way you do not need to select the name of<br />
the settlement and the search for street names might be faster as well.<br />
Use a coordinate (page 33)<br />
<br />
Use a saved location:<br />
a Favourite (page 31)<br />
a POI (page 32)<br />
the History of previously set destinations and waypoints (page 33)<br />
Tip!<br />
If you are going to use a route later, save it before you start navigating. Tap the<br />
following buttons: , , .<br />
3.1.1 Selecting the Cursor as the destination<br />
1. Locate your destination on the map: move and scale the map as needed (page 12).<br />
2. Tap the location that you want to select as your destination. The Cursor ( ) appears.<br />
3. Tap to open the Cursor menu.<br />
4. The map appears with the selected point in the middle. Tap from the<br />
Cursor menu. The route is then automatically calculated, and you can start navigating.<br />
Tip!<br />
If you know that you will use a destination later, when the Cursor menu appears, save<br />
it as a POI, or put it on the list of your Favourites first. The Cursor menu returns<br />
automatically with the same point. Now you can use it as a route point.<br />
24