advanced drainage system - Polypipe
advanced drainage system - Polypipe
advanced drainage system - Polypipe

Create successful ePaper yourself
Turn your PDF publications into a flip-book with our unique Google optimized e-Paper software.
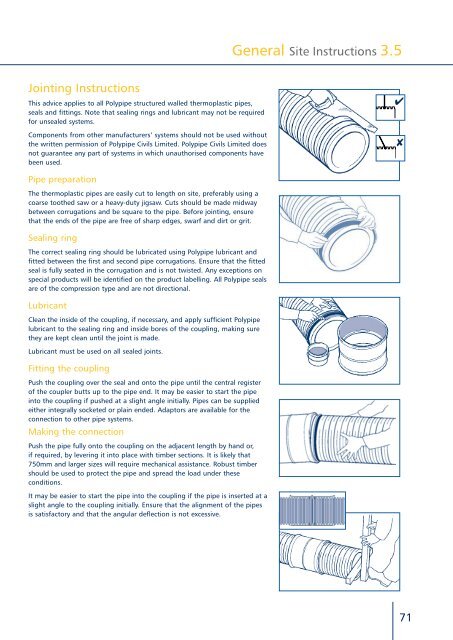
General Site Instructions 3.5<br />
Jointing Instructions<br />
This advice applies to all <strong>Polypipe</strong> structured walled thermoplastic pipes,<br />
seals and fittings. Note that sealing rings and lubricant may not be required<br />
for unsealed <strong>system</strong>s.<br />
Components from other manufacturers’ <strong>system</strong>s should not be used without<br />
the written permission of <strong>Polypipe</strong> Civils Limited. <strong>Polypipe</strong> Civils Limited does<br />
not guarantee any part of <strong>system</strong>s in which unauthorised components have<br />
been used.<br />
✔<br />
✘<br />
Pipe preparation<br />
The thermoplastic pipes are easily cut to length on site, preferably using a<br />
coarse toothed saw or a heavy-duty jigsaw. Cuts should be made midway<br />
between corrugations and be square to the pipe. Before jointing, ensure<br />
that the ends of the pipe are free of sharp edges, swarf and dirt or grit.<br />
Sealing ring<br />
The correct sealing ring should be lubricated using <strong>Polypipe</strong> lubricant and<br />
fitted between the first and second pipe corrugations. Ensure that the fitted<br />
seal is fully seated in the corrugation and is not twisted. Any exceptions on<br />
special products will be identified on the product labelling. All <strong>Polypipe</strong> seals<br />
are of the compression type and are not directional.<br />
Lubricant<br />
Clean the inside of the coupling, if necessary, and apply sufficient <strong>Polypipe</strong><br />
lubricant to the sealing ring and inside bores of the coupling, making sure<br />
they are kept clean until the joint is made.<br />
Lubricant must be used on all sealed joints.<br />
Fitting the coupling<br />
Push the coupling over the seal and onto the pipe until the central register<br />
of the coupler butts up to the pipe end. It may be easier to start the pipe<br />
into the coupling if pushed at a slight angle initially. Pipes can be supplied<br />
either integrally socketed or plain ended. Adaptors are available for the<br />
connection to other pipe <strong>system</strong>s.<br />
Making the connection<br />
Push the pipe fully onto the coupling on the adjacent length by hand or,<br />
if required, by levering it into place with timber sections. It is likely that<br />
750mm and larger sizes will require mechanical assistance. Robust timber<br />
should be used to protect the pipe and spread the load under these<br />
conditions.<br />
It may be easier to start the pipe into the coupling if the pipe is inserted at a<br />
slight angle to the coupling initially. Ensure that the alignment of the pipes<br />
is satisfactory and that the angular deflection is not excessive.<br />
71