You also want an ePaper? Increase the reach of your titles
YUMPU automatically turns print PDFs into web optimized ePapers that Google loves.
RTA: Average Mode<br />
Average Mode<br />
page 22<br />
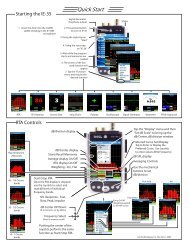
<strong>Ivie</strong> <strong>IE</strong>-<strong>33</strong> & <strong>IE</strong>-<strong>35</strong> <strong>Manual</strong><br />
The <strong>IE</strong>-<strong>33</strong> and <strong>IE</strong>-<strong>35</strong> Average Mode offer very powerful features that allow you to create continuous or triggered<br />
averages of various types, as well as select the type of average that best suits your measurement.<br />
Continuous Average Mode<br />
In the RTA mode, tap on the “Average-A” stylus button. The default condition for the stylus button below the<br />
Average button is “Cont.”, which indicates that you will be starting with a continuous average. When you tap the<br />
Average-A button, the button text changes to “Count = X," where "X" is the number of samples so far collected.<br />
You will see the sample number increment as the number of automatically collected data samples increases.<br />
A blue line will immediately form on the RTA screen, which is the graphic representation of the average that is<br />
being collected. The more samples collected, the slower this average display will change as short duration<br />
acoustic events are encountered.<br />
In Continuous Mode, the data sample collection can be paused by tapping Pause/Resume stylus button, or by<br />
pressing the mechanical Thumb Button on the side of the iPAQ or Axim. Tapping the stylus button again, or<br />
pressing the Thumb Button again, continues the sample taking process.<br />
You may switch the screen presentation between 1/1, 1/3, 1/6 octave and Max Res at any time during an<br />
Average measurement. However, doing so will reset the data sample counter to zero and start the averaging<br />
process over again.<br />
Triggered Average Mode<br />
Tapping the “Cont.” stylus button will switch it to “Trigger.” In this mode, data samples for averaging are taken<br />
only when the user manually triggers a sample. Triggering a sample can be done by tapping the “Add” stylus<br />
button, or by using the mechanical Thumb Button on the side of the iPAQ or Axim. Each time a data sample is<br />
added by triggering a sample, the sample count on the Average button will increment by one.<br />
You can manually clear an Average Curve and reset the data sample counter to zero at any time by tapping the<br />
“Clear” button. To exit the Average mode tap the “Count-X” stylus button.<br />
Average Type Selection: The <strong>IE</strong>-<strong>33</strong> and <strong>IE</strong>-<strong>35</strong> Average Mode offer the power of two types of averaging. The<br />
Arithmetic Average (Average-A) does straight arithmetic averaging. This type of average is probably best when<br />
you are viewing the RTA screen while doing active equalization or other dynamic spectral adjustments. The<br />
user may switch the averaging mode to “Power Average (Average-P), which is probably most useful in measurements<br />
where the total power is more important for measurements such as transmission loss, or noise isolation.<br />
Switching from Average-A to Average-P is done by tapping the "File" pop-up menu. Select "Preferences" next,<br />
and from that pop-up menu, select either Power Average or Arithmetic Average.<br />
Viewing an Average Curve: While the average is being taken, the blue average line is seen in the RTA screen.<br />
To see this line more clearly, you can temporarily remove the real-time data from the display. This is done by<br />
tapping the green “R” button immediately below the RTA display (see figure on the opposite page). Don’t forget<br />
to turn the real-time display back on when you’re done . . . It’ll save you a call to <strong>Ivie</strong> Tech Support!<br />
Storing and Loading an Average Curve: When an Average Curve is displayed on the RTA screen, it is what<br />
will be stored when you choose to store a curve. With this in mind, an Average Curve is stored in the same way<br />
any other spectrum is stored. Simply select an empty scratch memory location (red stylus buttons indicate<br />
empty memory locations) and tap it. The Memory Manager ("Memory" stylus button) allows the storing of any<br />
scratch memory. Similarly, stored curves can be loaded into any standard scratch memory location by opening<br />
the Memory Manager and selecting “Load” for any of the scratch memory locations.