
Create successful ePaper yourself
Turn your PDF publications into a flip-book with our unique Google optimized e-Paper software.
Sound Pressure Level (SPL) Monitor<br />
Making SPL Measurements<br />
page 28<br />
<strong>Ivie</strong> <strong>IE</strong>-<strong>33</strong> & <strong>IE</strong>-<strong>35</strong> <strong>Manual</strong><br />
An <strong>IE</strong>-<strong>33</strong>, or <strong>IE</strong><strong>35</strong>, as shown on the opposite page, can make all the SPL measurements required by U.S. and<br />
international standards, including A, C and unweighted SPL measurements. In addition to weighting, various<br />
detectors, again specified by U.S. and international standard, can be selected for SPL measurement. These<br />
detectors include Fast, Slow, Peak and Impulse. The Fast and Slow detectors are true RMS with different averaging<br />
times. Peak is a true peak detector, and quite fast. Impulse is a combination of an extremely fast peak<br />
detector, followed by an RMS buffer and is intended for measurement of extremely short duration phenomena.<br />
The Slow detector, in combination with A weighting, is normally used for making sound level measurements<br />
related to noise associated with hearing damage. OSHA and other regulatory SPL measurements are normally<br />
written around A weighted, Slow. It has been determined that high A weighted sound levels are more damaging<br />
to human hearing than C or unweighted levels.<br />
System Calibration for OSHA Measurements<br />
OSHA measurements generally require equipment that meets minimum specification standards - at least an<br />
ANSI Type II sound level meter, for example. The <strong>IE</strong>-<strong>33</strong>, or <strong>IE</strong>-<strong>35</strong>, with its supplied <strong>IE</strong>-<strong>33</strong>M, or <strong>IE</strong>-<strong>35</strong>M microphone,<br />
is a Type II sound level meter, and therefore satisfies OSHA minimum requirements. The electronics of<br />
the <strong>IE</strong>-<strong>33</strong> and <strong>IE</strong>-<strong>35</strong> meet Type I specifications, however. With the addition of an optional Type I microphone<br />
and preamplifier, both the <strong>IE</strong>-<strong>33</strong> and the <strong>IE</strong>-<strong>35</strong> become Type I measurement systems.<br />
In addition to the equipment meeting minimum specification standards, it must also be properly calibrated in<br />
order for an acceptable OSHA measurement to be made. What this normally requires is calibration prior to the<br />
measurement, and then a recheck of calibration after the measurement is made. In the case of SPL measurements,<br />
a calibration device (either a pistonphone or an acoustic calibrator) must be used. The standard <strong>IE</strong>-<strong>33</strong>M<br />
and <strong>IE</strong>-<strong>35</strong>M microphones are 8mm diameter, electret condenser microphones. Either can be calibrated with<br />
any quality calibration device that will accept a 8mm adapter. Most calibrators have a larger diameter opening<br />
to accommodate microphones up to one inch or slightly larger in diameter, and have plug-in adapters to reduce<br />
the opening size for smaller microphones. The <strong>Ivie</strong> Type I microphones, along with many other international<br />
standard air condenser microphones, are 1/2 inch in diameter and require the use of a 1/2 inch adapter when<br />
calibrating. With either <strong>Ivie</strong> microphone, the same calibration process applies. It is important that the microphone<br />
fit snugly inside the adapter to assure accurate readings during calibration.<br />
For complete information on calibration, see Appendix II of this manual dealing with this subject.<br />
Sound Pressure Level (SPL) Monitor<br />
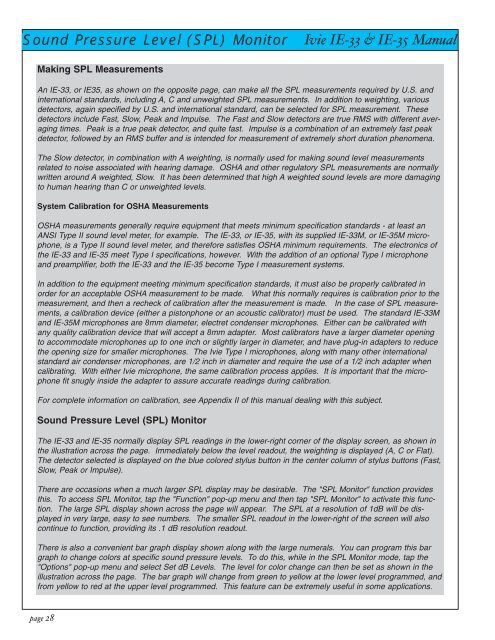
The <strong>IE</strong>-<strong>33</strong> and <strong>IE</strong>-<strong>35</strong> normally display SPL readings in the lower-right corner of the display screen, as shown in<br />
the illustration across the page. Immediately below the level readout, the weighting is displayed (A, C or Flat).<br />
The detector selected is displayed on the blue colored stylus button in the center column of stylus buttons (Fast,<br />
Slow, Peak or Impulse).<br />
There are occasions when a much larger SPL display may be desirable. The "SPL Monitor" function provides<br />
this. To access SPL Monitor, tap the "Function" pop-up menu and then tap "SPL Monitor" to activate this function.<br />
The large SPL display shown across the page will appear. The SPL at a resolution of 1dB will be displayed<br />
in very large, easy to see numbers. The smaller SPL readout in the lower-right of the screen will also<br />
continue to function, providing its .1 dB resolution readout.<br />
There is also a convenient bar graph display shown along with the large numerals. You can program this bar<br />
graph to change colors at specific sound pressure levels. To do this, while in the SPL Monitor mode, tap the<br />
"Options" pop-up menu and select Set dB Levels. The level for color change can then be set as shown in the<br />
illustration across the page. The bar graph will change from green to yellow at the lower level programmed, and<br />
from yellow to red at the upper level programmed. This feature can be extremely useful in some applications.