Lab 2.5.1: Basic PPP Configuration Lab
Lab 2.5.1: Basic PPP Configuration Lab
Lab 2.5.1: Basic PPP Configuration Lab

You also want an ePaper? Increase the reach of your titles
YUMPU automatically turns print PDFs into web optimized ePapers that Google loves.
CCNA Exploration<br />
Accessing the WAN: ACLs<br />
<strong>Lab</strong> 5.5.1 <strong>Basic</strong> Access Control Lists<br />
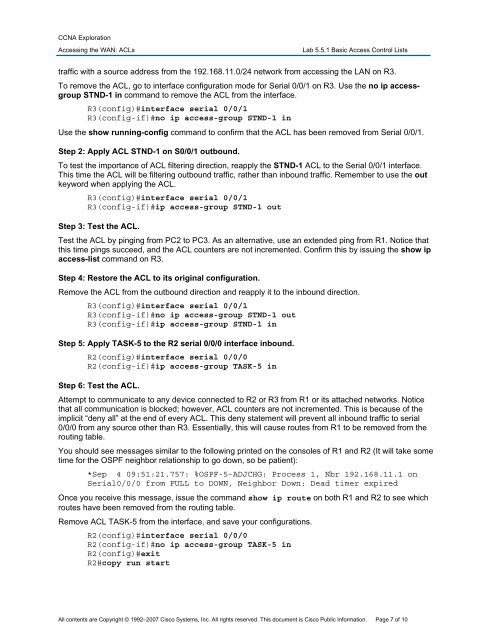
traffic with a source address from the 192.168.11.0/24 network from accessing the LAN on R3.<br />
To remove the ACL, go to interface configuration mode for Serial 0/0/1 on R3. Use the no ip accessgroup<br />
STND-1 in command to remove the ACL from the interface.<br />
R3(config)#interface serial 0/0/1<br />
R3(config-if)#no ip access-group STND-1 in<br />
Use the show running-config command to confirm that the ACL has been removed from Serial 0/0/1.<br />
Step 2: Apply ACL STND-1 on S0/0/1 outbound.<br />
To test the importance of ACL filtering direction, reapply the STND-1 ACL to the Serial 0/0/1 interface.<br />
This time the ACL will be filtering outbound traffic, rather than inbound traffic. Remember to use the out<br />
keyword when applying the ACL.<br />
R3(config)#interface serial 0/0/1<br />
R3(config-if)#ip access-group STND-1 out<br />
Step 3: Test the ACL.<br />
Test the ACL by pinging from PC2 to PC3. As an alternative, use an extended ping from R1. Notice that<br />
this time pings succeed, and the ACL counters are not incremented. Confirm this by issuing the show ip<br />
access-list command on R3.<br />
Step 4: Restore the ACL to its original configuration.<br />
Remove the ACL from the outbound direction and reapply it to the inbound direction.<br />
R3(config)#interface serial 0/0/1<br />
R3(config-if)#no ip access-group STND-1 out<br />
R3(config-if)#ip access-group STND-1 in<br />
Step 5: Apply TASK-5 to the R2 serial 0/0/0 interface inbound.<br />
R2(config)#interface serial 0/0/0<br />
R2(config-if)#ip access-group TASK-5 in<br />
Step 6: Test the ACL.<br />
Attempt to communicate to any device connected to R2 or R3 from R1 or its attached networks. Notice<br />
that all communication is blocked; however, ACL counters are not incremented. This is because of the<br />
implicit “deny all” at the end of every ACL. This deny statement will prevent all inbound traffic to serial<br />
0/0/0 from any source other than R3. Essentially, this will cause routes from R1 to be removed from the<br />
routing table.<br />
You should see messages similar to the following printed on the consoles of R1 and R2 (It will take some<br />
time for the OSPF neighbor relationship to go down, so be patient):<br />
*Sep 4 09:51:21.757: %OSPF-5-ADJCHG: Process 1, Nbr 192.168.11.1 on<br />
Serial0/0/0 from FULL to DOWN, Neighbor Down: Dead timer expired<br />
Once you receive this message, issue the command show ip route on both R1 and R2 to see which<br />
routes have been removed from the routing table.<br />
Remove ACL TASK-5 from the interface, and save your configurations.<br />
R2(config)#interface serial 0/0/0<br />
R2(config-if)#<br />
no ip access-group TASK-5 in<br />
R2(config)#exit<br />
R2#copy run start<br />
All contents are Copyright © 1992–2007 Cisco Systems, Inc. All rights reserved. This document is Cisco Public Information. Page 7 of 10