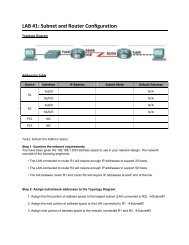
Lab 2.5.1: Basic PPP Configuration Lab
Lab 2.5.1: Basic PPP Configuration Lab
Lab 2.5.1: Basic PPP Configuration Lab

You also want an ePaper? Increase the reach of your titles
YUMPU automatically turns print PDFs into web optimized ePapers that Google loves.
CCNA Exploration<br />
Accessing the WAN: IP Addressing Services<br />
<strong>Lab</strong> 7.4.1: <strong>Basic</strong> DHCP and NAT <strong>Configuration</strong><br />
*Sep 13 21:15:02.275: NAT*: s=192.168.10.11->209.165.200.241, d=209.165.200.226 [27]<br />
*Sep 13 21:15:02.291: NAT*: s=209.165.200.226, d=209.165.200.241->192.168.10.11 [27]<br />
*Sep 13 21:15:02.307: NAT*: s=192.168.10.11->209.165.200.241, d=209.165.200.226 [28]<br />
*Sep 13 21:15:02.323: NAT*: s=209.165.200.226, d=209.165.200.241->192.168.10.11 [28]<br />
*Sep 13 21:15:02.335: NAT*: s=192.168.10.11->209.165.200.241, d=209.165.200.226 [29]<br />
*Sep 13 21:15:02.351: NAT*: s=209.165.200.226, d=209.165.200.241->192.168.10.11 [29]<br />
R2#<br />
Task 8: Configure NAT Overload<br />
In the previous example, what would happen if you needed more than the six public IP addresses that the<br />
pool allows<br />
__________________________________________________________________________________<br />
By tracking port numbers, NAT overloading allows multiple inside users to reuse a public IP address.<br />
In this task, you will remove the pool and mapping statement configured in the previous task. Then you<br />
will configure NAT overload on R2 so that all internal IP addresses are translated to the R2 S0/0/1<br />
address when connecting to any outside device.<br />
Step 1: Remove the NAT pool and mapping statement.<br />
Use the following commands to remove the NAT pool and the map to the NAT ACL.<br />
R2(config)#no ip nat inside source list NAT pool MY-NAT-POOL<br />
R2(config)#no ip nat pool MY-NAT-POOL 209.165.200.241 209.165.200.246 netmask<br />
255.255.255.248<br />
If you receive the following message, clear your NAT translations.<br />
%Pool MY-NAT-POOL in use, cannot destroy<br />
R2#clear ip nat translation *<br />
Step 2: Configure PAT on R2 using the serial 0/0/1 interface public IP address.<br />
The configuration is similar to dynamic NAT, except that instead of a pool of addresses, the interface<br />
keyword is used to identify the outside IP address. Therefore, no NAT pool is defined. The overload<br />
keyword enables the addition of the port number to the translation.<br />
Because you already configured an ACL to identify which inside IP addresses to translate as well as<br />
which interfaces are inside and outside, you only need to configure the following:<br />
R2(config)#ip nat inside source list NAT interface S0/0/1 overload<br />
Step 3: Verify the configuration.<br />
Ping ISP from PC1 or the Fast Ethernet interface on R1 using extended ping. Then use the show ip nat<br />
translations and show ip nat statistics commands on R2 to verify NAT.<br />
R2#show ip nat translations<br />
Pro Inside global Inside local Outside local Outside global<br />
icmp 209.165.200.225:6 192.168.10.11:6 209.165.200.226:6 209.165.200.226:6<br />
--- 209.165.200.254 192.168.20.254 --- ---<br />
R2#show ip nat statistics<br />
Total active translations: 2 (1 static, 1 dynamic; 1 extended)<br />
Outside interfaces:<br />
Serial0/0/1<br />
Inside interfaces:<br />
All contents are Copyright © 1992–2007 Cisco Systems, Inc. All rights reserved. This document is Cisco Public Information. Page 9 of 13