0870 849 8057 USERS G 24, 30 - Ideal Heating
0870 849 8057 USERS G 24, 30 - Ideal Heating
0870 849 8057 USERS G 24, 30 - Ideal Heating

Create successful ePaper yourself
Turn your PDF publications into a flip-book with our unique Google optimized e-Paper software.
FLUE OUTLET<br />
26<br />
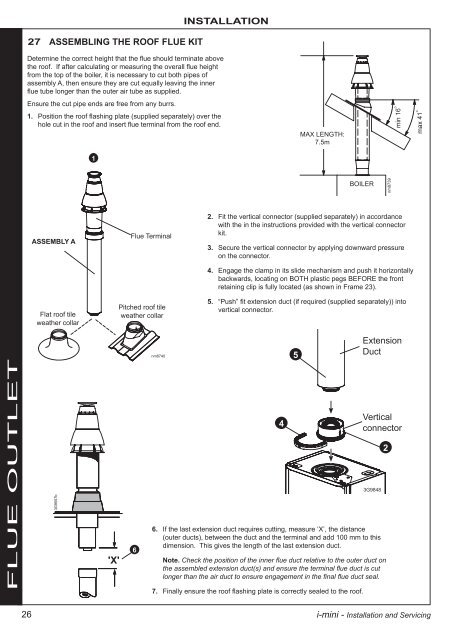
27 assEMBLINg ThE ROOF FLUE KIT<br />
Determine the correct height that the flue should terminate above<br />
the roof. If after calculating or measuring the overall flue height<br />
from the top of the boiler, it is necessary to cut both pipes of<br />
assembly A, then ensure they are cut equally leaving the inner<br />
flue tube longer than the outer air tube as supplied.<br />
Ensure the cut pipe ends are free from any burrs.<br />
1. Position the roof flashing plate (supplied separately) over the<br />
hole cut in the roof and insert flue terminal from the roof end.<br />
assEMBLy a<br />
Flat roof tile<br />
weather collar<br />
3G9557b<br />
1<br />
'X'<br />
Flue Terminal<br />
Pitched roof tile<br />
weather collar<br />
6<br />
nm8740<br />
INsTaLLaTION<br />
4<br />
5<br />
MAX LENGTH:<br />
7.5m<br />
BOILER<br />
2. Fit the vertical connector (supplied separately) in accordance<br />
with the in the instructions provided with the vertical connector<br />
kit.<br />
3. Secure the vertical connector by applying downward pressure<br />
on the connector.<br />
4. Engage the clamp in its slide mechanism and push it horizontally<br />
backwards, locating on BOTH plastic pegs BEFORE the front<br />
retaining clip is fully located (as shown in Frame 23).<br />
5. “Push” fit extension duct (if required (supplied separately)) into<br />
vertical connector.<br />
Extension<br />
Duct<br />
Vertical<br />
connector<br />
3G9848<br />
6. If the last extension duct requires cutting, measure ‘x’, the distance<br />
(outer ducts), between the duct and the terminal and add 100 mm to this<br />
dimension. This gives the length of the last extension duct.<br />
Note. Check the position of the inner flue duct relative to the outer duct on<br />
the assembled extension duct(s) and ensure the terminal flue duct is cut<br />
longer than the air duct to ensure engagement in the final flue duct seal.<br />
7. Finally ensure the roof flashing plate is correctly sealed to the roof.<br />
i-mini - Installation and Servicing<br />
2<br />
nm8739<br />
min 16 o<br />
max 41 o