0870 849 8057 USERS G 24, 30 - Ideal Heating
0870 849 8057 USERS G 24, 30 - Ideal Heating
0870 849 8057 USERS G 24, 30 - Ideal Heating

Create successful ePaper yourself
Turn your PDF publications into a flip-book with our unique Google optimized e-Paper software.
sERVICINg<br />
50<br />
sERVICINg<br />
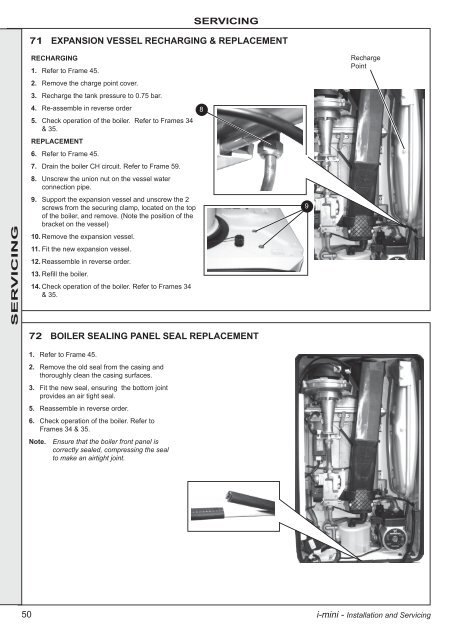
71 ExpaNsION VEssEL REChaRgINg & REpLaCEMENT<br />
REChaRgINg<br />
1. Refer to Frame 45.<br />
2. Remove the charge point cover.<br />
3. Recharge the tank pressure to 0.75 bar.<br />
4. Re-assemble in reverse order<br />
5. Check operation of the boiler. Refer to Frames 34<br />
& 35.<br />
REpLaCEMENT<br />
6. Refer to Frame 45.<br />
7. Drain the boiler CH circuit. Refer to Frame 59.<br />
8. Unscrew the union nut on the vessel water<br />
connection pipe.<br />
9. Support the expansion vessel and unscrew the 2<br />
screws from the securing clamp, located on the top<br />
of the boiler, and remove. (Note the position of the<br />
bracket on the vessel)<br />
10. Remove the expansion vessel.<br />
11. Fit the new expansion vessel.<br />
12. Reassemble in reverse order.<br />
13. Refill the boiler.<br />
14. Check operation of the boiler. Refer to Frames 34<br />
& 35.<br />
72 BOILER sEaLINg paNEL sEaL REpLaCEMENT<br />
1. Refer to Frame 45.<br />
2. Remove the old seal from the casing and<br />
thoroughly clean the casing surfaces.<br />
3. Fit the new seal, ensuring the bottom joint<br />
provides an air tight seal.<br />
5. Reassemble in reverse order.<br />
6. Check operation of the boiler. Refer to<br />
Frames 34 & 35.<br />
Note. Ensure that the boiler front panel is<br />
correctly sealed, compressing the seal<br />
to make an airtight joint.<br />
8<br />
9<br />
Recharge<br />
Point<br />
i-mini - Installation and Servicing