0870 849 8057 USERS G 24, 30 - Ideal Heating
0870 849 8057 USERS G 24, 30 - Ideal Heating
0870 849 8057 USERS G 24, 30 - Ideal Heating

You also want an ePaper? Increase the reach of your titles
YUMPU automatically turns print PDFs into web optimized ePapers that Google loves.
sERVICINg<br />
40<br />
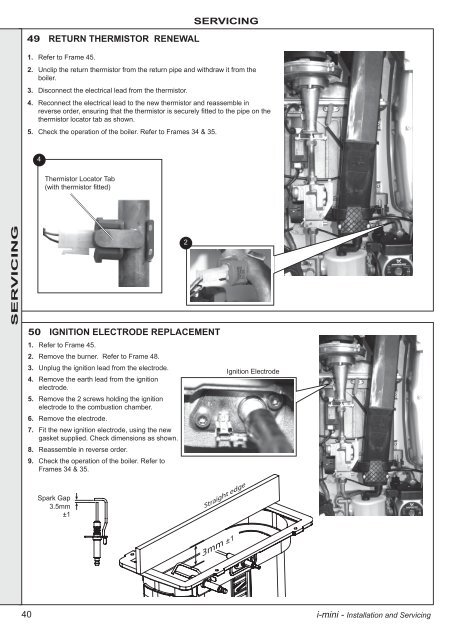
49 RETURN ThERMIsTOR RENEWaL<br />
50 IgNITION ELECTRODE REpLaCEMENT<br />
1. Refer to Frame 45.<br />
2. Remove the burner. Refer to Frame 48.<br />
3. Unplug the ignition lead from the electrode.<br />
4. Remove the earth lead from the ignition<br />
electrode.<br />
5. Remove the 2 screws holding the ignition<br />
electrode to the combustion chamber.<br />
6. Remove the electrode.<br />
7. Fit the new ignition electrode, using the new<br />
gasket supplied. Check dimensions as shown.<br />
8. Reassemble in reverse order.<br />
9. Check the operation of the boiler. Refer to<br />
Frames 34 & 35.<br />
sERVICINg<br />
1. Refer to Frame 45.<br />
2. Unclip the return thermistor from the return pipe and withdraw it from the<br />
boiler.<br />
3. Disconnect the electrical lead from the thermistor.<br />
4. Reconnect the electrical lead to the new thermistor and reassemble in<br />
reverse order, ensuring that the thermistor is securely fitted to the pipe on the<br />
thermistor locator tab as shown.<br />
5. Check the operation of the boiler. Refer to Frames 34 & 35.<br />
4<br />
Thermistor Locator Tab<br />
(with thermistor fitted)<br />
Spark Gap<br />
3.5mm<br />
2<br />
Straight edge<br />
3mm<br />
Ignition Electrode<br />
i-mini - Installation and Servicing