AVR 255/AVR 355 Audio/VideoReceiver - Harman Kardon
AVR 255/AVR 355 Audio/VideoReceiver - Harman Kardon
AVR 255/AVR 355 Audio/VideoReceiver - Harman Kardon

You also want an ePaper? Increase the reach of your titles
YUMPU automatically turns print PDFs into web optimized ePapers that Google loves.
<strong>Audio</strong> Effects<br />
Advanced Features<br />
Color: This control adjusts the hue of the colors<br />
in the picture, and may be set between 0 and<br />
100. Select a setting in which people and<br />
objects on screen look natural. There is no<br />
“recommended” setting, and no harm in<br />
experimenting.<br />
Sharpness: You may adjust the Sharpness<br />
setting from 0 to 100. We recommend leaving<br />
this setting as low as possible, as contrary to<br />
what you might expect, a less sharp image can<br />
appear clearer on screen. In addition, increasing<br />
the Sharpness requires additional video<br />
processing, which may lead to loss of sync with<br />
the audio or visual artifacts. However, there is no<br />
harm in experimenting with this setting.<br />
<strong>Audio</strong> Effects<br />
Depending on the specific characteristics of your<br />
listening room, you may wish to adjust some of<br />
the audio settings, such as tone controls, to<br />
improve performance. Access these settings from<br />
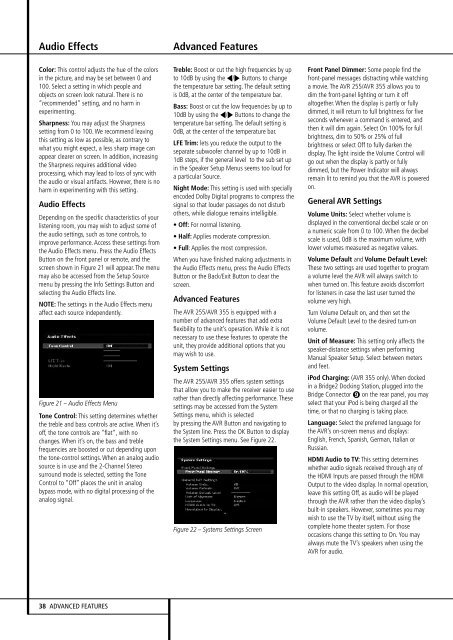
the <strong>Audio</strong> Effects menu. Press the <strong>Audio</strong> Effects<br />
Button on the front panel or remote, and the<br />
screen shown in Figure 21 will appear. The menu<br />
may also be accessed from the Setup Source<br />
menu by pressing the Info Settings Button and<br />
selecting the <strong>Audio</strong> Effects line.<br />
NOTE: The settings in the <strong>Audio</strong> Effects menu<br />
affect each source independently.<br />
Figure 21 – <strong>Audio</strong> Effects Menu<br />
Tone Control: This setting determines whether<br />
the treble and bass controls are active. When it’s<br />
off, the tone controls are “flat”, with no<br />
changes. When it’s on, the bass and treble<br />
frequencies are boosted or cut depending upon<br />
the tone-control settings. When an analog audio<br />
source is in use and the 2-Channel Stereo<br />
surround mode is selected, setting the Tone<br />
Control to “Off” places the unit in analog<br />
bypass mode, with no digital processing of the<br />
analog signal.<br />
Treble: Boost or cut the high frequencies by up<br />
to 10dB by using the M/N Buttons to change<br />
the temperature bar setting. The default setting<br />
is 0dB, at the center of the temperature bar.<br />
Bass: Boost or cut the low frequencies by up to<br />
10dB by using the M/N Buttons to change the<br />
temperature bar setting. The default setting is<br />
0dB, at the center of the temperature bar.<br />
LFE Trim: lets you reduce the output to the<br />
separate subwoofer channel by up to 10dB in<br />
1dB steps, if the general level to the sub set up<br />
in the Speaker Setup Menus seems too loud for<br />
a particular Source.<br />
Night Mode: This setting is used with specially<br />
encoded Dolby Digital programs to compress the<br />
signal so that louder passages do not disturb<br />
others, while dialogue remains intelligible.<br />
• Off: For normal listening.<br />
• Half: Applies moderate compression.<br />
• Full: Applies the most compression.<br />
When you have finished making adjustments in<br />
the <strong>Audio</strong> Effects menu, press the <strong>Audio</strong> Effects<br />
Button or the Back/Exit Button to clear the<br />
screen.<br />
Advanced Features<br />
The <strong>AVR</strong> <strong>255</strong>/<strong>AVR</strong> <strong>355</strong> is equipped with a<br />
number of advanced features that add extra<br />
flexibility to the unit’s operation. While it is not<br />
necessary to use these features to operate the<br />
unit, they provide additional options that you<br />
may wish to use.<br />
System Settings<br />
The <strong>AVR</strong> <strong>255</strong>/<strong>AVR</strong> <strong>355</strong> offers system settings<br />
that allow you to make the receiver easier to use<br />
rather than directly affecting performance. These<br />
settings may be accessed from the System<br />
Settings menu, which is selected<br />
by pressing the <strong>AVR</strong> Button and navigating to<br />
the System line. Press the OK Button to display<br />
the System Settings menu. See Figure 22.<br />
Figure 22 – Systems Settings Screen<br />
Front Panel Dimmer: Some people find the<br />
front-panel messages distracting while watching<br />
a movie. The <strong>AVR</strong> <strong>255</strong>/<strong>AVR</strong> <strong>355</strong> allows you to<br />
dim the front-panel lighting or turn it off<br />
altogether. When the display is partly or fully<br />
dimmed, it will return to full brightness for five<br />
seconds whenever a command is entered, and<br />
then it will dim again. Select On 100% for full<br />
brightness, dim to 50% or 25% of full<br />
brightness or select Off to fully darken the<br />
display. The light inside the Volume Control will<br />
go out when the display is partly or fully<br />
dimmed, but the Power Indicator will always<br />
remain lit to remind you that the <strong>AVR</strong> is powered<br />
on.<br />
General <strong>AVR</strong> Settings<br />
Volume Units: Select whether volume is<br />
displayed in the conventional decibel scale or on<br />
a numeric scale from 0 to 100. When the decibel<br />
scale is used, 0dB is the maximum volume, with<br />
lower volumes measured as negative values.<br />
Volume Default and Volume Default Level:<br />
These two settings are used together to program<br />
a volume level the <strong>AVR</strong> will always switch to<br />
when turned on. This feature avoids discomfort<br />
for listeners in case the last user turned the<br />
volume very high.<br />
Turn Volume Default on, and then set the<br />
Volume Default Level to the desired turn-on<br />
volume.<br />
Unit of Measure: This setting only affects the<br />
speaker-distance settings when performing<br />
Manual Speaker Setup. Select between meters<br />
and feet.<br />
iPod Charging: (<strong>AVR</strong> <strong>355</strong> only). When docked<br />
in a Bridge2 Docking Station, plugged into the<br />
Bridge Connector on the rear panel, you may<br />
select that your iPod is being charged all the<br />
time, or that no charging is taking place.<br />
Language: Select the preferred language for<br />
the <strong>AVR</strong>’s on-screen menus and displays:<br />
English, French, Spanish, German, Italian or<br />
Russian.<br />
HDMI <strong>Audio</strong> to TV: This setting determines<br />
whether audio signals received through any of<br />
the HDMI Inputs are passed through the HDMI<br />
Output to the video display. In normal operation,<br />
leave this setting Off, as audio will be played<br />
through the <strong>AVR</strong> rather than the video display’s<br />
built-in speakers. However, sometimes you may<br />
wish to use the TV by itself, without using the<br />
complete home theater system. For those<br />
occasions change this setting to On. You may<br />
always mute the TV’s speakers when using the<br />
<strong>AVR</strong> for audio.<br />
38 ADVANCED FEATURES