H.264 4/8/16-Channel DVR User Manual - Security Cameras Direct
H.264 4/8/16-Channel DVR User Manual - Security Cameras Direct
H.264 4/8/16-Channel DVR User Manual - Security Cameras Direct

You also want an ePaper? Increase the reach of your titles
YUMPU automatically turns print PDFs into web optimized ePapers that Google loves.
SECTION 2: HARDWARE OVERVIEW AND SETUP<br />
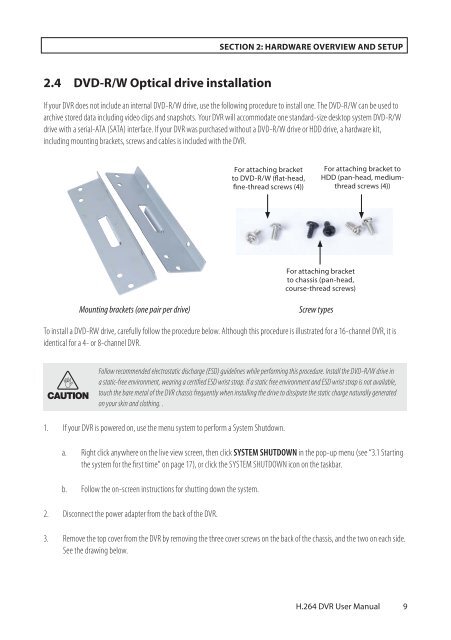
2.4 DVD-R/W Optical drive installation<br />
If your <strong>DVR</strong> does not include an internal DVD-R/W drive, use the following procedure to install one. The DVD-R/W can be used to<br />
archive stored data including video clips and snapshots. Your <strong>DVR</strong> will accommodate one standard-size desktop system DVD-R/W<br />
drive with a serial-ATA (SATA) interface. If your <strong>DVR</strong> was purchased without a DVD-R/W drive or HDD drive, a hardware kit,<br />
including mounting brackets, screws and cables is included with the <strong>DVR</strong>.<br />
For attaching bracket<br />
to DVD-R/W (flat-head,<br />
fine-thread screws (4))<br />
For attaching bracket to<br />
HDD (pan-head, mediumthread<br />
screws (4))<br />
For attaching bracket<br />
to chassis (pan-head,<br />
course-thread screws)<br />
Mounting brackets (one pair per drive)<br />
Screw types<br />
To install a DVD-RW drive, carefully follow the procedure below. Although this procedure is illustrated for a <strong>16</strong>-channel <strong>DVR</strong>, it is<br />
identical for a 4- or 8-channel <strong>DVR</strong>.<br />
<br />
CAUTION<br />
Follow recommended electrostatic discharge (ESD) guidelines while performing this procedure. Install the DVD-R/W drive in<br />
a static-free environment, wearing a certified ESD wrist strap. If a static free environment and ESD wrist strap is not available,<br />
touch the bare metal of the <strong>DVR</strong> chassis frequently when installing the drive to dissipate the static charge naturally generated<br />
on your skin and clothing. .<br />
1. If your <strong>DVR</strong> is powered on, use the menu system to perform a System Shutdown.<br />
a. Right click anywhere on the live view screen, then click SYSTEM SHUTDOWN in the pop-up menu (see “3.1 Starting<br />
the system for the first time” on page 17), or click the SYSTEM SHUTDOWN icon on the taskbar.<br />
b. Follow the on-screen instructions for shutting down the system.<br />
2. Disconnect the power adapter from the back of the <strong>DVR</strong>.<br />
3. Remove the top cover from the <strong>DVR</strong> by removing the three cover screws on the back of the chassis, and the two on each side.<br />
See the drawing below.<br />
<strong>H.264</strong> <strong>DVR</strong> <strong>User</strong> <strong>Manual</strong><br />
9