H.264 4/8/16-Channel DVR User Manual - Security Cameras Direct
H.264 4/8/16-Channel DVR User Manual - Security Cameras Direct
H.264 4/8/16-Channel DVR User Manual - Security Cameras Direct

You also want an ePaper? Increase the reach of your titles
YUMPU automatically turns print PDFs into web optimized ePapers that Google loves.
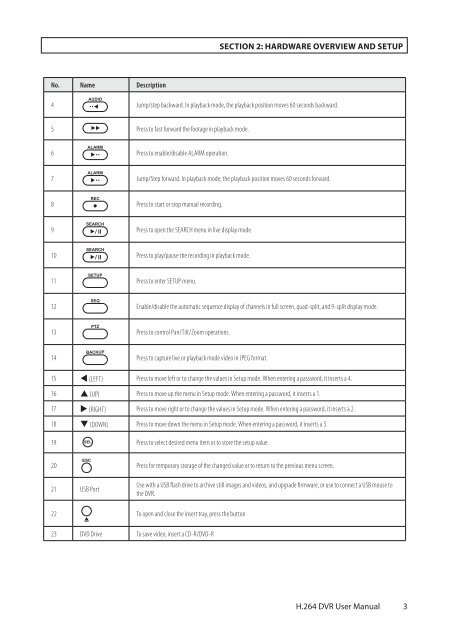
SECTION 2: HARDWARE OVERVIEW AND SETUP<br />
No. Name Description<br />
AUDIO<br />
4 .. <br />
Jump/step backward. In playback mode, the playback position moves 60 seconds backward.<br />
5 Press to fast forward the footage in playback mode.<br />
ALARM<br />
6 ..<br />
Press to enable/disable ALARM operation.<br />
ALARM<br />
7 ..<br />
Jump/Step forward. In playback mode, the playback position moves 60 seconds forward.<br />
8<br />
REC<br />
Press to start or stop manual recording.<br />
SEARCH<br />
9 / ll<br />
Press to open the SEARCH menu in live display mode.<br />
SEARCH<br />
10 / ll<br />
Press to play/pause the recording in playback mode.<br />
11<br />
SETUP<br />
Press to enter SETUP menu.<br />
12<br />
SEQ<br />
Enable/disable the automatic sequence display of channels in full screen, quad-split, and 9-split display mode.<br />
13<br />
PTZ<br />
Press to control Pan/Tilt/Zoom operations.<br />
14<br />
BACKUP<br />
Press to capture live or playback mode video in JPEG format.<br />
15 t (LEFT) Press to move left or to change the values in Setup mode. When entering a password, it inserts a 4.<br />
<strong>16</strong> p (UP) Press to move up the menu in Setup mode. When entering a password, it inserts a 1.<br />
17 u (RIGHT) Press to move right or to change the values in Setup mode. When entering a password, it inserts a 2.<br />
18 q (DOWN) Press to move down the menu in Setup mode. When entering a password, it inserts a 3.<br />
19 SEL<br />
Press to select desired menu item or to store the setup value.<br />
20<br />
ESC<br />
Press for temporary storage of the changed value or to return to the previous menu screen.<br />
21 USB Port<br />
Use with a USB flash drive to archive still images and videos, and upgrade firmware, or use to connect a USB mouse to<br />
the <strong>DVR</strong>.<br />
22<br />
<br />
To open and close the insert tray, press the button<br />
23 DVD Drive To save video, insert a CD-R/DVD-R<br />
<strong>H.264</strong> <strong>DVR</strong> <strong>User</strong> <strong>Manual</strong><br />
3