
Create successful ePaper yourself
Turn your PDF publications into a flip-book with our unique Google optimized e-Paper software.
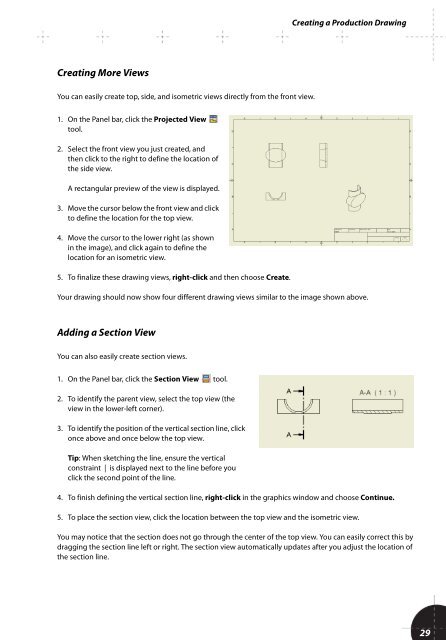
Creating a Production Drawing<br />
Creating More Views<br />
You can easily create top, side, and isometric views directly from the front view.<br />
1. On the Panel bar, click the Projected View<br />
tool.<br />
2. Select the front view you just created, and<br />
then click to the right to define the location of<br />
the side view.<br />
A rectangular preview of the view is displayed.<br />
3. Move the cursor below the front view and click<br />
to define the location for the top view.<br />
4. Move the cursor to the lower right (as shown<br />
in the image), and click again to define the<br />
location for an isometric view.<br />
5. To finalize these drawing views, right-click and then choose Create.<br />
Your drawing should now show four different drawing views similar to the image shown above.<br />
Adding a Section View<br />
You can also easily create section views.<br />
1. On the Panel bar, click the Section View tool.<br />
2. To identify the parent view, select the top view (the<br />
view in the lower-left corner).<br />
3. To identify the position of the vertical section line, click<br />
once above and once below the top view.<br />
Tip: When sketching the line, ensure the vertical<br />
constraint | is displayed next to the line before you<br />
click the second point of the line.<br />
4. To finish defining the vertical section line, right-click in the graphics window and choose Continue.<br />
5. To place the section view, click the location between the top view and the isometric view.<br />
You may notice that the section does not go through the center of the top view. You can easily correct this by<br />
dragging the section line left or right. The section view automatically updates after you adjust the location of<br />
the section line.<br />
29