
You also want an ePaper? Increase the reach of your titles
YUMPU automatically turns print PDFs into web optimized ePapers that Google loves.
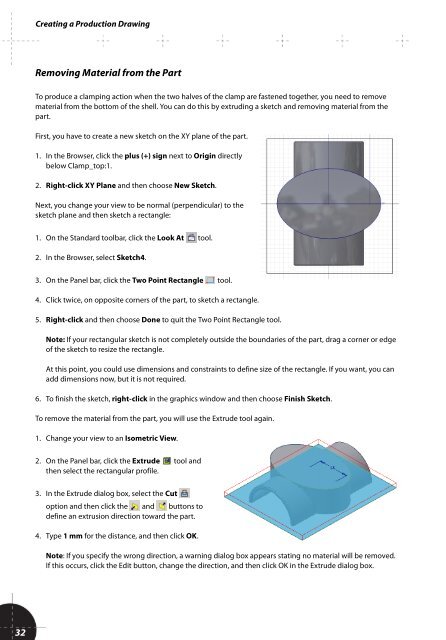
Creating a Production Drawing<br />
Removing Material from the Part<br />
To produce a clamping action when the two halves of the clamp are fastened together, you need to remove<br />
material from the bottom of the shell. You can do this by extruding a sketch and removing material from the<br />
part.<br />
First, you have to create a new sketch on the XY plane of the part.<br />
1. In the Browser, click the plus (+) sign next to Origin directly<br />
below Clamp_top:1.<br />
2. Right-click XY Plane and then choose New Sketch.<br />
Next, you change your view to be normal (perpendicular) to the<br />
sketch plane and then sketch a rectangle:<br />
1. On the Standard toolbar, click the Look At tool.<br />
2. In the Browser, select Sketch4.<br />
3. On the Panel bar, click the Two Point Rectangle tool.<br />
4. Click twice, on opposite corners of the part, to sketch a rectangle.<br />
5. Right-click and then choose Done to quit the Two Point Rectangle tool.<br />
Note: If your rectangular sketch is not completely outside the boundaries of the part, drag a corner or edge<br />
of the sketch to resize the rectangle.<br />
At this point, you could use dimensions and constraints to define size of the rectangle. If you want, you can<br />
add dimensions now, but it is not required.<br />
6. To finish the sketch, right-click in the graphics window and then choose Finish Sketch.<br />
To remove the material from the part, you will use the Extrude tool again.<br />
1. Change your view to an Isometric View.<br />
2. On the Panel bar, click the Extrude tool and<br />
then select the rectangular profile.<br />
3. In the Extrude dialog box, select the Cut<br />
option and then click the and buttons to<br />
define an extrusion direction toward the part.<br />
4. Type 1 mm for the distance, and then click OK.<br />
Note: If you specify the wrong direction, a warning dialog box appears stating no material will be removed.<br />
If this occurs, click the Edit button, change the direction, and then click OK in the Extrude dialog box.<br />
32