KM1301SAH-E Service Manual - Hoshizaki
KM1301SAH-E Service Manual - Hoshizaki
KM1301SAH-E Service Manual - Hoshizaki

Create successful ePaper yourself
Turn your PDF publications into a flip-book with our unique Google optimized e-Paper software.
D. Float Switch Check and Cleaning<br />
The float switch is used to determine that there is sufficient water in the tank after the<br />
1‐minute fill cycle and after each harvest cycle. The float switch is also used to determine<br />
that the appropriate volume of water has been converted into ice before switching out of<br />
the freeze cycle. No adjustment is required.<br />
1. Float Switch Check<br />
To check the float switch, follow the steps below.<br />
1) Turn off the power supply.<br />
2) Remove the front panel, then move the<br />
control switch to the "OFF" position.<br />
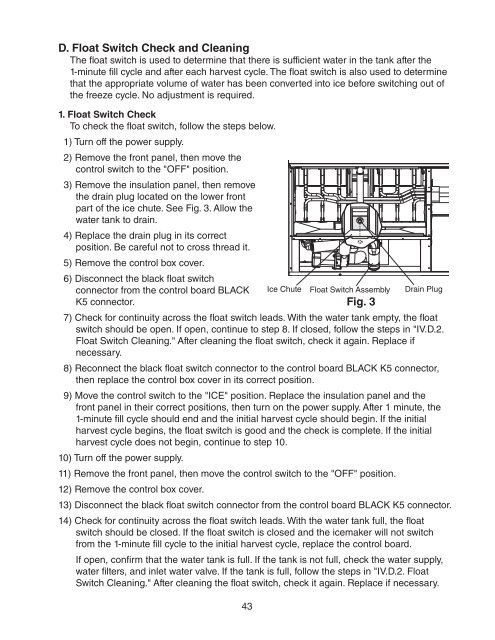
3) Remove the insulation panel, then remove<br />
the drain plug located on the lower front<br />
part of the ice chute. See Fig. 3. Allow the<br />
water tank to drain.<br />
4) Replace the drain plug in its correct<br />
position. Be careful not to cross thread it.<br />
5) Remove the control box cover.<br />
6) Disconnect the black float switch<br />
connector from the control board BLACK Ice Chute<br />
K5 connector.<br />
7) Check for continuity across the float switch leads. With the water tank empty, the float<br />
switch should be open. If open, continue to step 8. If closed, follow the steps in "IV.D.2.<br />
Float Switch Cleaning." After cleaning the float switch, check it again. Replace if<br />
necessary.<br />
8) Reconnect the black float switch connector to the control board BLACK K5 connector,<br />
then replace the control box cover in its correct position.<br />
9) Move the control switch to the "ICE" position. Replace the insulation panel and the<br />
front panel in their correct positions, then turn on the power supply. After 1 minute, the<br />
1-minute fill cycle should end and the initial harvest cycle should begin. If the initial<br />
harvest cycle begins, the float switch is good and the check is complete. If the initial<br />
harvest cycle does not begin, continue to step 10.<br />
10) Turn off the power supply.<br />
11) Remove the front panel, then move the control switch to the "OFF" position.<br />
12) Remove the control box cover.<br />
13) Disconnect the black float switch connector from the control board BLACK K5 connector.<br />
14) Check for continuity across the float switch leads. With the water tank full, the float<br />
switch should be closed. If the float switch is closed and the icemaker will not switch<br />
from the 1-minute fill cycle to the initial harvest cycle, replace the control board.<br />
If open, confirm that the water tank is full. If the tank is not full, check the water supply,<br />
water filters, and inlet water valve. If the tank is full, follow the steps in "IV.D.2. Float<br />
Switch Cleaning." After cleaning the float switch, check it again. Replace if necessary.<br />
43<br />
Float Switch Assembly<br />
Fig. 3<br />
Drain Plug