KM1301SAH-E Service Manual - Hoshizaki
KM1301SAH-E Service Manual - Hoshizaki
KM1301SAH-E Service Manual - Hoshizaki
You also want an ePaper? Increase the reach of your titles
YUMPU automatically turns print PDFs into web optimized ePapers that Google loves.
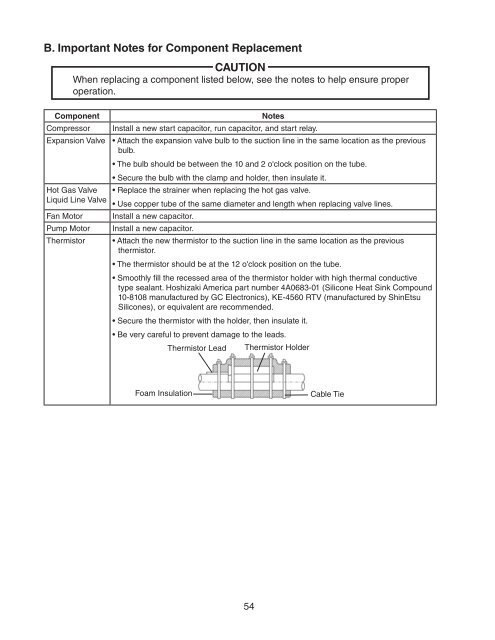
B. Important Notes for Component Replacement<br />
CAUTION<br />
When replacing a component listed below, see the notes to help ensure proper<br />
operation.<br />
Component<br />
Compressor<br />
Expansion Valve<br />
Hot Gas Valve<br />
Liquid Line Valve<br />
Fan Motor<br />
Pump Motor<br />
Thermistor<br />
Notes<br />
Install a new start capacitor, run capacitor, and start relay.<br />
• Attach the expansion valve bulb to the suction line in the same location as the previous<br />
bulb.<br />
• The bulb should be between the 10 and 2 o'clock position on the tube.<br />
• Secure the bulb with the clamp and holder, then insulate it.<br />
• Replace the strainer when replacing the hot gas valve.<br />
• Use copper tube of the same diameter and length when replacing valve lines.<br />
Install a new capacitor.<br />
Install a new capacitor.<br />
• Attach the new thermistor to the suction line in the same location as the previous<br />
thermistor.<br />
• The thermistor should be at the 12 o'clock position on the tube.<br />
• Smoothly fill the recessed area of the thermistor holder with high thermal conductive<br />
type sealant. <strong>Hoshizaki</strong> America part number 4A0683-01 (Silicone Heat Sink Compound<br />
10-8108 manufactured by GC Electronics), KE-4560 RTV (manufactured by ShinEtsu<br />
Silicones), or equivalent are recommended.<br />
• Secure the thermistor with the holder, then insulate it.<br />
• Be very careful to prevent damage to the leads.<br />
Thermistor Lead Thermistor Holder<br />
Foam Insulation<br />
Cable Tie<br />
54


