KM1301SAH-E Service Manual - Hoshizaki
KM1301SAH-E Service Manual - Hoshizaki
KM1301SAH-E Service Manual - Hoshizaki

You also want an ePaper? Increase the reach of your titles
YUMPU automatically turns print PDFs into web optimized ePapers that Google loves.
E. Thermistor Check<br />
To check thermistor resistance, follow the steps below.<br />
1) Turn off the power supply.<br />
2) Remove the front panel, then move the control switch to the "OFF" position.<br />
3) Remove the control box cover.<br />
4) Remove the thermistor.<br />
5) Immerse the thermistor sensor portion in a glass containing ice and water for 2 or<br />
3 minutes.<br />
6) Disconnect the white thermistor connector from the control board WHITE K3 connector<br />
and check the resistance between thermistor leads. Normal reading is within 4.7 to<br />
6.2 kΩ. If outside the normal reading, replace the thermistor. See "V.B. Important Notes<br />
for Component Replacement." If inside the normal reading, continue to the next step.<br />
7) Replace the thermistor in its correct position. See "V.B. Important Notes for Component<br />
Replacement."<br />
8) Reconnect the white thermistor connector to the control board WHITE K3 connector.<br />
9) Replace the control box cover in its correct position, then turn on the power supply.<br />
10) Move the control switch to the "ICE" position.<br />
11) Once the harvest cycle starts, begin timing the harvest cycle.<br />
12) The harvest timer should terminate and end the harvest cycle within 2 to 3 minutes. If<br />
the harvest timer does not terminate and end the harvest cycle, the harvest timer is bad<br />
and the control board should be replaced.<br />
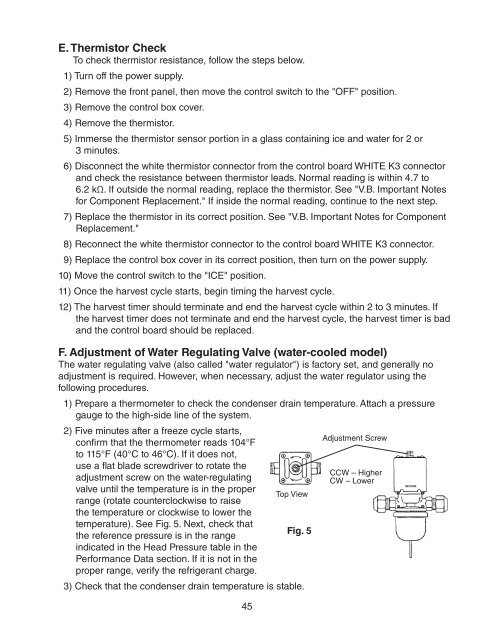
F. Adjustment of Water Regulating Valve (water-cooled model)<br />
The water regulating valve (also called "water regulator") is factory set, and generally no<br />
adjustment is required. However, when necessary, adjust the water regulator using the<br />
following procedures.<br />
1) Prepare a thermometer to check the condenser drain temperature. Attach a pressure<br />
gauge to the high-side line of the system.<br />
2) Five minutes after a freeze cycle starts,<br />
confirm that the thermometer reads 104°F<br />
to 115°F (40°C to 46°C). If it does not,<br />
use a flat blade screwdriver to rotate the<br />
adjustment screw on the water‐regulating<br />
valve until the temperature is in the proper<br />
Top View<br />
range (rotate counterclockwise to raise<br />
the temperature or clockwise to lower the<br />
temperature). See Fig. 5. Next, check that<br />
Fig. 5<br />
the reference pressure is in the range<br />
indicated in the Head Pressure table in the<br />
Performance Data section. If it is not in the<br />
proper range, verify the refrigerant charge.<br />
3) Check that the condenser drain temperature is stable.<br />
45<br />
Adjustment Screw<br />
CCW – Higher<br />
CW – Lower