KM1301SAH-E Service Manual - Hoshizaki
KM1301SAH-E Service Manual - Hoshizaki
KM1301SAH-E Service Manual - Hoshizaki

You also want an ePaper? Increase the reach of your titles
YUMPU automatically turns print PDFs into web optimized ePapers that Google loves.
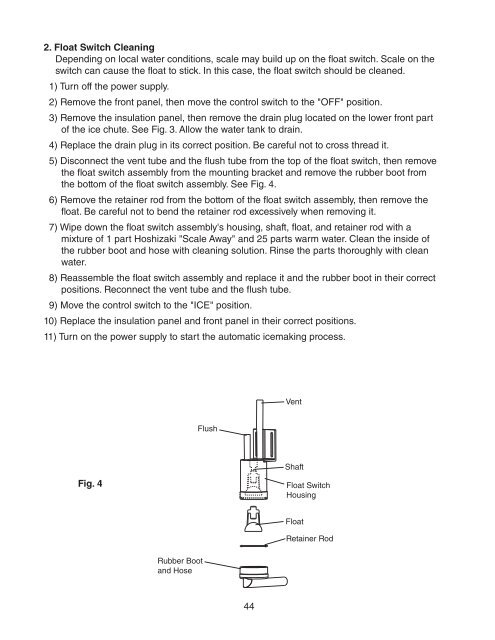
2. Float Switch Cleaning<br />
Depending on local water conditions, scale may build up on the float switch. Scale on the<br />
switch can cause the float to stick. In this case, the float switch should be cleaned.<br />
1) Turn off the power supply.<br />
2) Remove the front panel, then move the control switch to the "OFF" position.<br />
3) Remove the insulation panel, then remove the drain plug located on the lower front part<br />
of the ice chute. See Fig. 3. Allow the water tank to drain.<br />
4) Replace the drain plug in its correct position. Be careful not to cross thread it.<br />
5) Disconnect the vent tube and the flush tube from the top of the float switch, then remove<br />
the float switch assembly from the mounting bracket and remove the rubber boot from<br />
the bottom of the float switch assembly. See Fig. 4.<br />
6) Remove the retainer rod from the bottom of the float switch assembly, then remove the<br />
float. Be careful not to bend the retainer rod excessively when removing it.<br />
7) Wipe down the float switch assembly's housing, shaft, float, and retainer rod with a<br />
mixture of 1 part <strong>Hoshizaki</strong> "Scale Away" and 25 parts warm water. Clean the inside of<br />
the rubber boot and hose with cleaning solution. Rinse the parts thoroughly with clean<br />
water.<br />
8) Reassemble the float switch assembly and replace it and the rubber boot in their correct<br />
positions. Reconnect the vent tube and the flush tube.<br />
9) Move the control switch to the "ICE" position.<br />
10) Replace the insulation panel and front panel in their correct positions.<br />
11) Turn on the power supply to start the automatic icemaking process.<br />
Vent<br />
Flush<br />
Shaft<br />
Fig. 4<br />
Float Switch<br />
Housing<br />
Float<br />
Retainer Rod<br />
Rubber Boot<br />
and Hose<br />
44