Creating a Template quick start guide - DocuSign
Creating a Template quick start guide - DocuSign
Creating a Template quick start guide - DocuSign

You also want an ePaper? Increase the reach of your titles
YUMPU automatically turns print PDFs into web optimized ePapers that Google loves.
<strong>Creating</strong> a <strong>Template</strong> Quick Start Guide<br />
4<br />
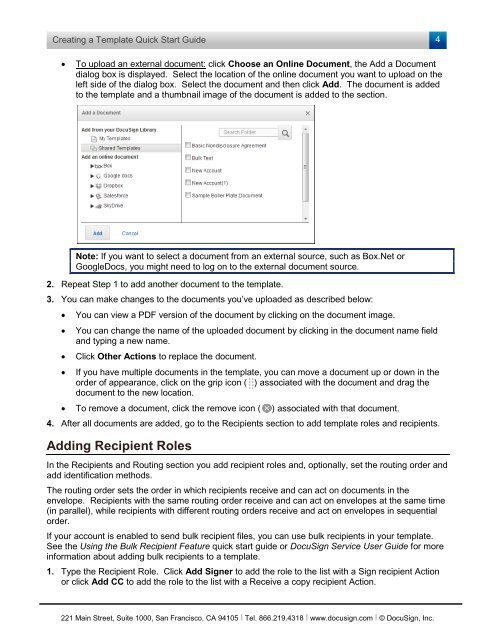
• To upload an external document: click Choose an Online Document, the Add a Document<br />
dialog box is displayed. Select the location of the online document you want to upload on the<br />
left side of the dialog box. Select the document and then click Add. The document is added<br />
to the template and a thumbnail image of the document is added to the section.<br />
Note: If you want to select a document from an external source, such as Box.Net or<br />
GoogleDocs, you might need to log on to the external document source.<br />
2. Repeat Step 1 to add another document to the template.<br />
3. You can make changes to the documents you’ve uploaded as described below:<br />
• You can view a PDF version of the document by clicking on the document image.<br />
• You can change the name of the uploaded document by clicking in the document name field<br />
and typing a new name.<br />
• Click Other Actions to replace the document.<br />
• If you have multiple documents in the template, you can move a document up or down in the<br />
order of appearance, click on the grip icon ( ) associated with the document and drag the<br />
document to the new location.<br />
• To remove a document, click the remove icon ( ) associated with that document.<br />
4. After all documents are added, go to the Recipients section to add template roles and recipients.<br />
Adding Recipient Roles<br />
In the Recipients and Routing section you add recipient roles and, optionally, set the routing order and<br />
add identification methods.<br />
The routing order sets the order in which recipients receive and can act on documents in the<br />
envelope. Recipients with the same routing order receive and can act on envelopes at the same time<br />
(in parallel), while recipients with different routing orders receive and act on envelopes in sequential<br />
order.<br />
If your account is enabled to send bulk recipient files, you can use bulk recipients in your template.<br />
See the Using the Bulk Recipient Feature <strong>quick</strong> <strong>start</strong> <strong>guide</strong> or <strong>DocuSign</strong> Service User Guide for more<br />
information about adding bulk recipients to a template.<br />
1. Type the Recipient Role. Click Add Signer to add the role to the list with a Sign recipient Action<br />
or click Add CC to add the role to the list with a Receive a copy recipient Action.<br />
221 Main Street, Suite 1000, San Francisco, CA 94105 Ι Tel. 866.219.4318 Ι www.docusign.com Ι © <strong>DocuSign</strong>, Inc.