Red Giant Grain Stir-Ator - David Manufacturing Co.
Red Giant Grain Stir-Ator - David Manufacturing Co.
Red Giant Grain Stir-Ator - David Manufacturing Co.
- No tags were found...

You also want an ePaper? Increase the reach of your titles
YUMPU automatically turns print PDFs into web optimized ePapers that Google loves.
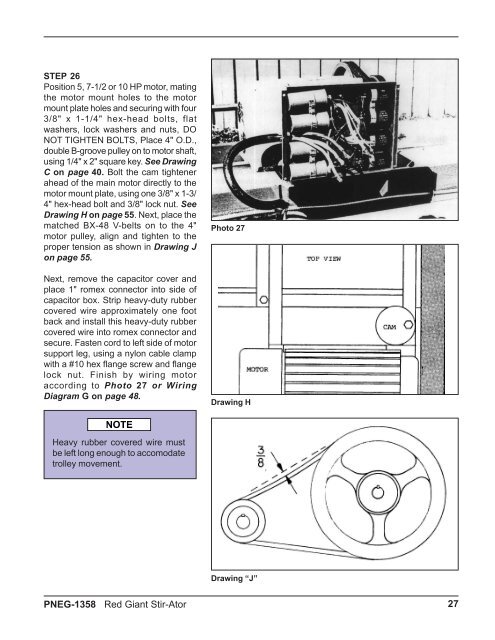
STEP 26<br />
Position 5, 7-1/2 or 10 HP motor, mating<br />
the motor mount holes to the motor<br />
mount plate holes and securing with four<br />
3/8" x 1-1/4" hex-head bolts, flat<br />
washers, lock washers and nuts, DO<br />
NOT TIGHTEN BOLTS, Place 4" O.D.,<br />
double B-groove pulley on to motor shaft,<br />
using 1/4" x 2" square key. See Drawing<br />
C on page 40. Bolt the cam tightener<br />
ahead of the main motor directly to the<br />
motor mount plate, using one 3/8" x 1-3/<br />
4" hex-head bolt and 3/8" lock nut. See<br />
Drawing H on page 55. Next, place the<br />
matched BX-48 V-belts on to the 4"<br />
motor pulley, align and tighten to the<br />
proper tension as shown in Drawing J<br />
on page 55.<br />
Next, remove the capacitor cover and<br />
place 1" romex connector into side of<br />
capacitor box. Strip heavy-duty rubber<br />
covered wire approximately one foot<br />
back and install this heavy-duty rubber<br />
covered wire into romex connector and<br />
secure. Fasten cord to left side of motor<br />
support leg, using a nylon cable clamp<br />
with a #10 hex flange screw and flange<br />
lock nut. Finish by wiring motor<br />
according to Photo 27 or Wiring<br />
Diagram G on page 48.<br />
Photo 27<br />
Drawing H<br />
Heavy rubber covered wire must<br />
be left long enough to accomodate<br />
trolley movement.<br />
Drawing “J”<br />
PNEG-1358 <strong>Red</strong> <strong>Giant</strong> <strong>Stir</strong>-<strong>Ator</strong><br />
27