Basic Rooftop Focus Guide.pdf - ProLon
Basic Rooftop Focus Guide.pdf - ProLon
Basic Rooftop Focus Guide.pdf - ProLon

You also want an ePaper? Increase the reach of your titles
YUMPU automatically turns print PDFs into web optimized ePapers that Google loves.
<strong>Focus</strong> <strong>Guide</strong><br />
<strong>Basic</strong> <strong>Rooftop</strong> Controller<br />
Configuration guide for <strong>ProLon</strong> <strong>Focus</strong><br />
<strong>Guide</strong> <strong>Focus</strong> Français<br />
software<br />
REV 5.4.0<br />
www.prolon.net<br />
info@prolon.net
<strong>Basic</strong> <strong>Rooftop</strong> Controller<br />
www.prolon.net<br />
Régulateur de climatiseur de base<br />
Table of Contents<br />
1 <strong>Basic</strong> <strong>Rooftop</strong> Controller Icon ............................................................................................. 4<br />
1.1 Icon Data ........................................................................................................................ 4<br />
1.2 Icon Colors ..................................................................................................................... 5<br />
1.3 Icon Right-Click .............................................................................................................. 6<br />
2 <strong>Basic</strong> <strong>Rooftop</strong> Controller Configuration ............................................................................. 7<br />
2.1 Config Menu ................................................................................................................... 7<br />
2.1.1 <strong>Basic</strong> <strong>Rooftop</strong> Home Screen ..................................................................................... 7<br />
2.1.1.1 Displayed Parameters ....................................................................................... 8<br />
2.1.1.2 Icon Quick Jump ............................................................................................... 8<br />
2.1.1.3 Icon Manual Override ........................................................................................ 9<br />
2.1.1.4 “Resume Normal” Button ................................................................................ 10<br />
2.1.2 Display Configuration ............................................................................................... 12<br />
2.1.3 Fan Configuration .................................................................................................... 14<br />
2.1.3.1 Unoccupied Mode ........................................................................................... 14<br />
2.1.3.2 Override mode................................................................................................. 15<br />
2.1.3.3 Intermittent ...................................................................................................... 15<br />
2.1.4 Cooling Configuration .............................................................................................. 16<br />
2.1.4.1 Cooling Setpoints ............................................................................................ 17<br />
2.1.4.2 Operation ......................................................................................................... 18<br />
2.1.4.3 Analog Cooling ................................................................................................ 18<br />
2.1.5 Heating Configuration .............................................................................................. 20<br />
2.1.5.1 Digital Output 4................................................................................................ 20<br />
2.1.5.2 Analog Output 1 .............................................................................................. 21<br />
2.1.5.3 Preheating ....................................................................................................... 22<br />
2.1.6 Limits ........................................................................................................................ 24<br />
2.1.6.1 Return Air Temperature .................................................................................. 24<br />
2.1.6.2 Outside Air Temperature ................................................................................. 25<br />
2.1.6.3 Supply Air Temperature .................................................................................. 25<br />
2.1.7 Priority ...................................................................................................................... 27<br />
2.1.7.1 Priority Mode ................................................................................................... 28<br />
2.1.8 Calibration ................................................................................................................ 29<br />
2.1.9 Device Properties ..................................................................................................... 31<br />
2.2 Network Menu .............................................................................................................. 33<br />
2.2.1 Slave List ................................................................................................................. 33<br />
2.2.1.1 Buttons ............................................................................................................ 34<br />
2.2.2 Math Functions ........................................................................................................ 35<br />
2.2.3 COM Port Settings ................................................................................................... 38<br />
2.2.4 Other ........................................................................................................................ 40<br />
2<br />
www.prolon.net<br />
info@prolon.net
<strong>Basic</strong> <strong>Rooftop</strong> Controller<br />
www.prolon.net<br />
Table of Figures<br />
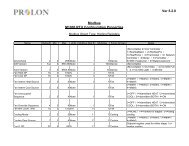
Figure 1.1.1: Typical Master icons ................................................................................................... 4<br />
Figure 1.2.1: Grey icon .................................................................................................................... 5<br />
Figure 1.2.2: Green icon .................................................................................................................. 5<br />
Figure 1.2.3: Orange icon ................................................................................................................ 5<br />
Figure 1.2.4: Blue icon ..................................................................................................................... 5<br />
Figure 1.3.1: Icon right-click for Master ........................................................................................... 6<br />
Figure 2.1.1: <strong>Basic</strong> <strong>Rooftop</strong> home screen ....................................................................................... 7<br />
Figure 2.1.2: Icon quick jump example ............................................................................................ 9<br />
Figure 2.1.3: Manual override example ........................................................................................... 9<br />
Figure 2.1.4: Override example ..................................................................................................... 10<br />
Figure 2.1.5: “Resume Normal” button .......................................................................................... 10<br />
Figure 2.1.6 Display configuration screen ..................................................................................... 12<br />
Figure 2.1.7: Fan configuration screen .......................................................................................... 14<br />
Figure 2.1.8: Cooling configuration screen .................................................................................... 16<br />
Figure 2.1.9: Heating configuration screen ................................................................................... 20<br />
Figure 2.1.10: Limits configuration screen .................................................................................... 24<br />
Figure 2.1.11: Priority configuration screen ................................................................................... 27<br />
Figure 2.1.12: Calibration configuration screen ............................................................................. 29<br />
Figure 2.1.13: Device properties screen ....................................................................................... 31<br />
Figure 2.2.1: Slave list configuration screen ................................................................................. 33<br />
Figure 2.2.2: Math functions configuration screen ........................................................................ 35<br />
Figure 2.2.3: COM Port configuration screen ................................................................................ 38<br />
Figure 2.2.4: Other configuration screen ....................................................................................... 40<br />
3<br />
www.prolon.net<br />
info@prolon.net
<strong>Basic</strong> <strong>Rooftop</strong> Controller<br />
www.prolon.net<br />
1 <strong>Basic</strong> <strong>Rooftop</strong> Controller Icon<br />
When a <strong>Basic</strong> <strong>Rooftop</strong> Controller is added to a system in the Systems View, it receives<br />
its own master icon. The master icon displays data about the <strong>Basic</strong> <strong>Rooftop</strong> Controller<br />
device it represents, and this data is updated regularly. You can open the configuration<br />
screen for a <strong>Basic</strong> <strong>Rooftop</strong> Controller by double-clicking on its icon or right-clicking it and<br />
choosing the “Configure” option. Values are set to “N/A” if the Controller is offline.<br />
Figure 1.1.1: <strong>Rooftop</strong> Icon<br />
It is important to note that when a master icon is created in a system, the icon<br />
representing that system in the Network View is replaced by that master icon itself. To<br />
view the system associated with the master icon, right-click it and choose the “View<br />
System” option.<br />
1.1 Icon Data<br />
• Supply Temp: The actual temperature in the duct. Will display “N/A” (not applicable) if<br />
no supply temperature sensor is attached or if the network does not supply a reading.<br />
• Return Temp: The temperature of the return air. Will display “N/A” if no return air<br />
temperature sensor is attached or if the master is offline.<br />
• Outside Temp: The outside temperature. Will display “N/A” if no outside air<br />
temperature sensor is attached.<br />
• Math: The values of the selected math functions. The values of the selected math<br />
functions. The displayed math functions can be changed in the Display Configuration<br />
page (p.12). Only the first two selected functions will be displayed.<br />
• Status Icon: An icon is always visible next to the <strong>ProLon</strong> logo, indicating if this master<br />
is in occupied or unoccupied mode. If the icon is lit up in orange, then the master is in<br />
occupied mode. If the icon is grey, the master is in unoccupied mode. The icon will<br />
be grey when working offline.<br />
4<br />
www.prolon.net<br />
info@prolon.net
<strong>Basic</strong> <strong>Rooftop</strong> Controller<br />
www.prolon.net<br />
1.2 Icon Colors<br />
The master icon changes color depending on the master’s status and current actions.<br />
• Grey: The master icon is grey when offline or if data is not being received.<br />
Figure 1.2.1: Grey icon<br />
• Green: The master icon is green when no heating or cooling actions are being taken.<br />
Figure 1.2.2: Green icon<br />
• Red: The master icon is red when the master is heating.<br />
Figure 1.2.3: Orange icon<br />
• Blue: The master icon is blue when the master is cooling.<br />
Figure 1.2.4: Blue icon<br />
5<br />
www.prolon.net<br />
info@prolon.net
<strong>Basic</strong> <strong>Rooftop</strong> Controller<br />
www.prolon.net<br />
1.3 Icon Right-Click<br />
At any time you can right-click the master icon to access a list of useful functions.<br />
Figure 1.3.1: Icon right-click for Master<br />
• Configure: This opens the configuration screen for the master (same as double-clicking<br />
the icon).<br />
• Rename: Lets you rename the master. Names are limited to 16 characters.<br />
• Delete: Removes the master from your network.<br />
• Get List: Causes the master to automatically retrieve the list of slaves attached to its<br />
system. A new slave icon is created for all slaves found on the list that do not already<br />
appear on the icon screen. This function is unavailable offline.<br />
6<br />
www.prolon.net<br />
info@prolon.net
<strong>Basic</strong> <strong>Rooftop</strong> Controller<br />
www.prolon.net<br />
2 <strong>Basic</strong> <strong>Rooftop</strong> Controller Configuration<br />
To view the configuration of a <strong>Basic</strong> <strong>Rooftop</strong> Controller in detail, double-click on its icon<br />
to see its configuration screen. Use the menus in the top left corner to navigate between<br />
the different sections, or simply double-click any item in the <strong>Basic</strong> <strong>Rooftop</strong> Controller<br />
Home screen to transfer you to its corresponding page. (See Icon Quick Jumps for more<br />
details, p.8).<br />
2.1 Config Menu<br />
2.1.1 <strong>Basic</strong> <strong>Rooftop</strong> Home Screen<br />
Figure 2.1.1: <strong>Basic</strong> <strong>Rooftop</strong> home screen<br />
This screen shows the status of all inputs and outputs in the <strong>Basic</strong> <strong>Rooftop</strong> device. All<br />
values will be “N/A” (Not Applicable) if offline.<br />
7<br />
www.prolon.net<br />
info@prolon.net
<strong>Basic</strong> <strong>Rooftop</strong> Controller<br />
www.prolon.net<br />
2.1.1.1 Displayed Parameters<br />
• Outside Temp: The outside temperature. Will display “N/A” if no outside air<br />
temperature sensor is attached.<br />
• Return Temp: The temperature of the return air. Will display “N/A” if no return air<br />
temperature sensor is attached.<br />
• Supply Temp: The actual temperature in the duct. Will display “N/A” if no supply<br />
temperature sensor is attached or if the network does not supply a reading.<br />
• Fan: An icon representing the state of the fan can be seen in the middle of the<br />
drawing. When the fan is ON, the fan blades rotate, the outside damper is open and<br />
arrows appear, indicating airflow. When the fan is OFF, the fan blades are stopped,<br />
the outside damper is closed and there are no more arrows. Set to OFF when offline.<br />
• Cooling: An icon showing two cooling coils represents the cooling action being taken<br />
by the unit. Each coil represents a stage of cooling. The first stage of cooling is the<br />
coil on the right and the second stage is the coil on the left. A cooling stage is ON if it<br />
is coloured blue and OFF when it is grey. Both stages are set to OFF when offline.<br />
• Heating: An icon of an electric coil represents the heating action being taken by the<br />
unit. The icon’s color represents the intensity of the heating action being taken. The<br />
Icon is grey when there is no heating.<br />
Status<br />
The value under the icon is the Total Heat. The Total Heat is calculated with the<br />
values of Outputs 4 and 5. When Output 4 is set to “Heating Stage”, its activity will<br />
represent half of the Total Heat, while Output 5 will represent the other half. If an<br />
output is not contributing to any heating action, its value will not count in the Total<br />
Heat calculation.<br />
• Cooling: The state of the cooling outputs. Indicates the highest stage that is currently<br />
ON.<br />
• Heating: The state and function of Output 4, as well as the value in percentage of<br />
Output 5. Output 4 can be a heating stage, preheat permission or be turned off.<br />
• Occupancy: Shows the current occupancy state of the unit (occupied or unoccupied,<br />
accompanied by a representative icon).<br />
Math Functions<br />
Display the current calculated values of each math function, as defined in the Math<br />
Functions screen (see p.35). Set to zero when offline.<br />
2.1.1.2 Icon Quick Jump<br />
8<br />
www.prolon.net<br />
info@prolon.net
<strong>Basic</strong> <strong>Rooftop</strong> Controller<br />
www.prolon.net<br />
Certain items in the Home screen will direct you to its corresponding configuration screen<br />
when they are double-clicked. A red contour will surround the object if this option is<br />
available, with the exception of the Occupancy section.<br />
Figure 2.1.2: Icon quick jump example<br />
The following is a list of the clickable objects and their corresponding destination:<br />
Items<br />
Outside Temp Sensor<br />
Return Temp Sensor<br />
Supply Temp Sensor<br />
Cooling Coils<br />
Fan<br />
Heating Coil<br />
Math Functions<br />
Quick Jump<br />
Limits<br />
Limits<br />
Limits<br />
Cooling Configuration<br />
Fan Configuration<br />
Heating Configuration<br />
Math Functions<br />
Please note that if the advanced password is enabled, you will not be able to double-click<br />
on any objects.<br />
2.1.1.3 Icon Manual Override<br />
Certain components of the <strong>Basic</strong> <strong>Rooftop</strong> device can be overridden. To use this feature,<br />
right-click on the icon of the component you wish to override. A pop-up menu will appear<br />
if this feature is available.<br />
Figure 2.1.3: Manual override example<br />
9<br />
www.prolon.net<br />
info@prolon.net
<strong>Basic</strong> <strong>Rooftop</strong> Controller<br />
www.prolon.net<br />
• Normal: Selecting the “Normal” button will revert the selected item to its normal<br />
behaviour. Any override still applied to this object will be disabled.<br />
• Override: Selecting the “Override” button will allow the user to manually override the<br />
selected object until normal mode is resumed.<br />
The following is a list of all items that can be overridden:<br />
Cooling Stages<br />
Output 4<br />
Output 5<br />
Fan<br />
Occupancy<br />
If a master is overridden to “unoccupied” and one of the slaves is then overridden back to<br />
“occupied”, the master will assume an occupied state as long as the slave remains<br />
overridden. The other slaves will remain unoccupied.<br />
Please note that cooling and heating overrides still respect the temperature limits,<br />
minimum time delays and fan activity. The fan status and the occupancy can be<br />
overridden at all times.<br />
When an override is applied to an object, a yellow contour appears around its icon and<br />
any associated text starts to flash. For example, in the adjacent picture, the fan is<br />
overridden.<br />
Figure 2.1.4: Override example<br />
Please note that if the advanced password is enabled, or if you are offline, you will not be<br />
able to override any objects. All overrides are removed when the device is reset or loses<br />
power.<br />
2.1.1.4 “Resume Normal” Button<br />
Figure 2.1.5: “Resume Normal” button<br />
This button allows the <strong>Basic</strong> <strong>Rooftop</strong> device to return to its fully automated behaviour. All<br />
overrides previously applied to the device will be disabled. However, before any action is<br />
taken, a dialog box will appear to confirm your choice.<br />
10<br />
www.prolon.net<br />
info@prolon.net
<strong>Basic</strong> <strong>Rooftop</strong> Controller<br />
www.prolon.net<br />
11<br />
www.prolon.net<br />
info@prolon.net
<strong>Basic</strong> <strong>Rooftop</strong> Controller<br />
www.prolon.net<br />
2.1.2 Display Configuration<br />
Figure 2.1.6 Display configuration screen<br />
This screen lets you customize the graphical display of the Home screen.<br />
• Sensors: This section lets you choose whether or not <strong>Focus</strong> will display the<br />
corresponding temperature sensors.<br />
• Filter: Lets you choose if <strong>Focus</strong> displays the air filter.<br />
• Fan: Lets you choose if <strong>Focus</strong> displays the fan.<br />
• Math Functions: Lets you select which of the five math functions <strong>Focus</strong> should display<br />
in the home screen. The first two will also be displayed on the <strong>Rooftop</strong>’s main icon.<br />
• Overrides: This option lets you choose the override mode. By default, manual<br />
overrides are blocked if the safety of the system is at risk, for example, by blocking a<br />
12<br />
www.prolon.net<br />
info@prolon.net
<strong>Basic</strong> <strong>Rooftop</strong> Controller<br />
www.prolon.net<br />
manual override to activate cooling because the fan is stopped or if it is too cold in<br />
the supply. However, with this option, absolute overrides can be enabled, bypassing<br />
all limits and restrictions, and therefore should only be used for testing.<br />
13<br />
www.prolon.net<br />
info@prolon.net
<strong>Basic</strong> <strong>Rooftop</strong> Controller<br />
www.prolon.net<br />
2.1.3 Fan Configuration<br />
Figure 2.1.7: Fan configuration screen<br />
This screen lets you configure the operation of the fan when in unoccupied mode and in<br />
override mode. The <strong>Basic</strong> <strong>Rooftop</strong> will enter u#noccupied mode when indicated by its<br />
attached timer. The <strong>Basic</strong> <strong>Rooftop</strong> will enter override mode from unoccupied mode after<br />
one of its slaves is overridden by pushing the override button on its thermostat. In<br />
occupied mode however, the fan is always ON.<br />
2.1.3.1 Unoccupied Mode<br />
• Fan OFF when unoccupied: When this is selected, the fan will always be OFF in<br />
unoccupied mode.<br />
• Fan INTERMITTENT when unoccupied: When this is selected, the fan will go ON if<br />
one of the conditions in the “Intermittent” section is met (see below).<br />
14<br />
www.prolon.net<br />
info@prolon.net
<strong>Basic</strong> <strong>Rooftop</strong> Controller<br />
www.prolon.net<br />
• Fan ON when unoccupied: When this is selected, the fan will always be ON in<br />
unoccupied mode.<br />
2.1.3.2 Override mode<br />
• Fan OFF when overridden: When this is selected, the fan will always be OFF in<br />
override mode.<br />
• Fan INTERMITTENT when overridden: When this is selected, the fan will go ON if one<br />
of the conditions in the “Intermittent” section is met (see below).<br />
• Fan ON when overridden: When this is selected, the fan will always be ON when<br />
overridden.<br />
2.1.3.3 Intermittent<br />
• Fan ON if heating demand is greater than: Select this if you want the fan to turn on<br />
according to a demand of heating. The demand is provided by one of the five math<br />
functions (defined in the Math Functions screen p.35) chosen in Demand Source.<br />
The fan will be ON when the heating demand is greater than the value in the<br />
adjacent box.<br />
Units MIN MAX Default<br />
% 0 100 10<br />
• Fan ON if cooling demand is greater than: Select this if you want the fan to turn ON<br />
according to a demand of cooling. The demand is provided by one of the five math<br />
functions (defined in the Math Functions configuration screen p.35) chosen in<br />
Demand Source. The fan will be ON when the cooling demand is greater than the<br />
value in the adjacent box.<br />
Units MIN MAX Default<br />
% 0 100 10<br />
• Minimum fan cycle time: This is the minimum amount of time that the fan will stay ON<br />
once activated. Even if the demand drops below the setpoint, the fan remains ON<br />
until the time delay is met. After this time, the fan will turn OFF as soon as the<br />
demand drops under the setpoint.<br />
Units MIN MAX Default<br />
Minutes 0 120 15<br />
15<br />
www.prolon.net<br />
info@prolon.net
<strong>Basic</strong> <strong>Rooftop</strong> Controller<br />
www.prolon.net<br />
2.1.4 Cooling Configuration<br />
Figure 2.1.8: Cooling configuration screen<br />
• Number of Cooling Stages: You can select the number of cooling stages used by the<br />
<strong>Basic</strong> <strong>Rooftop</strong>.<br />
• NONE: The rooftop controller will not perform any cooling actions. Outputs 2<br />
and 3 are inert. Cooling Setpoints section below is completely disabled.<br />
• 1: Only the first stage of cooling is enabled (Output 2). Output 3 is inert. Only<br />
the first stage in the Cooling Setpoints section below is enabled.<br />
• 2: Stages 1 and 2 are enabled (Output 2 and 3). The two first stages in the<br />
Cooling Setpoints section below are enabled. This is the default setting.<br />
• 3*: Stages 1 to 3 are enabled (Output 2). The three first stages in the Cooling<br />
Setpoints section below are enabled.<br />
• 4*: All cooling stages are enabled (Output 2). The Cooling Setpoints section<br />
below is completely enabled.<br />
16<br />
www.prolon.net<br />
info@prolon.net
<strong>Basic</strong> <strong>Rooftop</strong> Controller<br />
www.prolon.net<br />
* When stages 3 and/or 4 are enabled, a DMUX-4J interface must be installed on Output<br />
2 and set to “Sequenced Relay Control” with a one-second resolution. Output 3 is inert.<br />
Output 2 pulses with a pulse length proportional to the number of cooling stages enabled.<br />
This does not mean that the DMUX-4J will pulse. It remains an ON/OFF output. For more<br />
details on the DMUX-4J device, consult the DMUX-4J Specifications and Installation<br />
<strong>Guide</strong>s.<br />
• Cooling Demand Source: All cooling functions are regulated by the same demand<br />
source. This source is one of the predefined math functions (see Math Functions<br />
p.35). You can select “Math 1” through “Math 5”.<br />
2.1.4.1 Cooling Setpoints<br />
The activation and deactivation of each output is based on the setpoint and differential for<br />
that output, in relation to the chosen cooling demand source:<br />
• First Stage<br />
• Setpoint<br />
Units MIN MAX Default<br />
% 5 95 35<br />
• Differential<br />
Units MIN MAX Default<br />
% 8 99 20<br />
• Second Stage<br />
• Setpoint<br />
Units MIN MAX Default<br />
% 5 95 50<br />
• Differential<br />
Units MIN MAX Default<br />
% 8 99 20<br />
• Third Stage<br />
• Setpoint<br />
Units MIN MAX Default<br />
% 5 95 80<br />
17<br />
www.prolon.net<br />
info@prolon.net
<strong>Basic</strong> <strong>Rooftop</strong> Controller<br />
www.prolon.net<br />
• Differential<br />
Units MIN MAX Default<br />
% 8 99 20<br />
• Fourth Stage<br />
• Setpoint<br />
Units MIN MAX Default<br />
% 5 95 90<br />
2.1.4.2 Operation<br />
• Differential<br />
Units MIN MAX Default<br />
% 8 99 19<br />
• Minimum ON Time: Once a stage of cooling is activated, this is the minimum amount of<br />
time it will remain ON, even if cooling is no longer required. It is also the minimum<br />
time required to elapse before the next stage can be engaged.<br />
Units MIN MAX Default<br />
Minutes 0 10 2<br />
• Minimum OFF Time: Once a stage of cooling is deactivated, this is the minimum<br />
amount of time it will remain OFF, even if cooling is required.<br />
Units MIN MAX Default<br />
Minutes 0 10 5<br />
2.1.4.3 Analog Cooling<br />
This function allows for analog cooling when a PTA2 interface is installed on Output 2.<br />
Output 3 is inert. Output 2 pulses with a pulse length proportional to the analog output.<br />
This does not mean that the PTA2 will pulse. For more details on the PTA2 device,<br />
consult the PTA2 Specifications and Installation <strong>Guide</strong>s or the <strong>Rooftop</strong> Hardware <strong>Guide</strong>.<br />
Setpoint:<br />
Proportional:<br />
Units MIN MAX Default<br />
% 5 95 35<br />
Units MIN MAX Default<br />
% 8 95 20<br />
18<br />
www.prolon.net<br />
info@prolon.net
<strong>Basic</strong> <strong>Rooftop</strong> Controller<br />
www.prolon.net<br />
• Enable Reverse Acting: The output voltage will be inversely proportional to the<br />
calculated output value.<br />
• Output Range: The analog cooling output can work over 2 different voltage ranges<br />
• 0-10V<br />
• 2-10V<br />
19<br />
www.prolon.net<br />
info@prolon.net
<strong>Basic</strong> <strong>Rooftop</strong> Controller<br />
www.prolon.net<br />
2.1.5 Heating Configuration<br />
Figure 2.1.9: Heating configuration screen<br />
• Heating Demand Source: All heating functions are regulated by the same demand<br />
source. This source is one of the predefined math functions (see Math Functions<br />
p.35). You can select “Math 1” through “Math 5”.<br />
2.1.5.1 Digital Output 4<br />
• Function: Select the function of Output 4.<br />
• OFF: Output 4 is always OFF.<br />
• Preheat Permission: Output 4 is used for preheating permission. Permission<br />
is granted when the fan in ON and when there is no active cooling for a<br />
specified time period (see Delay between Heating and Cooling, page 27), and<br />
when the outside air limit is met (See p.24). This is the default setting.<br />
20<br />
www.prolon.net<br />
info@prolon.net
<strong>Basic</strong> <strong>Rooftop</strong> Controller<br />
www.prolon.net<br />
• Heating Stage: Output 4 is used as an additional heating stage (enables<br />
setpoint and differential fields).<br />
• Setpoint: The setpoint used in the Output 4 heating stage. Only enabled if the Output 4<br />
Function is set to “Heating Stage”.<br />
Units MIN MAX Default<br />
% 5 95 55<br />
• Differential: The differential used for the Output 4 heating stage. Only enabled if the<br />
Output 4 Function is set to “Heating Stage”.<br />
Units MIN MAX Default<br />
% 8 99 20<br />
2.1.5.2 Analog Output 1<br />
• Function: Select the function of Analog Output 1.<br />
• OFF: Analog Output 1 is always OFF.<br />
• Preheat ONLY: Analog Output 1 is used only for preheating of the supply air.<br />
• Preheat AND Heating: Analog Output 1 assumes main heating and supply air<br />
preheating sequences. The final value of Analog Output 1 will be the maximum<br />
of the two. This is the default setting.<br />
• Heating ONLY: Analog Output 1 will only perform heating as specified.<br />
• Setpoint: The setpoint used in the Analog Output 1 heating stage. Only enabled if the<br />
Analog Output 1 Function is set to “Preheat AND Heating” or “Heating ONLY’”<br />
Units MIN MAX Default<br />
% 1 95 40<br />
• Proportional: The proportional band used for the Analog Output 1 heating stage. Only<br />
enabled if the Analog Output 1 Function is set to “Preheat AND Heating” or “Heating<br />
ONLY”.<br />
Units MIN MAX Default<br />
% 5 99 60<br />
21<br />
www.prolon.net<br />
info@prolon.net
<strong>Basic</strong> <strong>Rooftop</strong> Controller<br />
www.prolon.net<br />
• Differential: The differential used for the Analog Output 1 heating stage. Only enabled<br />
if the Analog Output 1 Function is set to “Heating ONLY”.<br />
Units MIN MAX Default<br />
% 8 99 N/A<br />
• Enable Pulsing: Analog Output 1 will use pulse width modulation with a pulse width<br />
period of 1 second. Only enabled if using proportional. Pulse width modulation is<br />
designed for solid-state relay-equipped electric duct heaters.<br />
• Enable Reverse Acting: The output voltage will be inversely proportional to the<br />
calculated output value<br />
2.1.5.3 Preheating<br />
Preheating is calculated using a PI control loop (proportional and integral) to achieve the<br />
desired setpoint.<br />
• Setpoint: The setpoint used for the Analog Output 1 preheating control sequence. The<br />
Master Controller maintains the supply air at this value. Disabled if the Analog Output<br />
1 Function is set to “OFF” or “Heating ONLY”.<br />
Units MIN MAX Default<br />
°C 15 27 21.5<br />
°F 59 80.6 70.7<br />
• Proportional: The proportional band used to calculate the proportional component for<br />
Analog Output 1 preheating. Disabled if the Analog Output 1 Function is set to “OFF”<br />
or “Heating ONLY”.<br />
Units MIN MAX Default<br />
°C 0 50 20<br />
°F 0 90 36<br />
• Integral: The integral value used to calculate the integral component for preheating. It<br />
defines the amount of time required for the integral component to add 100% to the<br />
output due to an error of 1 °C. Disabled if the Analog Output 1 Function is set to<br />
“OFF” or “Heating ONLY”.<br />
22<br />
www.prolon.net<br />
info@prolon.net
<strong>Basic</strong> <strong>Rooftop</strong> Controller<br />
www.prolon.net<br />
Units MIN MAX Default<br />
Minutes 0 240 15<br />
23<br />
www.prolon.net<br />
info@prolon.net
<strong>Basic</strong> <strong>Rooftop</strong> Controller<br />
www.prolon.net<br />
2.1.6 Limits<br />
2.1.6.1 Return Air Temperature<br />
Figure 2.1.10: Limits configuration screen<br />
This section describes all the limits applicable to the return air temperature. If no return<br />
air temperature sensor is used, then these conditions are assumed to be satisfied.<br />
• Stop Cooling (1st Stage) when lower than:<br />
Units MIN MAX Default<br />
°C 10 40 14<br />
°F 50 104 57.2<br />
Re-enabled at 2°C (3.6°F) above this value.<br />
• Stop Cooling (2nd Stage) when lower than:<br />
Units MIN MAX Default<br />
°C 10 40 20<br />
°F 50 104 68<br />
Re-enabled at 2°C (3.6°F) above this value.<br />
• Stop Heating when higher than:<br />
Units MIN MAX Default<br />
°C 0 50 35<br />
°F 32 122 95<br />
24<br />
www.prolon.net<br />
info@prolon.net
<strong>Basic</strong> <strong>Rooftop</strong> Controller<br />
www.prolon.net<br />
Re-enabled at 5°C (9°F) below this value.<br />
2.1.6.2 Outside Air Temperature<br />
This section describes all the limits applicable to the outside air temperature. If no outside<br />
air temperature sensor is used, then these conditions are assumed to be satisfied.<br />
• Stop Cooling (1st Stage) when lower than:<br />
Units MIN MAX Default<br />
°C -40 40 -40<br />
°F -40 104 -40<br />
Re-enabled at 2°C (3.6°F) above this value. Note that these limits do not<br />
apply to the economizer sequence of the <strong>ProLon</strong> advanced rooftop.<br />
• Stop Cooling (2nd Stage) when lower than:<br />
Units MIN MAX Default<br />
°C -40 40 12<br />
°F -40 104 53.6<br />
Re-enabled at 2°C (3.6°F) above this value.<br />
• Stop Heating when higher than:<br />
Units MIN MAX Default<br />
°C 0 50 30<br />
°F 32 122 86<br />
Re-enabled at 2°C (3.6°F) below this value.<br />
• Enable Preheating if Lower than:<br />
Units MIN MAX Default<br />
°C -100 21 12<br />
°F -148 69.8 53.6<br />
Disabled at 2°C (3.6°F) above this value.<br />
• Restart fan if lower than: This function allows the fan to start even in unoccupied mode<br />
if the outside temperature gets too cold or too hot.<br />
Units MIN MAX Default<br />
Lower °C -40 40 -40<br />
than °F -40 104 -40<br />
Higher °C -40 40 40<br />
than °F -40 104 104<br />
There is a 2°C (3.6°F) differential applied to these values.<br />
2.1.6.3 Supply Air Temperature<br />
This section describes all the limits applicable to the supply air temperature. If no supply<br />
air temperature sensor is used and if no value is received from the network, these<br />
conditions are assumed to be satisfied.<br />
• Stop cooling stages in succession when lower than: When the supply temperature is<br />
lower than this setpoint, the currently activated cooling stages will turn OFF one by<br />
25<br />
www.prolon.net<br />
info@prolon.net
<strong>Basic</strong> <strong>Rooftop</strong> Controller<br />
www.prolon.net<br />
one. There will be a delay between each stage deactivation, which is equal to the<br />
minimum compressor off time.<br />
Units MIN MAX Default<br />
°C -40 40 9<br />
°F -40 104 48.2<br />
Re-enabled at 3°C (5.4°F) above this value.<br />
• Modulating heat limit of Analog Output 1: If Analog Output 1 is configured as<br />
modulating, it will decrease its signal to keep the supply temperature from exceeding<br />
this value.<br />
Units MIN MAX Default<br />
°C 21.5 55 40<br />
°F 70.7 131 104<br />
• Stop heating when higher than: All heating stages will shut off if the supply<br />
temperature exceeds this value.<br />
Units MIN MAX Default<br />
°C 21.5 55 50<br />
°F 70.7 131 122<br />
Re-enabled at 5°C (9°F) below this value.<br />
• Stop Fan if lower than: When the supply air temperature goes below this value, the fan<br />
will stop. This limit is ignored for a 5-minute period following a transition of the fan<br />
status from OFF to ON, unless it was first caused to stop by this limit.<br />
Units MIN MAX Default<br />
°C 0 21 4<br />
°F 32 69.8 39.2<br />
• Restart Fan at: If the fan has been stopped due to the supply low temperature limit<br />
(see previous limit), this is the temperature at which the fan will restart.<br />
Units MIN MAX Default<br />
°C 2+Stop Setpoint 20+Stop Setpoint 8+Stop Setpoint<br />
°F 3.6+Stop Setpoint 36+Stop Setpoint 14.4+Stop Setpoint<br />
26<br />
www.prolon.net<br />
info@prolon.net
<strong>Basic</strong> <strong>Rooftop</strong> Controller<br />
www.prolon.net<br />
2.1.7 Priority<br />
Figure 2.1.11: Priority configuration screen<br />
• Deadband Between Heating and Cooling: This specifies the deadband, centered on<br />
0%, in which no heating and no cooling actions will be taken. This value is applied to<br />
each math function.<br />
Units MIN MAX Default<br />
% 0 30 20<br />
• Delay Between Heating and Cooling: This is the minimum amount of time that must<br />
pass after the end of any heating action before any cooling action can begin, and<br />
vice-versa.<br />
Units MIN MAX Default<br />
Minutes 0 100 5<br />
27<br />
www.prolon.net<br />
info@prolon.net
<strong>Basic</strong> <strong>Rooftop</strong> Controller<br />
www.prolon.net<br />
2.1.7.1 Priority Mode<br />
• Auto: Choose this to have the priority switch automatically depending on the outside<br />
temperature.<br />
• Outside Temp: The outside temperature around which to switch heating or cooling<br />
priority. Heating will have priority below this value, while cooling will have priority<br />
above it.<br />
Units MIN MAX Default<br />
°C -20 30 8<br />
°F -4 86 46.4<br />
• Differential: The variation of the outside temperature around the setpoint necessary to<br />
activate a switch in priority. Used to prevent rapid changes in priority due to small<br />
temperature variations around the setpoint.<br />
Units MIN MAX Default<br />
°C 0 20 4<br />
°F 32 68 39.2<br />
• Manual: Use this mode to manually set the priority to heating or cooling.<br />
Please note that if the cooling and heating outputs are controlled by the same math<br />
function, the priority has no importance because a single math function cannot produce a<br />
heating and cooling demand at the same time.<br />
28<br />
www.prolon.net<br />
info@prolon.net
<strong>Basic</strong> <strong>Rooftop</strong> Controller<br />
www.prolon.net<br />
2.1.8 Calibration<br />
Figure 2.1.12: Calibration configuration screen<br />
• Supply Temperature Calibration: This value will be added to the temperature received<br />
from the supply sensor to calculate the actual supply temperature. This value will<br />
NOT be added if the network provides the supply temperature to this device.<br />
Units MIN MAX Default<br />
°C -20 +20 0<br />
°F -36 +36 0<br />
• Return Temperature Calibration: This value will be added to the temperature received<br />
from the return air sensor to calculate the actual return air temperature.<br />
Units MIN MAX Default<br />
°C -20 +20 0<br />
°F -36 +36 0<br />
• Outside Temperature Calibration: This value will be added to the temperature received<br />
from the outside air sensor to calculate the actual outside air temperature.<br />
Units MIN MAX Default<br />
°C -20 +20 0<br />
°F -36 +36 0<br />
29<br />
www.prolon.net<br />
info@prolon.net
<strong>Basic</strong> <strong>Rooftop</strong> Controller<br />
www.prolon.net<br />
30<br />
www.prolon.net<br />
info@prolon.net
<strong>Basic</strong> <strong>Rooftop</strong> Controller<br />
www.prolon.net<br />
2.1.9 Device Properties<br />
Figure 2.1.13: Device properties screen<br />
This screen shows all the intrinsic properties of the device you are configuring. This helps<br />
you determine its capabilities without having to visually inspect the device.<br />
• Device Type: The type of controller you are configuring.<br />
• Software version: The current software in the controller. The greater the software<br />
version, the more advanced the device is. Devices can be upgraded by<br />
reprogramming them (see “Reprogram” below).<br />
• Hardware version: This is the physical nature of the controller. Different hardware has<br />
different features. The hardware can only be changed by replacing it physically.<br />
• Device Number: The network address of the controller, which is configured manually<br />
using the dipswitches on the board itself.<br />
• Device Name: This field indicates the current name of the controller, which you can<br />
modify. Alternatively, you can just right-click on the icon and select the rename<br />
option.<br />
31<br />
www.prolon.net<br />
info@prolon.net
<strong>Basic</strong> <strong>Rooftop</strong> Controller<br />
www.prolon.net<br />
• Reset Device: Causes the device to perform a reset. All configuration properties<br />
REMAIN SAVED. However, resetting the controller removes all active overrides. This<br />
function is useful for recalibrating the damper or for other debugging purposes.<br />
• Reprogram: This function is used to upgrade the controller with a new software<br />
version. <strong>Focus</strong> will begin by asking you for the HEX file that contains the software<br />
update. Software update HEX files can only be provided by <strong>ProLon</strong>. At the end of the<br />
procedure, <strong>Focus</strong> will automatically reapply all the parameters you have previously<br />
configured into the device.<br />
32<br />
www.prolon.net<br />
info@prolon.net
<strong>Basic</strong> <strong>Rooftop</strong> Controller<br />
www.prolon.net<br />
2.2 Network Menu<br />
A <strong>ProLon</strong> Master (<strong>Basic</strong> <strong>Rooftop</strong>, Advanced <strong>Rooftop</strong> and Heatpump) controls and<br />
manages the <strong>ProLon</strong> Slaves (VAV Controller, Thermostat, Boiler Controller and<br />
Humidifier Controller) on its system. The data exchanged between the master and its<br />
slaves is used to calculate the math functions, control the occupancy, activate morning<br />
warm up functions, and much more. Therefore, a proper network configuration is an<br />
important element in any zoning system.<br />
The Network menu, which can be found at the top of the configuration screen of any<br />
master, gives you access to the network configuration screens, which are explained in<br />
this section.<br />
2.2.1 Slave List<br />
Figure 2.2.1: Slave list configuration screen<br />
Used mostly for offline configuration, in this screen you can manually add slaves from<br />
your <strong>Focus</strong> network list to the master’s slave list.<br />
• System List: The list of slave icons already existing in the selected system. All icons<br />
already created on this masters system will be found here.<br />
• Master’s List: The list of slaves that the master is aware of. If a slave is not on the<br />
master’s slave list, the master will NOT attempt to communicate with it. This means<br />
that the demand of this slave will not be included in any math function calculation,<br />
and it will not receive the system-shared supply temperature or occupancy status. In<br />
addition, <strong>ProLon</strong> <strong>Focus</strong> will NOT be able to communicate with the slave (its icon<br />
33<br />
www.prolon.net<br />
info@prolon.net
<strong>Basic</strong> <strong>Rooftop</strong> Controller<br />
www.prolon.net<br />
becomes grey). This is because the master assumes that the slave does not exist<br />
and therefore blocks any related network traffic.<br />
Updating the master’s slave list is useful when offline because it allows you to<br />
configure certain network properties.<br />
When online, updating the master’s slave list can be done quickly by simply pressing<br />
the “Check Network” button, by right-clicking the master icon and choosing “Get List”,<br />
or by pressing the reset button on the master physically.<br />
2.2.1.1 Buttons<br />
• Add>>: Add all the selected slaves from the system’s slave list to the master’s slave<br />
list. To select a slave, simply click on its name in the list. To select multiple slaves,<br />
hold CTRL while clicking on their names.<br />
• Add All>>: Add all the slaves from the system’s slave list to the master’s slave list.<br />
• Remove: Remove all selected slaves from the master’s slave list. To select a slave to<br />
remove, simply click on its name in the list. To select multiple slaves, hold CTRL<br />
while clicking on their names.<br />
• Remove All: Remove all the slaves from the master’s slave list.<br />
• Create Icons: Create <strong>Focus</strong> icons for each slave in the master’s slave list, unless the<br />
icon already exists.<br />
• Check Network: Causes the master to automatically retrieve the list of slaves attached<br />
to it. All slaves found will be displayed in the “Master’s List” box. This function is<br />
unavailable offline.<br />
34<br />
www.prolon.net<br />
info@prolon.net
<strong>Basic</strong> <strong>Rooftop</strong> Controller<br />
www.prolon.net<br />
2.2.2 Math Functions<br />
Figure 2.2.2: Math functions configuration screen<br />
This screen is used to configure a <strong>ProLon</strong> Master’s math functions. A <strong>ProLon</strong> Master<br />
does not produce its own demand; it must first retrieve the demand of each slave on its<br />
network. With the demand of each slave on hand, it can process these values using<br />
certain general math functions. The results of the math functions are then applied to the<br />
cooling, heating and other functions of the master, as defined by the user. There are five<br />
available slots to program. For each slot, you have the following options:<br />
• Source: This is the type of math function used.<br />
• Weighted Average: The weighted average of all the slaves included in the<br />
calculation. The weighted average is calculated by multiplying the demand of<br />
each slave by its respective weight and adding them together. The result is<br />
then divided by the total weight in the calculation. This provides a math function<br />
whose final result is more influenced by the zones with greater weight.<br />
• Max Heating: This returns the highest demand of heating of all the slaves<br />
included in the calculation.<br />
• Max Cooling: This returns the highest demand of cooling of all the slaves<br />
included in the calculation.<br />
35<br />
www.prolon.net<br />
info@prolon.net
<strong>Basic</strong> <strong>Rooftop</strong> Controller<br />
www.prolon.net<br />
• Weighted Average (heating only): This is the same as “Weighted Average”,<br />
except only zones with a heating demand are included in the calculation.<br />
• Weighted Average (cooling only): This is the same as “Weighted Average”,<br />
except only zones with a cooling demand are included in the calculation.<br />
• Occupancy: If there is at least one slave found in this calculation that is<br />
occupied (or overridden to be occupied), this math function will return 100%,<br />
otherwise it will be 0%.<br />
• Override: If there is at least one slave found in this calculation that is<br />
overridden from unoccupied to occupied mode, this math function will return<br />
100%, otherwise it will be 0%<br />
• Global: When this is selected, ALL slaves on the system are included in the<br />
calculation. The global weight of each slave device will be used in the calculations.<br />
• Group Code: When this is selected, ONLY the slaves belonging to this group are<br />
included in the calculation. There are 250 groups available, numbered 1 through 250.<br />
The group weight of each slave controller belonging to that group will be used in the<br />
calculation. When Group Codes are not being used, they are automatically set to<br />
zero.<br />
Units MIN MAX Default<br />
N/A 1 250 0 (Not used)<br />
• Poll Rate: The rate at which this master will update all the slaves on the system and<br />
receive new information from them. Increase this value to alleviate network traffic.<br />
Units MIN MAX Default<br />
Seconds 1 250 3<br />
During a Master/Slave data transaction, the exchanged data is as follows:<br />
Master Slave:<br />
• Supply temperature<br />
• Outside temperature<br />
• Occupancy status of the master<br />
• Morning warm up command<br />
• Override of Outputs 3, 4 or 5 based on the outside temperature<br />
• Damper Override<br />
Slaves Master<br />
• Demand<br />
• Group codes and weights<br />
• Global weight<br />
• Override status<br />
• Supply temperature, if this slave is the source of the system’s supply<br />
temperature (see below)<br />
36<br />
www.prolon.net<br />
info@prolon.net
<strong>Basic</strong> <strong>Rooftop</strong> Controller<br />
www.prolon.net<br />
• List Refresh Rate: The interval at which this device will attempt to scan the network for<br />
slaves and create a new slave list. When set to zero, the device will refrain from<br />
searching for slaves.<br />
Units MIN MAX Default<br />
Minutes 0 250 30<br />
• Demand Filter: The demand filter is used to limit the rate of change of the math<br />
functions. When a math value changes, it is first compared to its previous value. The<br />
difference between the two is multiplied by the demand filter and added to the<br />
previous value. Example:<br />
- Demand Filter = 30%<br />
- Previous math value = 50%<br />
- Desired math value = 75%<br />
- Final math value = (75-50) x 30% + 50 = 57.5%<br />
Therefore, instead of the math value suddenly jumping from 50% to 75% in the span<br />
of 1 second, it will instead jump to 57.5 % and gradually reach the 75% mark. Note<br />
that the demand filter is not applied if the difference between the previous math value<br />
and the desired math value is equal or less than 3%.<br />
Units MIN MAX Default<br />
% 0 100 10<br />
• Unoccupied Mode: This option lets you decide if the master should modify the math<br />
calculation strategies during unoccupied mode.<br />
• Max demand: During unoccupied mode, “Averaging” type math functions will<br />
be replaced by “Max demand” type functions:<br />
o “Weighted Average” is replaced by “Max Demand”. In the case<br />
where there are conflicting demands between different slaves<br />
(cooling and heating), priority is used to decide between them (p.28).<br />
o “Weighted Average (Cooling Only)” is replaced by “Maximum<br />
o<br />
Cooling”<br />
“Weighted Average (Heating Only)” is replaced by “Maximum<br />
Heating”<br />
• Normal: Math functions will always be calculated the same way, regardless<br />
of occupancy.<br />
37<br />
www.prolon.net<br />
info@prolon.net
<strong>Basic</strong> <strong>Rooftop</strong> Controller<br />
www.prolon.net<br />
2.2.3 COM Port Settings<br />
Figure 2.2.3: COM Port configuration screen<br />
Changes to the settings in this section will only take effect once the <strong>ProLon</strong> Master is<br />
reset or powered OFF/ON. Each port on the master has the same options. The NET port<br />
is the port with two screw terminals.<br />
• Baud Rate: This sets the baud rate value for the COM port. The default baud rate used<br />
by a master is 57600bps but may be set to any of these standard values:<br />
• 9600 bps<br />
• 19200 bps<br />
• 38400 bps<br />
• 57600 bps<br />
• 76800 bps<br />
• 115200 bps<br />
• Parity: This sets the parity for communication on the COM port. The default parity used<br />
by a master is “None” but may be set to any of these standard values:<br />
• None<br />
• Odd<br />
• Even<br />
• Stop Bits: Sets the number of stop bits used by the COM port. By default, it is set to 1,<br />
but can also be set to 2.<br />
38<br />
www.prolon.net<br />
info@prolon.net
<strong>Basic</strong> <strong>Rooftop</strong> Controller<br />
www.prolon.net<br />
39<br />
www.prolon.net<br />
info@prolon.net
<strong>Basic</strong> <strong>Rooftop</strong> Controller<br />
www.prolon.net<br />
2.2.4 Other<br />
Figure 2.2.4: Other configuration screen<br />
This screen lets you configure various network parameters.<br />
• System Supply Temperature Source: The desired device to be the source of the<br />
system supply temperature. The master retrieves the supply temperature from this<br />
device and distributes it to all other slaves. Any slave that already has its own supply<br />
temperature sensor will ignore this value. By default, it is set to the system’s master<br />
device.<br />
Morning Warm Up Sequence<br />
• Disable Outputs 3 / 4 / 5 on All Slaves: When the master detects a switch from<br />
unoccupied mode to occupied mode (not including overrides), it commands all slaves<br />
to disable their Outputs 3 and/or 4 and/or 5 (output = 0 V) for the amount of time<br />
specified by Delay time. Because Outputs 3, 4 and 5 are generally used for zone<br />
40<br />
www.prolon.net<br />
info@prolon.net
<strong>Basic</strong> <strong>Rooftop</strong> Controller<br />
www.prolon.net<br />
terminal heating, this function can help maximize energy savings by relegating all<br />
morning heating to the central unit.<br />
41<br />
www.prolon.net<br />
info@prolon.net
<strong>Basic</strong> <strong>Rooftop</strong> Controller<br />
www.prolon.net<br />
• Delay Time: The amount of time Outputs 3 and 4 remain disabled.<br />
Units MIN MAX Default<br />
Minutes 1 300 OFF<br />
Cooling priority zones<br />
When a zone is specified as a cooling priority zone, the master will use the cooling<br />
demand of that zone as soon as its demand surpasses the math output assigned to<br />
cooling. A maximum of three high-priority cooling zones may be selected.<br />
WARNING: This option should only be used by experienced building automation<br />
specialists.<br />
Outside Temperature Override<br />
This function commands selected slaves to set their Output 3/4/5 to the minimum value<br />
specified when a certain condition on the outside temperature is met. This override can<br />
be activated when the outside temperature is either greater or less than the temperature<br />
setpoint:<br />
Units MIN MAX Default<br />
°C -30 40 -20<br />
°F -22 104 -4<br />
If you set the override to zero, the output will remain deactivated (0%). The overrides will<br />
remain active as long as the outside temperature satisfies the specified condition. By<br />
default, these overrides are deactivated.<br />
Clicking the “Set Participation” button opens a window that allows you to select the slaves<br />
that will participate in the corresponding outside temperature override.<br />
Slave Damper Override<br />
Override all slave dampers to the desired position (between 0 and 100%). This function is<br />
useful during air balancing procedures. This parameter will be lost if the master loses<br />
power or is reset.<br />
© Copyright 2013 <strong>ProLon</strong>. All rights reserved.<br />
No part of this document may be photocopied or reproduced by any means, or translated to another language without prior written consent<br />
of <strong>ProLon</strong>. All specifications are nominal and may change as design improvements are introduced. <strong>ProLon</strong> shall not be liable for damages<br />
resulting from misapplication or misuse of its products. All trademarks are the property of their respective owners.<br />
42<br />
www.prolon.net<br />
info@prolon.net