- Page 1 and 2:
USER MANUAL
- Page 3 and 4:
Table of Contents License Agreement
- Page 5 and 6:
Table of Contents GENERAL 1. You ma
- Page 7 and 8:
Table of Contents Table of Contents
- Page 9 and 10:
Table of Contents Chapter 7. Using
- Page 11 and 12:
Preface Before You Begin Welcome to
- Page 13 and 14:
Chapter 1 Installing Q-Capture Pro
- Page 15 and 16:
Installing Q-Capture Pro 7 Installi
- Page 17 and 18:
Installing Q-Capture Pro 7 The Read
- Page 19 and 20:
Chapter 2 Getting Started This chap
- Page 21 and 22:
The Q-Capture Pro 7 Application Win
- Page 23 and 24:
The Q-Capture Pro 7 Application Win
- Page 25 and 26:
The Q-Capture Pro 7 Application Win
- Page 27 and 28:
The Q-Capture Pro 7 Application Win
- Page 29 and 30:
The Q-Capture Pro 7 Application Win
- Page 31 and 32:
The Q-Capture Pro 7 Application Win
- Page 33 and 34:
The Q-Capture Pro 7 Application Win
- Page 35 and 36:
The Q-Capture Pro 7 Application Win
- Page 37 and 38:
The Q-Capture Pro 7 Application Win
- Page 39 and 40:
The Q-Capture Pro 7 Application Win
- Page 41 and 42:
Chapter 3 Capturing Images This cha
- Page 43 and 44:
The Capture Tab 3. Got to Settings,
- Page 45 and 46:
The Capture Tab Using Advanced Sett
- Page 47 and 48:
The Capture Tab 4. Next, expand the
- Page 49 and 50:
The Capture Tab formats available.
- Page 51 and 52:
The Capture Tab Saving Your Capture
- Page 53 and 54:
The Capture Tab 3. From this panel,
- Page 55 and 56:
The Capture Tab 3. Draw a line over
- Page 57 and 58: The Capture Tab For example, if the
- Page 59 and 60: The Capture Tab If there is a featu
- Page 61 and 62: The Capture Tab Applying a Calibrat
- Page 63 and 64: The Capture Tab TIP: You may need t
- Page 65 and 66: Chapter 4 Viewing Intensity Informa
- Page 67 and 68: Viewing a Image Histogram Right-cli
- Page 69 and 70: Viewing a Line Profile 3. When you
- Page 71 and 72: Viewing a Line Profile Polygon/Poly
- Page 73 and 74: Viewing a Line Profile The Options
- Page 75 and 76: Using the Saturation Warning The Re
- Page 77 and 78: Chapter 5 Working with Images This
- Page 79 and 80: Opening an Image Opening an Image T
- Page 81 and 82: Opening an Image Opening an Recent
- Page 83 and 84: Opening an Image Using Quick Save I
- Page 85 and 86: Zooming Images Zooming Images The z
- Page 87 and 88: Panning Images 1. Position the curs
- Page 89 and 90: Enhancing an Image Enhancing an Ima
- Page 91 and 92: Enhancing an Image Rotating an Imag
- Page 93 and 94: Enhancing an Image Using the Canvas
- Page 95 and 96: Using Color Group Commands Using Co
- Page 97 and 98: Using Color Group Commands Click Ap
- Page 99 and 100: Using Color Group Commands Detailed
- Page 101 and 102: Adjusting Color Channels Adjusting
- Page 103 and 104: Adjusting Color Channels Changing t
- Page 105 and 106: Adjusting Color Channels Gamma: Adj
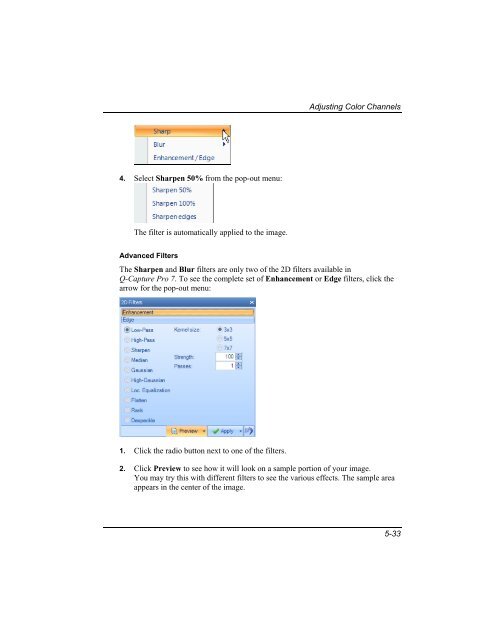
- Page 107: Adjusting Color Channels 3. Choose
- Page 111 and 112: Image Sequences Use active range ap
- Page 113 and 114: Chapter 6 Using Annotations Annotat
- Page 115 and 116: Creating an Annotation Creating a G
- Page 117 and 118: Creating an Annotation Auto-Trace.
- Page 119 and 120: Arranging Annotations The specified
- Page 121 and 122: Arranging Annotations 3. Click on t
- Page 123 and 124: Setting the Appearance of Annotatio
- Page 125 and 126: Setting the Appearance of Annotatio
- Page 127 and 128: Chapter 7 Using ROIs You can define
- Page 129 and 130: Defining an ROI Defining an ROI Bef
- Page 131 and 132: Delete Selected/Delete All: Use the
- Page 133 and 134: Arranging ROIs If the cursor is pos
- Page 135 and 136: Setting the Appearance of ROIs Sett
- Page 137 and 138: Setting the Appearance of ROIs Labe
- Page 139 and 140: Chapter 8 Measuring Objects in Imag
- Page 141 and 142: Making Manual Measurements Making M
- Page 143 and 144: Making Manual Measurements You can
- Page 145 and 146: Manual Tagging 5. Save your data to
- Page 147 and 148: Manual Tagging 7. Use the Outlines
- Page 149 and 150: Viewing Measurement Data The Data T
- Page 151 and 152: Chapter 9 Customizing the User Inte
- Page 153 and 154: Using the Quick Access Toolbar To A
- Page 155 and 156: Using the Quick Access Toolbar The
- Page 157 and 158: Customizing the Image Strip If you
- Page 159 and 160:
Customizing the Image Strip Viewing
- Page 161 and 162:
Customizing the Image Strip Activat
- Page 163 and 164:
Appendix A - File Format Specificat
- Page 165 and 166:
Index * *.AVI, 10‐1 *.BMP, 10‐1
- Page 167 and 168:
Index G Gain, 3‐6 Gamma, 3‐6 ga
- Page 169 and 170:
Index setting the appearance of, 7
- Page 171:
www.QIMAGING.com tel+1800.874.9789