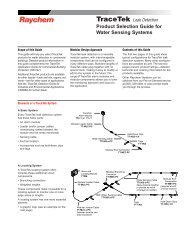
TTDMâNMM and - California Detection Systems
TTDMâNMM and - California Detection Systems
TTDMâNMM and - California Detection Systems

You also want an ePaper? Increase the reach of your titles
YUMPU automatically turns print PDFs into web optimized ePapers that Google loves.
Appendix 6 – Connection to Other Devices<br />
Note: All connections to external devices are made at the<br />
TTDM-NMM.<br />
Relays<br />
TTDM-NMM has three relays:<br />
• Service<br />
• Leak<br />
• Fault<br />
Relay Logic<br />
Each relay provides two Form-C relay contacts, with normally<br />
open <strong>and</strong> normally closed contacts both provided. The relays<br />
are de-energized to indicate an alarm condition. The diagram<br />
below shows the relay status when each is in an alarm (deenergized)<br />
state.<br />
SERVICE RELAY LEAK RELAY FAULT RELAY<br />
15 16 17 18 19 20 21 22 23 24 25 26 27 28 29 30 31 32<br />
4-20 mA Interface<br />
The module is equipped with an analog 4-20 mA interface<br />
which can communicate the status of a selected SIM channel.<br />
The TTDM-NMM adjusts its current output based on whether<br />
an alarm condition exists in the selected channel, <strong>and</strong> (when a<br />
leak is detected) on the location of the leak. The module’s output<br />
can be scaled to make full use of the 4-20 mA range for the<br />
length of sensing cable connected to the selected SIM channel.<br />
Important: The 4-20 mA interface communicates the status of a<br />
single SIM channel. The default SIM channel is the TTDM-NMM<br />
internal Sensor Interface board. To use the port for a different<br />
SIM channel, select 4-20 mA SIM from the 4-20 mA Test menu<br />
(as described at the end of this section).<br />
Note: The current output is isolated from the sensing circuit <strong>and</strong><br />
therefore requires an external 24 Vdc power supply.<br />
4-20 mA Wiring<br />
The 4-20 mA output port is connector J2 on the TTDM-NMM<br />
motherboard (feature 18 in the diagram on the inside front<br />
cover), with terminals as noted in the following table:<br />
Wiring Options to Gang Alarm Relays on a Single Pair of Wires<br />
The illustrations below show how the relays (features 15 , 16 ,<br />
<strong>and</strong> 17 in the diagram on the inside front cover) can<br />
be jumpered together to allow remote monitoring of the<br />
TTDM-NMM system status with only a single pair of wires. The<br />
TTDM-NMM de-energizes its relays to signal an alarm condition.<br />
Therefore, loss of power as well as any other type of alarm<br />
would trip the remote alarm.<br />
PL<br />
4-20MA OUT PORT<br />
J2<br />
1<br />
IRTN IOUT +V +VRTN<br />
11 12 13 14<br />
PL<br />
RS-485 EXT XMTRS<br />
1<br />
J10<br />
+51SO ICOM 485+ 485–<br />
1 2 3 4<br />
PL<br />
PL<br />
RS-232/485 EXT COM PORT 4-20MA OUT PORT<br />
1<br />
J13<br />
1<br />
J2<br />
RX/A TX/B RTS CTS +5V GND IRTN IOUT +V +VRTN<br />
5 6 7 8 9 10 11 12 13 14<br />
Open on Alarm<br />
SERVICE RELAY<br />
5A 250V<br />
J6<br />
LEAK RELAY<br />
5A 250V<br />
J25<br />
1 1 1<br />
FAULT RELAY<br />
5A 250V<br />
J9<br />
Relays wired<br />
in series<br />
Pin Desc. Use<br />
J2-11 IRTN Current loop return<br />
J2-12 IOUT Current output<br />
J2-13 +V 24 Vdc supply (required)<br />
J2-14 +VRTN 24 Vdc common (required)<br />
NC NO COM NC NO COM<br />
15 16 17 18 19 20<br />
NC NO COM NC NO COM<br />
21 22 23 24 25 26<br />
NC NO COM NC NO COM<br />
27 28 29 30 31 32<br />
Monitoring circuit<br />
(open on alarm)<br />
Close on Alarm<br />
SERVICE RELAY<br />
5A 250V<br />
J6<br />
LEAK RELAY<br />
5A 250V<br />
J25<br />
1 1 1<br />
FAULT RELAY<br />
5A 250V<br />
J9<br />
Relays wired<br />
in parallel<br />
NC NO COM NC NO COM<br />
15 16 17 18 19 20<br />
NC NO COM NC NO COM<br />
21 22 23 24 25 26<br />
NC NO COM NC NO COM<br />
27 28 29 30 31 32<br />
Monitoring circuit<br />
(close on alarm)<br />
29