10 table saw - Grizzly Industrial Inc.
10 table saw - Grizzly Industrial Inc.
10 table saw - Grizzly Industrial Inc.

You also want an ePaper? Increase the reach of your titles
YUMPU automatically turns print PDFs into web optimized ePapers that Google loves.
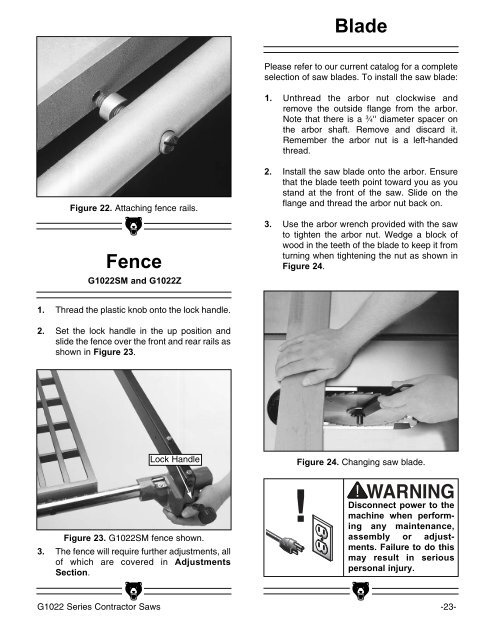
BladePlease refer to our current catalog for a completeselection of <strong>saw</strong> blades. To install the <strong>saw</strong> blade:1. Unthread the arbor nut clockwise andremove the outside flange from the arbor.Note that there is a 3 ⁄4'' diameter spacer onthe arbor shaft. Remove and discard it.Remember the arbor nut is a left-handedthread.Figure 22. Attaching fence rails.FenceG<strong>10</strong>22SM and G<strong>10</strong>22Z2. Install the <strong>saw</strong> blade onto the arbor. Ensurethat the blade teeth point toward you as youstand at the front of the <strong>saw</strong>. Slide on theflange and thread the arbor nut back on.3. Use the arbor wrench provided with the <strong>saw</strong>to tighten the arbor nut. Wedge a block ofwood in the teeth of the blade to keep it fromturning when tightening the nut as shown inFigure 24.1. Thread the plastic knob onto the lock handle.2. Set the lock handle in the up position andslide the fence over the front and rear rails asshown in Figure 23.Lock HandleFigure 24. Changing <strong>saw</strong> blade.Figure 23. G<strong>10</strong>22SM fence shown.3. The fence will require further adjustments, allof which are covered in AdjustmentsSection.!Disconnect power to themachine when performingany maintenance,assembly or adjustments.Failure to do thismay result in seriouspersonal injury.G<strong>10</strong>22 Series Contractor Saws -23-