
Create successful ePaper yourself
Turn your PDF publications into a flip-book with our unique Google optimized e-Paper software.
12<strong>Using</strong> <strong>Scripts</strong> (Macros) in MIPAVIn this chapter...“Developing and using scripts” on page 492“Combining scripts and other programs- TBD” on page 527MIPAV provides three different methods of customizing the program.The first method involves developing scripts, which you use directly withinthe program (see ‘‘Developing and using scripts’’).In the second method, you also develop scripts but you initiate, or call, themfrom another program. Developing scripts does not require programmingskills or learning a new script language, and calling them from anotherprogram may require, depending on the program, only minimalprogramming knowledge (see “Combining scripts and other programs-TBD” on page 527). This chapter discusses both of these methods ofdeveloping and using scripts.The third method of customizing MIPAV—developing plug-in programs—does require Java programming skills. For more information about thismethod, refer to Chapter 11, “Developing Plug-in Programs.”MIPAV User’s Guide, Volume 1, Basics 49112/2/08
M I P A VM e d i c a l I m a g e P r o c e s s i n g, A n a l y s i s, & V i s u a l i z a t i o nMIPAV User’s Guide, Volume 1, BasicsDeveloping and using scripts<strong>Scripts</strong>, sometimes referred to as macros in other programs, record a seriesof commands or actions on specific images or groups of images that you canrun with a single command. <strong>Using</strong> scripts can increase productivity andimprove efficiency in performing commonly repeated actions or series ofactions.Tip: Most important! You can use scripts to process a large set of user-definedimages.Setting up scriptingThis section explains the following tasks:• Setting up scripting (refer to “Setting up scripting” on page 492• Planning scripts (refer to “Planning scripts” on page 495)• Creating scripts (refer to “Recording scripts” on page 498)• Running scripts (refer to “Examples of working scripts” onpage 525)• Editing and deleting scripts (refer to “Editing and deleting scripts”on page 508)Before you start create, edit, run, or delete scripts, you need to1 Select the scripts home directory, refer to “<strong>Scripts</strong> Home” on page 493;2 And display the scripting toolbar (optional, but very helpful).To display the scripting toolbarLike the paint toolbar, you can choose to show it on an as-needed basis ornot to show it on an as-needed basis. To display the scripting toolbar on anMIPAV User’s Guide, Volume 1, Basics 49212/2/08
M I P A VM e d i c a l I m a g e P r o c e s s i n g, A n a l y s i s, & V i s u a l i z a t i o nMIPAV User’s Guide, Volume 1, Basicsas-needed basis, select Toolbars > Scripting Toolbar (Figure 285) MIPAV.Scripting toolbarFigure 285. Scripting Toolbar command on the Toolbar menuThe scripting toolbar immediately appears beneath the VOI toolbar or, ifthe Paint toolbar is also displayed, immediately below the Paint toolbar. SeeFigure 286.Figure 286. The Scripting toolbar is highlightedSCRIPTS HOMEThe scripts home is the directory where you store scripts, and from whichyou run them. After you select a scripts home, the name of one of the scripts(which are ordered alphabetically) in that directory appears after CurrentScript on the scripting toolbar (Figure 287). If there is more than one scriptin the directory, Current Script becomes a list box from which you can selectthe script to run.To set up <strong>Scripts</strong> Home1 Start MIPAV. The initial MIPAV window opens.2 Open an image. The expanded MIPAV window appears.MIPAV User’s Guide, Volume 1, Basics 49312/2/08
M I P A VM e d i c a l I m a g e P r o c e s s i n g, A n a l y s i s, & V i s u a l i z a t i o nMIPAV User’s Guide, Volume 1, Basics3 Select Toolbars > Scripting Toolbar. The scripting toolbar appears.A dimmed rectangle appears immediately following the words CurrentScript in the scripting toolbar.Refresh the script listingRun the selected scriptStart recording a scriptFigure 287. The Scripting toolbar4 Click <strong>Scripts</strong> Directory... The Choose Directory dialog box (Figure 288)appears.Figure 288. Choose Directory dialog box. Note that it shows onlydirectories, not individual files5 Select a directory in which to store your scripts.6 Click Open. The directory opens and the Choose Directory dialog boxcloses.After you’ve selected a scripts home and run a script for the first time,Current Script becomes a list box that shows the name of a script in thescripts home directory (Figure 287). After creating more scripts, you canselect the one you want to run from Current Script.MIPAV User’s Guide, Volume 1, Basics 49412/2/08
M I P A VM e d i c a l I m a g e P r o c e s s i n g, A n a l y s i s, & V i s u a l i z a t i o nMIPAV User’s Guide, Volume 1, BasicsPlanning scriptsAlthough MIPAV allows you to easily create scripts, it is important to planscripts before creating them, particularly if the scripts perform actions onVOIs. First, however, you need to understand:• Methods for creating scripts (refer to page 495 below)• Actions that can be performed in scripts, refer to page 496• Use of VOIs in scripts, see page 496METHODS FOR CREATING SCRIPTSThere are two methods for creating scripts:• To create a script using the Scripting toolbar, open an image of interestand simply click the Start Recording Script icon on the Scriptingtoolbar. See Figure 290.Figure 289. The Start Recording Script button• To create a script using the main MIPAV menu, click <strong>Scripts</strong> > RecordScript in the MIPAV window and simply start recording. SeeFigure 290.For more information, refer to Section “Recording scripts” on page 498.Figure 290. The Record Script command available via the <strong>Scripts</strong> menuMIPAV User’s Guide, Volume 1, Basics 49512/2/08
M I P A VM e d i c a l I m a g e P r o c e s s i n g, A n a l y s i s, & V i s u a l i z a t i o nMIPAV User’s Guide, Volume 1, BasicsACTIONS PERMITTED IN SCRIPTSIt’s also important to understand what actions or events you can record inscripts. For example, scripts neither record views, such as lightbox, triplanar,and volume renderer; nor do they record other visualization commands,such as those that adjust the lookup table.Actions that you can record in scripts include:• Saving and closing images• Opening VOIs• Saving VOIs including the Save all VOIs and Save all VOIs tocommands• Performing algorithms on images or on open VOIs on images 1• Applying utilities to images or to open VOIs on images• Saving the global data page in the Output window• Exiting from the MIPAV program 2USE OF VOIS IN SCRIPTSThe only VOI commands that can be recorded in scripts are the open VOIcommands:• VOI > Open VOI• VOI > Open All VOIsMIPAV scripts do not record and save VOIs. Therefore, to apply VOIs toimages in scripts, you need to:• Create and save all VOIs in advance of creating a script;• Open and apply the VOIs when you are recording the script.After you’ve created all necessary VOIs, you can save them through the Save1. Not all MIPAV algorithms are scriptable.2. Exit( ) end is auto added when the script is running from the command line with -hide key.MIPAV User’s Guide, Volume 1, Basics 49612/2/08
M I P A VM e d i c a l I m a g e P r o c e s s i n g, A n a l y s i s, & V i s u a l i z a t i o nMIPAV User’s Guide, Volume 1, BasicsVOI commands available via the VOI menu in the main MIPAV window:• VOI > Save VOI• VOI > Save VOI as• VOI > Save All VOIs• VOI > Save All VOIs toCaution: Do not use the Exit command in MIPAV scripts unless you arecalling the script from another program or scripts (Perl, C++, Windowsbatch).Tip: You might consider to organize your workplace, for example, designate aspecific folder(s) for VOIs using in scripts.Saving VOIs: Some RemindersYou can save VOIs under names that MIPAV assigns or under names that youassign. If the VOIs have never been saved before, MIPAV assigns names toVOIs when you use the Save VOI or Save All VOIs commands. The name ofthe first VOI or set of VOIs that you save is Area1.voi; the second is Area2.voi;and so on.If you want to specify a different name for the VOI or set of VOIs: select VOI >Save VOI as or VOI > Save All VOIs to. The Save VOI as dialog box opens.Type a name for the VOI in File name and the extension .voi or .xml, and clickSave. The program saves the file under the specified name.MIPAV User’s Guide, Volume 1, Basics 49712/2/08
M I P A VM e d i c a l I m a g e P r o c e s s i n g, A n a l y s i s, & V i s u a l i z a t i o nMIPAV User’s Guide, Volume 1, BasicsRecording scriptsTo record a script using the <strong>Scripts</strong> toolbar:1 Start MIPAV. The initial MIPAV window and the Output window open.2 Open the images on which you want to run the script. The MIPAVwindow expands.3 Click the Start Recording Script icon on the scripting toolbar. SeeFigure 291.Figure 291. Click the Start Recording Script icon to record a scriptNote: The Start Recording Script icon turns red to indicate that MIPAV is nowrecording a script.4 The Record New Script dialog box (Figure 293) opens. The followingplacard message appears at the top of the dialog box: The script is nowrecording. Your actions will appear below.5 Open any previously created VOIs that you want to use with the images.Perform any algorithm or utility.6 Repeat steps above as needed.7 In the Record New Script dialog box, select File > Save. The Save dialogbox opens. Type a name for the script and either the .sct or .xmlextension in File name.8 Click Save. The program saves the script in the scripts home directory.9 Click File > Exit to close the Record New Script dialog box. The dialogbox closes. You should now be able to select and run the script fromCurrent Script.MIPAV User’s Guide, Volume 1, Basics 49812/2/08
M I P A VM e d i c a l I m a g e P r o c e s s i n g, A n a l y s i s, & V i s u a l i z a t i o nMIPAV User’s Guide, Volume 1, BasicsFileOpen—Opens a previously savedscript. When you select this command,the Open dialog box appears.Save—Saves the script under thespecified name. When you select thiscommand, the Save dialog box opens.Exit—Closes this dialog box withoutsaving the script.Open scriptSave scriptPause scriptingResumescriptingInsertcommentOpen—Opens a previously savedscript. When you select this command,the Open dialog box appears.Save—Saves the script under thespecified name. When you select thiscommand, the Save dialog box opens.Stops recording the script. When youselect this icon, the icon changes tothe Resume scripting icon.Activates the recording process again. When you select this icon, the iconchanges to the Pause scripting icon.Allows you to insert a comment into the script. When you select this icon, theInput dialog box opens. Type the comment in Enter comment and click OK.MIPAV adds your comment into the script after the word Comment.ABFigure 292. Input dialog box (A) showing a comment and (B) thecomment as it appears in the scripting boxInsertcommand tocollect garbage(free memory)Frees memory by inserting the command to collect garbage, a Java method thatclears all unnecessarily reserved memory. For more information, refer to “Savinga history of actions on images (TBD)” on page 126.Figure 293. Record New Script dialog boxMIPAV User’s Guide, Volume 1, Basics 49912/2/08
M I P A VM e d i c a l I m a g e P r o c e s s i n g, A n a l y s i s, & V i s u a l i z a t i o nMIPAV User’s Guide, Volume 1, BasicsInsertcommand toend MIPAVInserts the command for exiting MIPAV (Exit) into the script, which allows MIPAVto close as a part of the script.Caution: Do not use the Exit command in MIPAV scripts unless you arecalling the script from another program or scripts (Perl, C++, Windowsbatch, etc.).Scripting boxPauseEnable EditDisable EditHelpDisplays the action commands (algorithms and utilities) and any comments inthe script.Stops recording the script. When you select this button, the name of the buttonchanges to Resume.Paused the script recording first, then it allows you to make changes orcorrections to the script. When you select this button, the scripting box turnsfrom gray to white to indicate that 1) the script is paused and 2) that you cannow type, copy, paste, or delete information from the script, and the buttonname changes to Disable Edit.Prevents any changes or corrections being made to the script from typing,pasting, inserting, or deleting information. It does, however, allow MIPAV torecord actions on images. When you select this button, the scripting box turnsfrom white to gray, and the button name changes to Enable Edit. It also restartsthe script recording.Displays online help for this dialog box.Figure 293. Record New Script dialog box (continued)Recording a script using the <strong>Scripts</strong> > Record Scriptmenu1 Start MIPAV.2 Select <strong>Scripts</strong> > Record Script. The Record New Script dialog box opens.The following appears at the top of the dialog box: The script is nowrecording. Your actions will appear below.Figure 294. Recording a script via <strong>Scripts</strong> > Record Script menu3 Open an image on which you want to run the script. The MIPAV windowexpands.MIPAV User’s Guide, Volume 1, Basics 50012/2/08
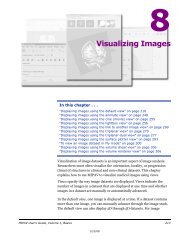
M I P A VM e d i c a l I m a g e P r o c e s s i n g, A n a l y s i s, & V i s u a l i z a t i o nMIPAV User’s Guide, Volume 1, Basics4 Perform any algorithms or utilities that you want recorded in the script,as if you run recording from the Scripting toolbar.For example,flip the image twice applying step by step the Flip Vertically and then FlipHorizontally option. See Figure 295.5 The following appears in the Record New Script window:Flip("input_image_1 ext_image $image1", "flip_axis string X")Flip("input_image_1 image $image1", "flip_axis string Y")6 Then, save the image in MINC format using the Save As option andspecifying an *.mnc extension in the dialog box. 1 The following stringappears in the Record New Script window:SaveImageAs("input_image_1 ext_image $image1", "file_type string.mnc")Figure 295. At the top: the flipping options available via the ImageToolbar. Below: the original image (A), the same image flippedvertically (B) and then horizontally (C)7 In the Record New Script dialog box, select File > Save. The Save dialogbox opens.1. http://www.bic.mni.mcgill.ca/software/minc/MIPAV User’s Guide, Volume 1, Basics 50112/2/08
M I P A VM e d i c a l I m a g e P r o c e s s i n g, A n a l y s i s, & V i s u a l i z a t i o nMIPAV User’s Guide, Volume 1, Basics8 Enter a name for the script, for example, FlippingImagesTwice.sct, andthen press Save. By default, the script will be saved in the <strong>Scripts</strong> Homedirectory. See “<strong>Scripts</strong> Home” on page 493 for details.9 Click File > Exit to close the Record New Script dialog box. The dialogbox closes.10 Use the Refresh button on the <strong>Scripts</strong> toolbar to refresh the <strong>Scripts</strong>Home directory.11 You should now be able to select and run the script from the CurrentScript box. See Figure 295.TO PAUSE RECORDING A SCRIPTPauseResume RecordingIf you are interrupted or need to take a break while you are recording ascript, use the Pause icon located on the Scripting toolbar. This allows youto stop recording the script. When you click Pause, the following messageappears at the top of the Record New Script dialog box: The script is nowpaused. Press Resume to resume recording; and the Pause icon changes toResume Recording. When you return to recording the script, click ResumeRecording to resume.Running scriptsYou can run a script either using the <strong>Scripts</strong> toolbar or via the <strong>Scripts</strong>>RunScript menu.If you are running the script via the Scripting toolbar and have at least oneimage open and selected, the script will automatically apply to that activeimage. Here, the active image is the image that is currently selected, refer toFigure 296.MIPAV User’s Guide, Volume 1, Basics 50212/2/08
M I P A VM e d i c a l I m a g e P r o c e s s i n g, A n a l y s i s, & V i s u a l i z a t i o nMIPAV User’s Guide, Volume 1, BasicsFigure 296. An active image, which bar is highlighted (on your left) andinactive image, which bar is dimmed and grey (on your right)To run scripts from the <strong>Scripts</strong> toolbar1 Open an image of interest and VOI, if needed.2 Select a script from Current Script in the scripting toolbar, then click theRun the Selected Script icon. See Figure 297.Figure 297. Current Script lists all of the scripts in the scripts homedirectory alphabetically. To reorder the list of scripts in Current Script,click the Refresh icon3 MIPAV automatically performs all of the actions in the script on theactive image.If the script requires more than one image or VOI, it will pop up the ScriptExecution Setup dialog box, where you can add more images and VOIs tothe script procedure. Refer to “To run scripts from the Run Script menu” onpage 504 and Figure 298.MIPAV User’s Guide, Volume 1, Basics 50312/2/08
M I P A VM e d i c a l I m a g e P r o c e s s i n g, A n a l y s i s, & V i s u a l i z a t i o nMIPAV User’s Guide, Volume 1, BasicsTo run scripts from the Run Script menu1 Call <strong>Scripts</strong> > Run Script from the main MIPAV menu.2 Select a script you wish to run and press OK. The MIPAV Script Tooldialog box opens. Refer to Figure 298.3 Add images to the Script Execution Setup, refer to “Adding images tothe Script Execution Setup” on page 504.4 Add VOIs to the Script Execution Setup, if needed. Refer to “AddingVOIs to the Script Execution Setup” on page 505.5 Repeat step 3 and step 4 for as many images and VOIs on which youwant to run the script.6 Press Run Script.7 MIPAV automatically performs all of the actions in the script on theimages indicated in the Script Execution Setup dialog.Adding images to the Script Execution Setup1 Use the Add Image from File option to choose the images and add themto the dialog box. Selected images appear in the Images window. SeeFigure 298. Images which have already been opened in MIPAV alsoappear in the Images window.Figure 298. The MIPAV Script Tool dialog box2 Use the mouse to drag selected images from the Images window to theScript Execution Setup. Arrange the order of the images.MIPAV User’s Guide, Volume 1, Basics 50412/2/08
M I P A VM e d i c a l I m a g e P r o c e s s i n g, A n a l y s i s, & V i s u a l i z a t i o nMIPAV User’s Guide, Volume 1, Basics3 If each script execution requires more than one image (e.g. you areapplying algorithm(s) to Image 1, and then to Image 2), make sure thatyou add the same number of images under $image 1 and $image 2 in theScript Execution Setup. The same is also applied to VOIs. Refer toFigure 299.Figure 299. Adding images to the Script Execution Setup4 Press Run Script.5 Multiple images assigned to the same script will be used for separateexecution of the chosen script.Adding VOIs to the Script Execution Setup1 Add images to the Images window and then to the Script ExecutionSetup window.2 Add one or more VOIs to the VOIs from Selected Image window. Inorder to do that, click the Add VOI from File button and then select aVOI.You don’t need to manually associate VOIs for those images that alreadyhave associated VOIs. Those VOIs appear in the Script Execution Setupwindow automatically under the corresponding image.MIPAV User’s Guide, Volume 1, Basics 50512/2/08
M I P A VM e d i c a l I m a g e P r o c e s s i n g, A n a l y s i s, & V i s u a l i z a t i o nMIPAV User’s Guide, Volume 1, Basics3 For those images that don’t have linked VOIs, add VOIs manually bydragging files from the VOIs window to the designated image in theScript Execution Setup. Linked VOI is a result of OpenVOI() action inthe script. Refer to Figure 300 for details.Figure 300. Adding VOIs to images4 Press Run Script.5 Multiple images and VOIs assigned to the same script will be used forseparate execution of the chosen script.Note: After assigning an image or VOI to a script in the Script Execution Setup,your can delete the assignment using the Delete context menu option.Notes about running scriptsUse the Scripting toolbar to run simple scripts which involve one image andone VOI. Use the Run Script menu option to run more complicated scriptswhich apply to multiple images and VOIs. You can also use the Scriptingmenu to execute the same script multiple times.For example, you can consider to use the toolbar option to execute the scriptwhile you are setting the script parameters and/or testing it; and after thescript has been tested and debugged, you can run it over the set of imagesvia the Scripting menu.MIPAV User’s Guide, Volume 1, Basics 50612/2/08
M I P A VM e d i c a l I m a g e P r o c e s s i n g, A n a l y s i s, & V i s u a l i z a t i o nMIPAV User’s Guide, Volume 1, BasicsTHE MIPAV SCRIPT TOOL DIALOG BOXOPTIONSScript ExecutionSetup windowImagesAdd image fromfileContains a list ofimages andassociated VOIs.Lists the images thatappear in the scriptAllows you to addone or more imageson which to run thescript.VOIs from selectedfileAdd VOI from fileLists any saved VOIs that are necessary when you run the script.Allows you to add one or more VOIs to the script.File menuOpen saved imageand VOI selectionsSave currentimage and VOIselectionsView current scriptcontentsCloseRun ScriptOpens the corresponding dialog box, which allows you to browse through thefolders and select an image file or VOI with any specified extension.Allows you to save the selected image or VOI.Opens a window that shows the script contents. Here, you can only selectthe script contents and copy it to the Clipboard using the CTRL+Ccombination of keys.Closes the Script Execution Setup.Begins running the script.Figure 301. The MIPAV Script Tool dialog boxTip: To speed up the process of associating VOIs with images, you can openall of the images at once and all of their associated VOIs at once. The Imagesbox shows all of the images selected and the VOI box lists all of the VOIsselected. Select an image in the Images box and then select the VOI thatapplies to that image. Drag the image and VOI to the Script Execution Setuppane. Repeat these steps for as many images and VOIs as you need.MIPAV User’s Guide, Volume 1, Basics 50712/2/08
M I P A VM e d i c a l I m a g e P r o c e s s i n g, A n a l y s i s, & V i s u a l i z a t i o nMIPAV User’s Guide, Volume 1, BasicsEditing and deleting scriptsYou can either edit a script while you are creating it, or you can edit anypreviously saved script. MIPAV saves the script in text format so that anytext editor, such as Microsoft Wordpad or Notepad, can modify the file.Caution: Editing scripts may cause serious problems if the scriptcommands are not entered correctly. This task is recommended for moreadvanced users.To edit scripts during creationSuppose you make an error while you are recording a script, or perhapsyou’ve changed your mind about performing a specific action. It can bemore practical to correct the problem right away.To correct errors or make changes to scripts while you’re creating andrunning them, simply click the Enable Edit button, in the Record NewScript dialog box (Figure 302). Three things occur:1 It pauses the script execution.2 The scripting box in the dialog box turns from gray to white to indicatethat you can now type, copy, or paste information into it and deleteinformation from it.3 The Enable Edit button changes to the Disable Edit button. If thescripting box contains actions that you want to erase, select the actionsand delete them. To add new actions, you can type them into thescripting box directly. You can also rearrange actions by copying andpasting them.MIPAV User’s Guide, Volume 1, Basics 50812/2/08
M I P A VM e d i c a l I m a g e P r o c e s s i n g, A n a l y s i s, & V i s u a l i z a t i o nMIPAV User’s Guide, Volume 1, BasicsABFigure 302. Record New Script dialog box (A) before and (B) afterclicking Enable EditWhen you’ve finished editing the script, click Disable Edit. The record ofscript actions resumes. The scripting box turns gray and the Disable Editbutton becomes the Enable Edit button.To edit previously created scripts1 Click the Start Recording Script icon on the scripting toolbar. The iconturns red, and the Record New Script dialog box opens.2 Select File > Open on the Record New Script dialog box. The Opendialog box opens.3 Select the script that you want to edit. The script appears in the scriptingbox on the Record New Script dialog box.4 Click Enable Edit. The actions box turns from gray to white.5 Select any of the actions and copy, rearrange, or delete them, or typenew actions directly into the scripting box.6 Click Disable Edit when you are satisfied with the script. The scriptingbox returns to gray.7 Continue recording actions if needed until you are satisfied the script.MIPAV User’s Guide, Volume 1, Basics 50912/2/08
M I P A VM e d i c a l I m a g e P r o c e s s i n g, A n a l y s i s, & V i s u a l i z a t i o nMIPAV User’s Guide, Volume 1, Basics8 Save the script by clicking File > Save. The Save dialog box opens.9 Type the name of the script followed by the .sct extension in the FileName box.10 Click Save. MIPAV saves the script under the specified name.To delete scripts (Windows specific)If you decide at some point that you want to delete a script, go to WindowsExplorer and navigate to the scripts home directory.1 Open Windows explorer.2 Navigate to the scripts home directory.3 Select the script or scripts that you want to delete.4 Right-click on the selected script(s).5 Click Delete. Windows deletes the selected scripts and places them inthe Recycle Bin where they stay until you empty the bin.Examples:APPLYING FACE DE-IDENTIFICATION, BSE,AND FUZZY C-MEANSIn this example, we will to show you how to record a script, and then run itin via the Scripting menu. The script includes:1 Applying the Face De-Identification algorithm;2 Applying the Extract Brain Surface (BET) algorithm;3 And finally, performing brain segmentation using the Fuzzy C-Means >Single Channel algorithm.To start recording the script:Open an image of interest and then, press Start Recording Script button onthe <strong>Scripts</strong> toolbar. The Record New Script dialog box appears indicatingthat recording a script is started.MIPAV User’s Guide, Volume 1, Basics 51012/2/08
M I P A VM e d i c a l I m a g e P r o c e s s i n g, A n a l y s i s, & V i s u a l i z a t i o nMIPAV User’s Guide, Volume 1, BasicsRecording the Face De-Identification algorithm execution:1 Call Algorithms > Brain Tools > Face De-Identification;2 The Anonymize Face dialog box opens;3 Fill out the dialog box as shown in Figure 303. The right columndisplays the script text corresponding to the dialog box options;4 Press OK to run the algorithm.FaceAnonymizerBET("input_image_1 ext_image $image1","face_orientation int 2","mms_to_delete_from_face int15","vertical_deletion_limit_ratiofloat 0.33","bet_do_estimate_with_sphereboolean true","bet_image_influence float 0.01","bet_stiffness float 0.015")Figure 303. The Anonymize Face dialog box options and thecorresponding script text. Here, "face_orientation int 2" is an imagespecific and corresponds to the Left option chosen in the “Which way isthe patient’s face pointing?” dialogAfter the algorithm finishes running and the result image appears on thescreen, make the result image active and call the next Extract Brain Surface(BET) algorithm.Recording the BET algorithm execution:1 Call Algorithms > Brain Tools > Extract Brain Surface (BET);2 The Extract Brain dialog box opens;3 Fill out the dialog box as shown in Figure 304. The right columndisplays the part of the script corresponding to the dialog box options;4 Press OK to start the algorithm.MIPAV User’s Guide, Volume 1, Basics 51112/2/08
M I P A VM e d i c a l I m a g e P r o c e s s i n g, A n a l y s i s, & V i s u a l i z a t i o nMIPAV User’s Guide, Volume 1, BasicsAfter the algorithm finishes running and the result image appears on theExtractBrain("input_image_1 image $image1","orientation_type int 0","do_use_sphere_estimation boolean false","do_show_just_init_ellipse boolean false","num_iterations int 100","depth int 11","image_ratio float 0.2","stiffness float 0.15","do_second_stage_erosion boolean false","factor_above_median_to_erode float 0.0","do_extract_paint booleanfalse","do_init_with_center_of_mass boolean true","init_center_pointlist_float114.22103,75.82523,94.18212")Figure 304. The Extract Brain dialog box options and the correspondingscript text. Here, "init_center_point list_float 114.22103,75.82523,94.18212"is an image specificscreen, make the result image active and call the last algorithm – Fuzzy C-Means > Single Channel.Recording the Fuzzy C-Means > Single Channel algorithm execution:1 Call Algorithms > Segmentation > Fuzzy C-Means > Single Channel;2 The Fuzzy C-Means dialog box opens;3 Fill out the dialog box as shown in Figure 305. The right columndisplays the part of the script corresponding to the dialog box options;4 Press OK to start the algorithm.MIPAV User’s Guide, Volume 1, Basics 51212/2/08
M I P A VM e d i c a l I m a g e P r o c e s s i n g, A n a l y s i s, & V i s u a l i z a t i o nMIPAV User’s Guide, Volume 1, BasicsFuzzyCMeans("input_image_1image $image1","number_of_result_images int 4","do_process_whole_image booleantrue", "number_of_classes int 3","exponent_q float 2.0","do_crop_background booleantrue", "threshold float 0.01","end_tolerance float 0.01","max_iterations int 200","segmentation_type int 0","centroids list_float8318.767,20926.652,33534.54")Figure 305. The FUzzy C-Means dialog box options and thecorresponding script text. Here, "centroids list_float8318.767,20926.652,33534.54" is an image specificAfter the algorithm finishes running and the result image appears on thescreen, close all intermediate images, and then save the final image.Now, save the script. You might consider to add comments to the script text.In order to do that,1 Click the Insert Comment icon located on the Record New Script dialogbox toolbar;2 The Enter Comment window appears;3 Type in the comment and press OK;4 The comment text appears in the Record New Script dialog box;5 Save the script;6 Close the dialog box.To run the script via the <strong>Scripts</strong> menu1 Call <strong>Scripts</strong> > Run Script from the main MIPAV menu;2 Select the script you’ve just recorded, and press OK;3 The MIPAV Script Tool dialog box opens;MIPAV User’s Guide, Volume 1, Basics 51312/2/08
M I P A VM e d i c a l I m a g e P r o c e s s i n g, A n a l y s i s, & V i s u a l i z a t i o nMIPAV User’s Guide, Volume 1, Basics4 In the dialog box, use the Add Images from File button to select and addimages, on which you wish to run the script, to the Images window;5 Then, use the mouse to drug images from the Images window to theScript Execution Setup window. Refer to Figure 306 and “Addingimages to the Script Execution Setup” on page 504;6 Press Run Script.Figure 306. Adding images to the Images window, first, and thenmoving the images to the main Script execution Setup windowThe script starts running and the intermediate images and progress barsappear on the screen. See Figure 307.MIPAV User’s Guide, Volume 1, Basics 51412/2/08
M I P A VM e d i c a l I m a g e P r o c e s s i n g, A n a l y s i s, & V i s u a l i z a t i o nMIPAV User’s Guide, Volume 1, BasicsFigure 307. The script is running in group mode and the intermediateimages and progress bars appear on the screenWhen the algorithm finishes running, the progress bars disappear, and theresults replace the original and intermediate images.ScriptThe script text is shown below. Note that the comment strings included inthe script start with “#”.# First Face De-IdentificationFaceAnonymizerBET("input_image_1 ext_image $image1", "face_orientationint 2", "mms_to_delete_from_face int 15", "vertical_deletion_limit_ratio float0.33", "bet_do_estimate_with_sphere boolean true", "bet_image_influencefloat 0.01", "bet_stiffness float 0.015")#Here, "face_orientation int 2" is an image specific.# Second BETExtractBrain("input_image_1 image $image1", "orientation_type int 0","do_use_sphere_estimation boolean false", "do_show_just_init_ellipseboolean false", "num_iterations int 100", "depth int 11", "image_ratio float0.2", "stiffness float 0.15", "do_second_stage_erosion boolean false","factor_above_median_to_erode float 0.0", "do_extract_paint boolean false","do_init_with_center_of_mass boolean true", "init_center_point list_float114.22103,75.82523,94.18212")#Here, "init_center_point list_float 114.22103,75.82523,94.18212" is animage specific.# Third Fuzzy C-MeansMIPAV User’s Guide, Volume 1, Basics 51512/2/08
M I P A VM e d i c a l I m a g e P r o c e s s i n g, A n a l y s i s, & V i s u a l i z a t i o nMIPAV User’s Guide, Volume 1, BasicsFuzzyCMeans("input_image_1 image $image1", "number_of_result_imagesint 4", "do_process_whole_image boolean true", "number_of_classes int 3","exponent_q float 2.0", "do_crop_background boolean true", "threshold float0.01", "end_tolerance float 0.01", "max_iterations int 200","segmentation_type int 0", "centroids list_float8318.767,20926.652,33534.54")#Here, "centroids list_float 8318.767,20926.652,33534.54" is an imagespecific.#Closing intermediate imagesCloseFrame("input_image_1 image $image4")CloseFrame("input_image_1 image $image3")CloseFrame("input_image_1 image $image2")#Saving resultsSaveImageAs("input_image_1 image $image5", "file_type string .xml")CLONING IMAGES, ADDING MARGINS, ANDAPPLYING GAUSSIAN BLURIn this example, we will to show you how to record the script that does thefollowing:1 Clones an active image;2 Adds margins to the clone;3 Applies the Gaussian Blur algorithm to the clone, and produces thesecond clone;4 Closes the original image and saves the clones.To get started,open an image of interest and then, press Start Recording Script button.The Record New Script dialog box appears indicating that recording a scriptis started, see Figure 308.1 Call the Utilities > Clone (Copy). This clones the active image and thefollowing string appears in the Recording Script dialog:Clone("input_image_1 ext_image $image1")Here, ext_ indicates that this image is not produced within the script, butmust be selected by a user.MIPAV User’s Guide, Volume 1, Basics 51612/2/08
M I P A VM e d i c a l I m a g e P r o c e s s i n g, A n a l y s i s, & V i s u a l i z a t i o nMIPAV User’s Guide, Volume 1, BasicsHere, the command in the script is Clone. This command clones an imagewhich is labeled as $image1 in the script, and then passes it as input_image_1parameter to the Clone operator.Figure 308. The Record New Script dialog box appears indicating thatrecording a script is started. The initial script (A) and the script withcomments (B)2 Now, select the clone image and call Utilities > Add Image Margins. Inthe Add Image Border dialog box, specify the margins as shown inFigure 309 and press OK.In the dialog box:20 points margins are added tothe top, bottom, left and rightsides of the imageThe Replace Image option ischecked indicating that themodified image will appear in thesame frameFigure 309. The Add Image Border dialog box optionsMIPAV User’s Guide, Volume 1, Basics 51712/2/08
M I P A VM e d i c a l I m a g e P r o c e s s i n g, A n a l y s i s, & V i s u a l i z a t i o nMIPAV User’s Guide, Volume 1, BasicsThis adds margins to the image clone1, and the following string appears inthe Recording Script dialog:AddMargins("input_image_1 image $image2", "do_output_new_imageboolean false", "left_side int 20", "right_side int 20", "top_side int 20","bottom_side int 20", "front int 0", "back int 0", "margin_value double -5213.51513671875", "margin_value_rgb list_double 0.0,0.0,0.0")Here, the command in the script is AddMargins(parameter1,...parameterN).Script parameters are as follows:"input_image_1 image $image2" shows that the script applies to theactive image clone"do_output_new_image boolean false" indicates that the new image (withmargins) appears in the same image frame replacing the old one 1"left_side int 20", "right_side int 20", "top_side int 20", "bottom_side int20" are the image margins, refer to Figure 309"front int 0", "back int 0" indicates that there are no slices added to thefront and back of the image, refer to Figure 309"margin_value double -5213.51513671875" – the margin fill value forgrayscale images"margin_value_rgb list_double 0.0,0.0,0.0" – the margin fill value forRGB images3 Select the clone image with margins and call Algorithms > Filters(spatial) > Gaussian Blur. In the Gaussian Blur dialog box that appears,specify the parameters as shown in Figure 310 and press OK.1. "do_output_new_image boolean true" will indicate that the result image appears in a new imageframeMIPAV User’s Guide, Volume 1, Basics 51812/2/08
M I P A VM e d i c a l I m a g e P r o c e s s i n g, A n a l y s i s, & V i s u a l i z a t i o nMIPAV User’s Guide, Volume 1, BasicsFor the first time, use thedefault parameters for Scaleof Gaussian, Options, andColor Channel SelectionCheck the Destination > NewImage optionCheck the Process > WholeImage optionPress OKFigure 310. The Gaussian Blur dialog boxThis applies the Gaussian Blur algorithm to the image clone, which now hasmargins added, and the following string appears in the Recording Scriptdialog:GaussianBlur("input_image_1 image $image2", "do_output_new_imageboolean true", "do_process_whole_image boolean true", "do_process_in_2.5Dboolean false", "do_separable_convolution boolean true", "gauss_std_devlist_float 1.0,1.0,1.0", "gauss_do_z_resolution_correction boolean true","do_process_r_g_b_channel list_boolean false,false,false")Here, the command in the script is GaussianBlur(parameter1,...parameterN).The parameters are as follows:"input_image_1 image $image2" shows that the script applies to theimage clone"do_output_new_image boolean true" indicates that the new imageappears in a image frame"do_process_whole_image boolean true" indicates that the algorithm isapplied to the whole image (not only to VOI regions)MIPAV User’s Guide, Volume 1, Basics 51912/2/08
M I P A VM e d i c a l I m a g e P r o c e s s i n g, A n a l y s i s, & V i s u a l i z a t i o nMIPAV User’s Guide, Volume 1, Basics"do_separable_convolution boolean true" corresponds to checking theUse Separable Convolution Kernels option in the dialog box. For moreinformation, refer to Volume 2 Algorithms, Section ‘‘Applying theGaussian Blur algorithm’’4 As a result, the second image clone appears on the screen. SeeFigure 311.A B CFigure 311. The original image (A), the first clone after applyingmargins (B), and the second clone (C) after applying Gaussian Blur5 Now, you can close the original image. And the following string appearsin the script: CloseFrame("input_image_1 image $image1") indicatingthat the image frame has been closed.6 You might save last two images. In order to do that, select the imageframe, and then call File > Save Image As from the main MIPAV menu.The image will be saved in specified format in the chosen location. Thefollowing strings appears in the script: SaveImageAs("input_image_1image $image2", "file_type string .mnc") indicating that the image hasbeen saved as a MINC file. 17 To save the script, click File > Save. The program saves the script in thescripts home directory.8 You might add the comments in the script. In order to do that, press theInsert Comment button, and enter the comment in the dialog box thatappears. Add as many comments as needed. Then, save the script.9 Click File > Exit to close the Record New Script dialog box. The dialogbox closes. You should now be able to select and run the script from theCurrent Script box.1. This saves only the image with margins, not the post-blurred image.MIPAV User’s Guide, Volume 1, Basics 52012/2/08
M I P A VM e d i c a l I m a g e P r o c e s s i n g, A n a l y s i s, & V i s u a l i z a t i o nMIPAV User’s Guide, Volume 1, BasicsAPPLYING GAUSSIAN BLUR AND GRADIENTMAGNITUDEIn this example, we want to show you the script that does the following:1 Clones an image;2 Apples Gaussian Blur to the clone;3 Saves the clone;4 Then, applies Gradient Magnitude to the saved clone;5 Saves the result.To get started,open an image of interest and then, press the Start Recording Script button.The Record New Script dialog box appears indicating that recording a scriptis started. Refer to Figure 308.1 Call the Utilities > Clone (Copy). This clones the active image and thefollowing string appears in the Recording Script dialog box:Clone("input_image_1 ext_image $image1")2 Apply the Gaussian Blur algorithm to the clone. The following stringappears in the Recording Script dialog box:GaussianBlur("input_image_1 image $image2", "do_output_new_imageboolean true", "do_process_whole_image boolean true", "do_process_in_2.5Dboolean false", "do_separable_convolution boolean true", "gauss_std_devlist_float 1.1,1.1,1.1", "gauss_do_z_resolution_correction boolean true","do_process_r_g_b_channel list_boolean false,false,false")See also Figure 312 (Gaussian Blur).3 Now, save the image which appears after applying Gaussian Blur. Useeither File > Save Image or File > Save Image As option. The followingstring appears in the Recording Script dialog box:SaveImageAs("input_image_1 image $image3", "file_type string .mnc")4 Apply the Gradent Magnitude algorithm to the same image. Thefollowing string appears in the Recording Script dialog box:GradientMagnitude("input_image_1 image $image3", "do_output_new_imageboolean true", "do_process_whole_image boolean true", "do_process_in_2.5DMIPAV User’s Guide, Volume 1, Basics 52112/2/08
M I P A VM e d i c a l I m a g e P r o c e s s i n g, A n a l y s i s, & V i s u a l i z a t i o nMIPAV User’s Guide, Volume 1, Basicsboolean false", "do_separable_convolution boolean true", "gauss_std_devlist_float 1.0,1.0,1.0", "gauss_do_z_resolution_correction boolean true","do_process_r_g_b_channel list_boolean false,false,false")See also Figure 312 (Gradient Magnitude).5 Save the image using the Save Image As option. The following stringappears in the Recording Script dialog box:SaveImageAs("input_image_1 image $image4", "file_type string .mnc")6 Save the script, and then close the Recording Script dialog box. Youshould now be able to select and run the script from the Current Scriptbox. If the script doesn’t appear under Current Script, click the RefreshScript Listing icon and try again.Figure 312. The Gaussian Blur and Gradient Magnitude parameterswhich were used to record the scriptFigure 312 shows the options selected for the Gaussian Blur and GradientMagnitude algorithms. You might consider to compare the parameteschosen in the dialog boxes with the corresponding text of the script as itshown in step 2 and step 4.Tip: If the script doesn’t appear under Current Script, click the Refresh ScriptListing icon and try again.MIPAV User’s Guide, Volume 1, Basics 52212/2/08
M I P A VM e d i c a l I m a g e P r o c e s s i n g, A n a l y s i s, & V i s u a l i z a t i o nMIPAV User’s Guide, Volume 1, BasicsEXTRACTING A SURFACE FROM A VOIIn this example, we want to show you how to record the script whichincludes:1 Delineating a VOI on the opened image2 Extracting a surface from the VOIPlease, remember that to apply VOIs to images in scripts, you need to createand save the VOIs in advance of creating a script, and then, open and applythe VOIs while you are recording the script. In this example, we will use theVOI which helps extract the cerebellum from the brain image. SeeFigure 313.To delineate the VOI on the image,use the Draw Polygon/Polyline VOItool from the MIPAV toolbar. Afteryou’ve created the VOI, save itthrough the VOI >Save VOIcommand.Figure 313. The Cerebellum VOI is delineated on the imageTo record the scriptOpen an image of interest and then, press Start Recording Script button.The Record New Script dialog box appears indicating that recording a scriptis started.1 Call the VOI > Open VOI menu, and then select the VOI file. Thefollowing string appears in the Record New Script dialog box:OpenVOI("input_image_1 ext_image $image1")Here, the command in the script is OpenVOI(parameters); in other words,apply a VOI to $image1, which is listed in the parameters list with a labelinput_image_1.2 Now, select the VOI and then call Algorithms > Extract Surface(marching cubes).MIPAV User’s Guide, Volume 1, Basics 52312/2/08
M I P A VM e d i c a l I m a g e P r o c e s s i n g, A n a l y s i s, & V i s u a l i z a t i o nMIPAV User’s Guide, Volume 1, Basics3 In the Extract Surface dialog box that appears, specify the algorithmparameters as shown in Figure 314, then press OK.4 The following string appears in the Record New Script dialog box:ExtractSurfaceCubes("input_image_1 image $image1”, "extraction_typestring VOI”, "do_decimate boolean true”, "file_name string brain.sur”,"do_blur_before_extraction boolean false”, "blur_std_dev float 0.5")Here, the command in the script is ExtractSurfaceCubes(parameter1,..parameterN).The parameters are as follows:"input_image_1 image $image1" indicates that the script is applying tothe image"extraction_type string VOI" corresponds to selecting the VOI regionoption in the dialog box and indicates that the algorithm is appliedonly to the image region bounded by the VOI"do_decimate boolean true" corresponds to checking the DecimateSurface parameter in the dialog box"file_name string brain.sur" indicates that the extracted surface will besaved as the brain.sur file"do_blur_before_extraction boolean false" – shows that there is noblurring will be applying to the image before extraction. Thiscorresponds to not checking the Blur by (Std.Dev.) checkbox"blur_std_dev float 0.5" – the default value for the Blur by (Std.Dev.)parameter. It is only used if the above parameter is set to trueCheck the VOI Regioncheckbox;Check the Decimate Surfaceparameter;Do not check the Blur bycheckbox;Enter the surface file name;Press OK.Figure 314. The Extract Surface dialog boxMIPAV User’s Guide, Volume 1, Basics 52412/2/08
M I P A VM e d i c a l I m a g e P r o c e s s i n g, A n a l y s i s, & V i s u a l i z a t i o nMIPAV User’s Guide, Volume 1, Basics5 Now, click File > Save. The program saves the script in the scripts homedirectory.6 Click File > Exit to close the Record New Script dialog box. The dialogbox closes. You should now be able to select and run the script from theCurrent Script box. If the script name doesn’t appear in Current Script,press Refresh to reload the scripts home directory.Tip: The file extension for the script file is “.sct.” Make sure that you type thisextension at the end of the file name.EXAMPLES OF WORKING SCRIPTSBelow are the summary of the scripts that were used as examples in Section“Examples:” on page 510. Comments using in the scripts are shown as#comment.Script: Cloning an image, then adding margins and applying Gaussian Blur to theclone.#Clone an imageClone("input_image_1 ext_image $image1")#Add margins to the clone – $image1AddMargins("input_image_1 image $image2", "do_output_new_imageboolean false", "left_side int 20", "right_side int 20", "top_side int 20","bottom_side int 20", "front int 0", "back int 0", "margin_value double -5213.51513671875", "margin_value_rgb list_double 0.0,0.0,0.0")#Apply GB and create a new clone – $image2GaussianBlur("input_image_1 image $image2", "do_output_new_imageboolean true", "do_process_whole_image boolean true", "do_process_in_2.5Dboolean false", "do_separable_convolution boolean true", "gauss_std_devlist_float 1.0,1.0,1.0", "gauss_do_z_resolution_correction boolean true","do_process_r_g_b_channel list_boolean false,false,false")#Close the original imageCloseFrame("input_image_1 image $image1")#Save the clone 2 – $image2SaveImageAs("input_image_1 image $image2", "file_type string .mnc")Script: Flipping an image twice.#Flip the image verticallyMIPAV User’s Guide, Volume 1, Basics 52512/2/08
M I P A VM e d i c a l I m a g e P r o c e s s i n g, A n a l y s i s, & V i s u a l i z a t i o nMIPAV User’s Guide, Volume 1, BasicsFlip("input_image_1 ext_image $image1", "flip_axis string X")#Flip the result image horizontallyFlip("input_image_1 image $image1", "flip_axis string Y")#Save the resultSaveImageAs("input_image_1 ext_image $image1", "file_type string .mnc")Script: Applying Gaussian Blur and then Gradient Magnitude.#Applying Gaussian Blur and sending output to as a new image frame –$image2GaussianBlur("input_image_1 ext_image $image1", "do_output_new_imageboolean true", "do_process_whole_image boolean true", "do_process_in_2.5Dboolean false", "do_separable_convolution boolean true", "gauss_std_devlist_float 1.0,1.0,1.0", "gauss_do_z_resolution_correction boolean true","do_process_r_g_b_channel list_boolean false,false,false")#Applying Gradient Magnitude to $image2 and sending output to as a newimage frame –$image3GradientMagnitude("input_image_1 image $image2", "do_output_new_imageboolean true", "do_process_whole_image boolean true", "do_process_in_2.5Dboolean false", "do_separable_convolution boolean true", "gauss_std_devlist_float 1.0,1.0,1.0", "gauss_do_z_resolution_correction boolean true","do_process_r_g_b_channel list_boolean false,false,false")MIPAV User’s Guide, Volume 1, Basics 52612/2/08
M I P A VM e d i c a l I m a g e P r o c e s s i n g, A n a l y s i s, & V i s u a l i z a t i o nMIPAV User’s Guide, Volume 1, BasicsCombining scripts and other programs- TBDTo increase productivity and efficiency, you can integrate MIPAV functionsinto your normal workflow by calling the scripts you’ve created. A simpleexample is creating a DOS batch file that opens and runs MIPAV scripts.Caution: this functionality has changed and the text below needsrevision!<strong>Using</strong> the <strong>mipav</strong> commandTo call scripts from other programs, you use the <strong>mipav</strong> command in theCommand Prompt dialog box. The correct syntax of this command follows.Syntax of the <strong>mipav</strong> command<strong>mipav</strong> [-hH] [-iI] imageFileName [-sS] ScriptFileName [-vV] voiFileName [-hideHide]Parameters[-h][-H][-hide][-HIDE][-i][-I][-s][-S][-x][-X][-v][-V][-o][-O][-d] [-D][-inputdir] [-INPUTDIR][-outpudir] [-OUTPUTDIR]ExitPurposeDisplays help for the <strong>mipav</strong> command in aCommand Prompt windowHides application frameImage file nameScript file nameXML script file nameVOI file nameSpecifies the output file name when “Save ImageAs” script command is usedSet a value of a variable used in the scriptSpecifies the input directory with imagesSpecifies the output directory with imagesExits the MIPAV programFigure 315 shows examples of the <strong>mipav</strong> command.MIPAV User’s Guide, Volume 1, Basics 52712/2/08
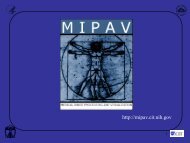
M I P A VM e d i c a l I m a g e P r o c e s s i n g, A n a l y s i s, & V i s u a l i z a t i o nMIPAV User’s Guide, Volume 1, BasicsNote: When calling MIPAV scripts from other programs, be sure to enter an Exitcommand at the end of the MIPAV script.Example 1: Starts MIPAV> <strong>mipav</strong>Example 2: Starts MIPAV and opening an image> <strong>mipav</strong> imageFileNameExample 3: Starts MIPAV but does not display frame, opens an image, and runs a script on the image.> <strong>mipav</strong> -i imageFileName -s scriptFileName -hideExample 4: Starts MIPAV, runs a script, opens the first image, opens two VOIs associated with thatimage, opens a second image, and associates another VOI with that image> <strong>mipav</strong> -s scriptFileName -i imageFileName1 -v voiName1 -v voiName2 -iimageFileName2 -v voiName3Example 5: Exiting the MIPAV program> <strong>mipav</strong> ExitFigure 315. Examples of using the <strong>mipav</strong> commandTo display help for using the <strong>mipav</strong> command1 Navigate to the <strong>mipav</strong> directory on your computer.2 Select Start > All Programs > Accessories > Command Prompt. TheCommand Prompt dialog box opens.3 Type <strong>mipav</strong> -H (refer to Figure 316).MIPAV User’s Guide, Volume 1, Basics 52812/2/08
M I P A VM e d i c a l I m a g e P r o c e s s i n g, A n a l y s i s, & V i s u a l i z a t i o nMIPAV User’s Guide, Volume 1, BasicsFigure 316. Command Prompt dialog box showing command to open Command Line Help dialogbox4 Press Enter. The Command Line Help dialog box (Figure 317) opens.Figure 317. Command Line Help dialog box, which shows the syntax of the <strong>mipav</strong> command aswell as examplesTo open a DICOM image datasetSuppose you want to open a single DICOM image from a collection ofexperiments made in 2004 named exp2004. You would type the followingcommand in the Command Prompt dialog box in Microsoft Windows XP:MIPAV User’s Guide, Volume 1, Basics 52912/2/08
M I P A VM e d i c a l I m a g e P r o c e s s i n g, A n a l y s i s, & V i s u a l i z a t i o nMIPAV User’s Guide, Volume 1, BasicsC:\ <strong>mipav</strong> -i i:\images\DICOM\exp2004\I04301.dcmTo open VOIs into that imageYou can open VOIs as well as the image from the command line. InWindows XP, it would be the following:C> <strong>mipav</strong> -i i:\images\DICOM\exp2004\I04301.dcm -v i:\VOIs\exp2004\levelset1.xmlIn a UNIX BASH shell, this command looks like:$ <strong>mipav</strong> -i ~/images/DICOM/exp2004/I043401.dcm -v ~/VOIs/exp2004/levelset1.xmlTo open multiple images using compound commandsSuppose you know that there were multiple DICOM datasets in exp2004.To open every DICOM image on the Windows computer, you would type:C> for %f in (i:\images\DICOM\exp2004\*01.dcm) do <strong>mipav</strong> -i %fIn this case, you must know something of the file structure of that dataset—you assumed that all image datasets had only one image ending in 01.However, the disadvantages of this format is the possibility of not openingall of the images at the same time.A similar loop to open image sets on a UNIX BASH command line lookslike:$ for FI in `ls ~/images/DICOM/exp200?/*01.dcm`; do ./<strong>mipav</strong> -i $FI &; doneThere are three significant differences between the BASH command and theWindows command (beside from how a directory is specified):• The use of the ls command when listing the directory—Thereason you must list the ls is due to the way a for loop works in BASH.The for requires a command and uses that command's return value asthe boolean test to continue repeating the interior list of commands. Bycontrast, the Windows command shell expects a list of files. So long asMIPAV User’s Guide, Volume 1, Basics 53012/2/08
M I P A VM e d i c a l I m a g e P r o c e s s i n g, A n a l y s i s, & V i s u a l i z a t i o nMIPAV User’s Guide, Volume 1, Basicsthe file listing has more results to list, BASH continues to repeat the<strong>mipav</strong> command.• The use of a wildcard when listing the directory—BASH allowsthe directory list to use wildcard characters in more than one location,which permits searching for the images in any seven-characterdirectory beginning with exp200 as well as all files ending in 01.dcm.This means that MIPAV starts with images from the exp2004directory, as well as exp2003 or should it exist, exp200M, since the ?matches any character, not just a number. This is an example of afeature of the shell being used to expand the results. Windowscommand shell does not support this feature.• Sending the <strong>mipav</strong> command to operate in the background—BASH is a shell that allows job control. <strong>Using</strong> this feature allows you tostart MIPAV and continue it asynchronously, permitting BASH toretain control. BASH can then continue processing the loop andstarting MIPAV with the next matching file. Each MIPAV runsconcurrently and allows you to manipulate each image with MIPAV atwill. Although this allows you to see the images at the same time, thedisadvantage is that the various windows begin to clutter the screencausing operator confusion.When there is more than one MIPAV application window running, it’spossible to close the wrong image by closing the wrong MIPAV application.In addition, operations that can occur between windows when running asingle MIPAV may not be transferable between images being run byseparate MIPAV windows.While starting more than one MIPAV to display a set of images may be finein limited applications, it causes needless overhead within in the operatingsystem wasting system resources.<strong>Using</strong> Shell scripting to lessen typing<strong>Using</strong> shell scripts to reduce the amount of repetitive work is a commonreason for writing a script. When best used, several small scripts that workin concert can reduce the amount of typing required and the amount of timeneeded and can automate tasks.The following example uses a Windows command shell to illustrate how youcan shorten the number of keystrokes required. In this case, you wouldMIPAV User’s Guide, Volume 1, Basics 53112/2/08
M I P A VM e d i c a l I m a g e P r o c e s s i n g, A n a l y s i s, & V i s u a l i z a t i o nMIPAV User’s Guide, Volume 1, Basicswrite a batch file to load a levelset VOI into an image.@echo offrem -- %1 is the full path to the image file, though notrem -- the file itself; we assume there to be a *01.dcmrem -- file to exist in this directory.rem -- VOI is assumed to be in the same directory with namerem -- levelset1.xml./<strong>mipav</strong> -i %1\*01.dcm -v %1\levelset1.xmlMore efficient and more useful, starting MIPAV with multiple images iseasily done in a simple script. Here is how it is done in BASH:#! /bin/bash# argument 1 is the file (with wild-cards) we want to open# arg 1 must be escaped (with quotes) to allow the shell to send# the wildcards unmolested to the script. Otherwise, the shell# will try to expand the shorthand. This has a different effect.LISTING=`ls $1` # Generate the file listingMIPARGS=# For each file in the listing, prepend it with '-i' and# the filename, then follow it with all the previous# files.for FS in $LISTING;doMIPARGS=" -i $FS $MIPARGS";done# start MIPAV:./<strong>mipav</strong> $MIPARGSAlthough this script doesn’t include the line ./<strong>mipav</strong> $MIPARGS with a “&”to run MIPAV in the background, it could have. This would have the effectof exiting the script with MIPAV in the background; as it is, the script doesnot exit—and return control to you at the command line—until MIPAVexits.MIPAV User’s Guide, Volume 1, Basics 53212/2/08