Multisport 270 Owner's Manual - Aquaglide
Multisport 270 Owner's Manual - Aquaglide
Multisport 270 Owner's Manual - Aquaglide
- No tags were found...

Create successful ePaper yourself
Turn your PDF publications into a flip-book with our unique Google optimized e-Paper software.
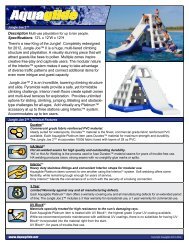
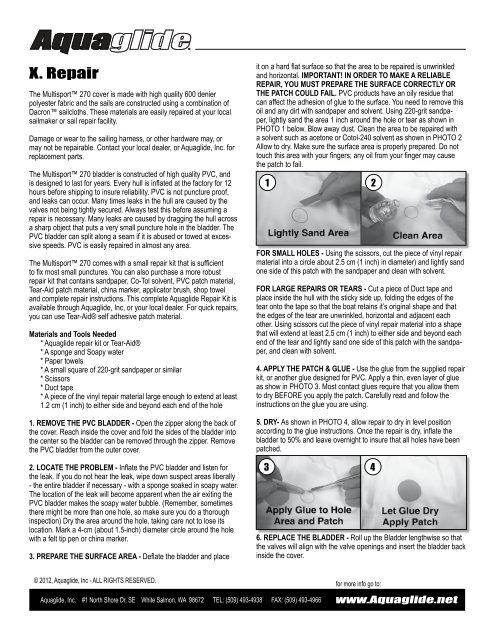
X. RepairThe <strong>Multisport</strong> <strong>270</strong> cover is made with high quality 600 denierpolyester fabric and the sails are constructed using a combination ofDacron sailcloths. These materials are easily repaired at your localsailmaker or sail repair facility.Damage or wear to the sailing harness, or other hardware may, ormay not be repairable. Contact your local dealer, or <strong>Aquaglide</strong>, Inc. forreplacement parts.The <strong>Multisport</strong> <strong>270</strong> bladder is constructed of high quality PVC, andis designed to last for years. Every hull is inflated at the factory for 12hours before shipping to insure reliability. PVC is not puncture proof,and leaks can occur. Many times leaks in the hull are caused by thevalves not being tightly secured. Always test this before assuming arepair is necessary. Many leaks are caused by dragging the hull acrossa sharp object that puts a very small puncture hole in the bladder. ThePVC bladder can split along a seam if it is abused or towed at excessivespeeds. PVC is easily repaired in almost any area.The <strong>Multisport</strong> <strong>270</strong> comes with a small repair kit that is sufficientto fix most small punctures. You can also purchase a more robustrepair kit that contains sandpaper, Co-Tol solvent, PVC patch material,Tear-Aid patch material, china marker, applicator brush, shop toweland complete repair instructions. This complete <strong>Aquaglide</strong> Repair Kit isavailable through <strong>Aquaglide</strong>, Inc, or your local dealer. For quick repairs,you can use Tear-Aid® self adhesive patch material.Materials and Tools Needed* <strong>Aquaglide</strong> repair kit or Tear-Aid®* A sponge and Soapy water* Paper towels* A small square of 220-grit sandpaper or similar* Scissors* Duct tape* A piece of the vinyl repair material large enough to extend at least1.2 cm (1 inch) to either side and beyond each end of the hole1. REMOVE THE PVC BLADDER - Open the zipper along the back ofthe cover. Reach inside the cover and fold the sides of the bladder intothe center so the bladder can be removed through the zipper. Removethe PVC bladder from the outer cover.2. LOCATE THE PROBLEM - Inflate the PVC bladder and listen forthe leak. If you do not hear the leak, wipe down suspect areas liberally- the entire bladder if necessary - with a sponge soaked in soapy water.The location of the leak will become apparent when the air exiting thePVC bladder makes the soapy water bubble. (Remember, sometimesthere might be more than one hole, so make sure you do a thoroughinspection) Dry the area around the hole, taking care not to lose itslocation. Mark a 4-cm (about 1.5-inch) diameter circle around the holewith a felt tip pen or china marker.3. PREPARE THE SURFACE AREA - Deflate the bladder and placeit on a hard flat surface so that the area to be repaired is unwrinkledand horizontal. IMPORTANT! IN ORDER TO MAKE A RELIABLEREPAIR, YOU MUST PREPARE THE SURFACE CORRECTLY ORTHE PATCH COULD FAIL. PVC products have an oily residue thatcan affect the adhesion of glue to the surface. You need to remove thisoil and any dirt with sandpaper and solvent. Using 220-grit sandpaper,lightly sand the area 1 inch around the hole or tear as shown inPHOTO 1 below. Blow away dust. Clean the area to be repaired witha solvent such as acetone or Cotol-240 solvent as shown in PHOTO 2Allow to dry. Make sure the surface area is properly prepared. Do nottouch this area with your fingers; any oil from your finger may causethe patch to fail.1 2FOR SMALL HOLES - Using the scissors, cut the piece of vinyl repairmaterial into a circle about 2.5 cm (1 inch) in diameter) and lightly sandone side of this patch with the sandpaper and clean with solvent.FOR LARGE REPAIRS OR TEARS - Cut a piece of Duct tape andplace inside the hull with the sticky side up, folding the edges of thetear onto the tape so that the boat retains it’s original shape and thatthe edges of the tear are unwrinkled, horizontal and adjacent eachother. Using scissors cut the piece of vinyl repair material into a shapethat will extend at least 2.5 cm (1 inch) to either side and beyond eachend of the tear and lightly sand one side of this patch with the sandpaper,and clean with solvent.4. APPLY THE PATCH & GLUE - Use the glue from the supplied repairkit, or another glue designed for PVC. Apply a thin, even layer of glueas show in PHOTO 3. Most contact glues require that you allow themto dry BEFORE you apply the patch. Carefully read and follow theinstructions on the glue you are using.5. DRY- As shown in PHOTO 4, allow repair to dry in level positionaccording to the glue instructions. Once the repair is dry, inflate thebladder to 50% and leave overnight to insure that all holes have beenpatched.3 46. REPLACE THE BLADDER - Roll up the Bladder lengthwise so thatthe valves will align with the valve openings and insert the bladder backinside the cover.© 2012, <strong>Aquaglide</strong>, Inc - ALL RIGHTS RESERVED.<strong>Aquaglide</strong>, Inc. #1 North Shore Dr, SE White Salmon, WA 98672 TEL: (509) 493-4938 FAX: (509) 493-4966for more info go to:www.<strong>Aquaglide</strong>.net