

Assembly Instructions - Swing-N-Slide
Assembly Instructions - Swing-N-Slide
Assembly Instructions - Swing-N-Slide
- No tags were found...

You also want an ePaper? Increase the reach of your titles
YUMPU automatically turns print PDFs into web optimized ePapers that Google loves.
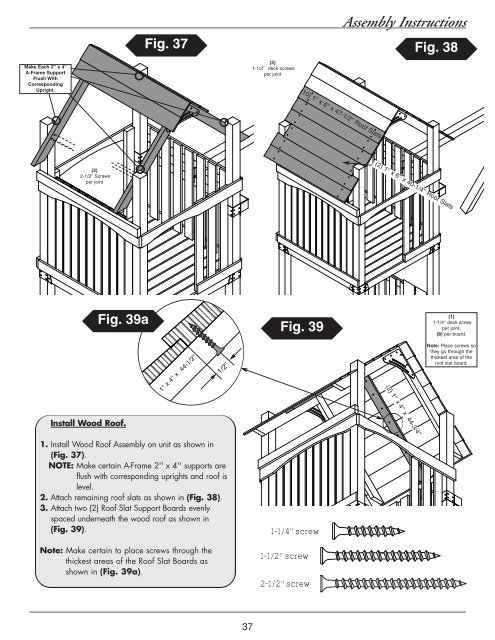
<strong>Assembly</strong> <strong>Instructions</strong>Fig. 37 Fig. 38Make Each 2'' x 4''A-Frame SupportFlush WithCorrespondingUpright.(2)1-1/2'' deck screwsper joint(10) 1'' x 6'' x 47-1/2'' Roof Slats(2) 1'' x 6'' x 40-1/4'' Roof Slats(3)2-1/2'' Screwsper jointFig. 39aFig. 39(1)1-1/4'' deck screwper joint,(8) per board.1'' x 4'' x 44-1/2''1/2''Note: Place screws sothey go through thethickest area of theroof slat board.(2) 1'' x 4'' x 44-3/4''Install Wood Roof.1. Install Wood Roof <strong>Assembly</strong> on unit as shown in(Fig. 37).NOTE: Make certain A-Frame 2'' x 4'' supports areflush with corresponding uprights and roof islevel.2. Attach remaining roof slats as shown in (Fig. 38).3. Attach two (2) Roof Slat Support Boards evenlyspaced underneath the wood roof as shown in(Fig. 39).Note: Make certain to place screws through thethickest areas of the Roof Slat Boards asshown in (Fig. 39a).1-1/4'' screw1-1/2'' screw2-1/2'' screw37


