

Assembly Instructions - Swing-N-Slide
Assembly Instructions - Swing-N-Slide
Assembly Instructions - Swing-N-Slide
- No tags were found...

You also want an ePaper? Increase the reach of your titles
YUMPU automatically turns print PDFs into web optimized ePapers that Google loves.
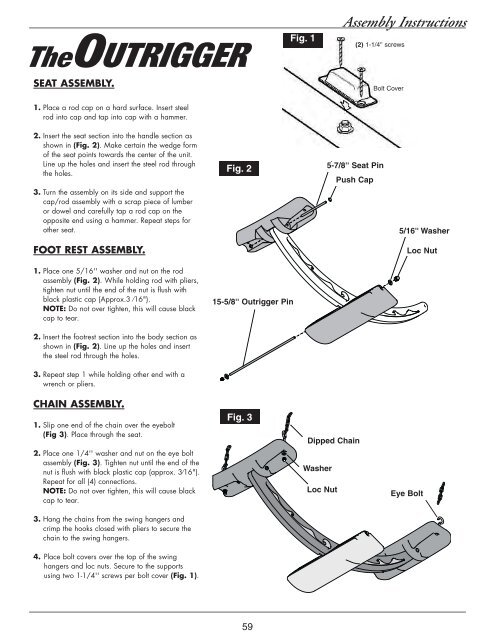
TheOUTRIGGERSEAT ASSEMBLY.Fig. 1<strong>Assembly</strong> <strong>Instructions</strong>(2) 1-1/4'' screwsBolt Cover1. Place a rod cap on a hard surface. Insert steelrod into cap and tap into cap with a hammer.2. Insert the seat section into the handle section asshown in (Fig. 2). Make certain the wedge formof the seat points towards the center of the unit.Line up the holes and insert the steel rod throughthe holes.3. Turn the assembly on its side and support thecap/rod assembly with a scrap piece of lumberor dowel and carefully tap a rod cap on theopposite end using a hammer. Repeat steps forother seat.FOOT REST ASSEMBLY.1. Place one 5/16'' washer and nut on the rodassembly (Fig. 2). While holding rod with pliers,tighten nut until the end of the nut is flush withblack plastic cap (Approx.3 ⁄16").NOTE: Do not over tighten, this will cause blackcap to tear.Fig. 215-5/8'' Outrigger Pin5-7/8'' Seat PinPush Cap5/16'' WasherLoc Nut2. Insert the footrest section into the body section asshown in (Fig. 2). Line up the holes and insertthe steel rod through the holes.3. Repeat step 1 while holding other end with awrench or pliers.CHAIN ASSEMBLY.1. Slip one end of the chain over the eyebolt(Fig 3). Place through the seat.2. Place one 1/4'' washer and nut on the eye boltassembly (Fig. 3). Tighten nut until the end of thenut is flush with black plastic cap (approx. 3⁄16").Repeat for all (4) connections.NOTE: Do not over tighten, this will cause blackcap to tear.3. Hang the chains from the swing hangers andcrimp the hooks closed with pliers to secure thechain to the swing hangers.Fig. 3Dipped ChainWasherLoc NutEye Bolt4. Place bolt covers over the top of the swinghangers and loc nuts. Secure to the supportsusing two 1-1/4'' screws per bolt cover (Fig. 1).59


