Advanced CAD System for Electromagnetic MEMS Interactive Analysis
Advanced CAD System for Electromagnetic MEMS Interactive Analysis
Advanced CAD System for Electromagnetic MEMS Interactive Analysis

You also want an ePaper? Increase the reach of your titles
YUMPU automatically turns print PDFs into web optimized ePapers that Google loves.
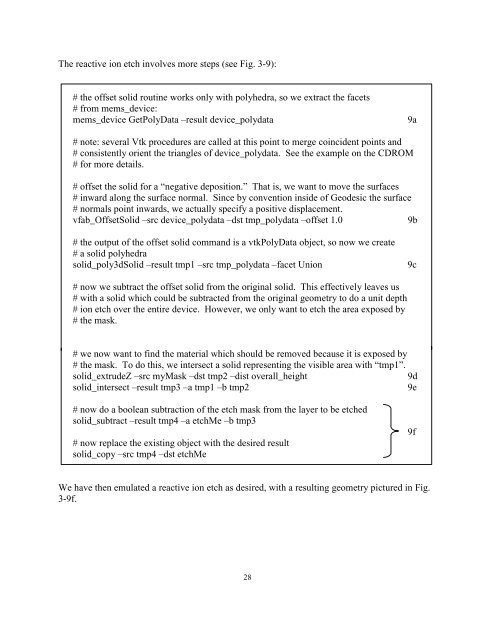
The reactive ion etch involves more steps (see Fig. 3-9):<br />
# the offset solid routine works only with polyhedra, so we extract the facets<br />
# from mems_device:<br />
mems_device GetPolyData –result device_polydata 9a<br />
# note: several Vtk procedures are called at this point to merge coincident points and<br />
# consistently orient the triangles of device_polydata. See the example on the CDROM<br />
# <strong>for</strong> more details.<br />
# offset the solid <strong>for</strong> a “negative deposition.” That is, we want to move the surfaces<br />
# inward along the surface normal. Since by convention inside of Geodesic the surface<br />
# normals point inwards, we actually specify a positive displacement.<br />
vfab_OffsetSolid –src device_polydata –dst tmp_polydata –offset 1.0 9b<br />
# the output of the offset solid command is a vtkPolyData object, so now we create<br />
# a solid polyhedra<br />
solid_poly3dSolid –result tmp1 –src tmp_polydata –facet Union 9c<br />
# now we subtract the offset solid from the original solid. This effectively leaves us<br />
# with a solid which could be subtracted from the original geometry to do a unit depth<br />
# ion etch over the entire device. However, we only want to etch the area exposed by<br />
# the mask.<br />
# we now want to find the material which should be removed because it is exposed by<br />
# the mask. To do this, we intersect a solid representing the visible area with “tmp1”.<br />
solid_extrudeZ –src myMask –dst tmp2 –dist overall_height 9d<br />
solid_intersect –result tmp3 –a tmp1 –b tmp2 9e<br />
# now do a boolean subtraction of the etch mask from the layer to be etched<br />
solid_subtract –result tmp4 –a etchMe –b tmp3<br />
# now replace the existing object with the desired result<br />
solid_copy –src tmp4 –dst etchMe<br />
We have then emulated a reactive ion etch as desired, with a resulting geometry pictured in Fig.<br />
3-9f.<br />
28<br />
9f