Installation Manual HLF-25, 30, 40, & 50 - Waltco
Installation Manual HLF-25, 30, 40, & 50 - Waltco
Installation Manual HLF-25, 30, 40, & 50 - Waltco
- No tags were found...

You also want an ePaper? Increase the reach of your titles
YUMPU automatically turns print PDFs into web optimized ePapers that Google loves.
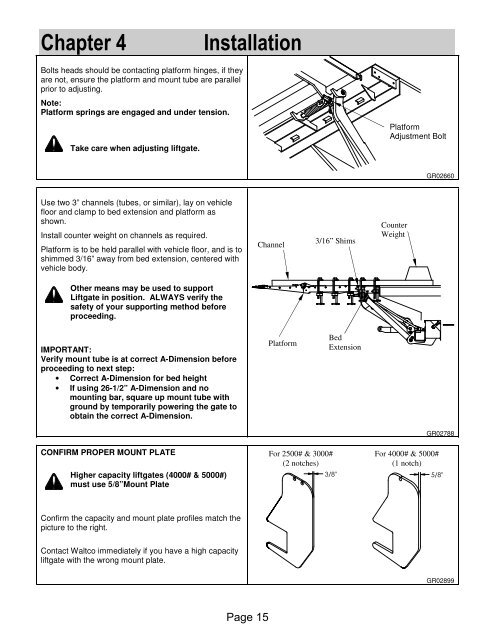
Chapter 4<strong>Installation</strong>Bolts heads should be contacting platform hinges, if theyare not, ensure the platform and mount tube are parallelprior to adjusting.Note:Platform springs are engaged and under tension.Take care when adjusting liftgate.PlatformAdjustment BoltGR02660Use two 3” channels (tubes, or similar), lay on vehiclefloor and clamp to bed extension and platform asshown.Install counter weight on channels as required.Platform is to be held parallel with vehicle floor, and is toshimmed 3/16” away from bed extension, centered withvehicle body.Channel3/16” ShimsCounterWeightOther means may be used to supportLiftgate in position. ALWAYS verify thesafety of your supporting method beforeproceeding.IMPORTANT:Verify mount tube is at correct A-Dimension beforeproceeding to next step:• Correct A-Dimension for bed height• If using 26-1/2” A-Dimension and nomounting bar, square up mount tube withground by temporarily powering the gate toobtain the correct A-Dimension.PlatformBedExtensionGR02788CONFIRM PROPER MOUNT PLATEHigher capacity liftgates (<strong>40</strong>00# & <strong>50</strong>00#)must use 5/8”Mount PlateFor <strong>25</strong>00# & <strong>30</strong>00#(2 notches)For <strong>40</strong>00# & <strong>50</strong>00#(1 notch)3/8" 5/8"Confirm the capacity and mount plate profiles match thepicture to the right.Contact <strong>Waltco</strong> immediately if you have a high capacityliftgate with the wrong mount plate.GR02899Page 15