Installation Manual HLF-25, 30, 40, & 50 - Waltco
Installation Manual HLF-25, 30, 40, & 50 - Waltco
Installation Manual HLF-25, 30, 40, & 50 - Waltco
- No tags were found...

Create successful ePaper yourself
Turn your PDF publications into a flip-book with our unique Google optimized e-Paper software.
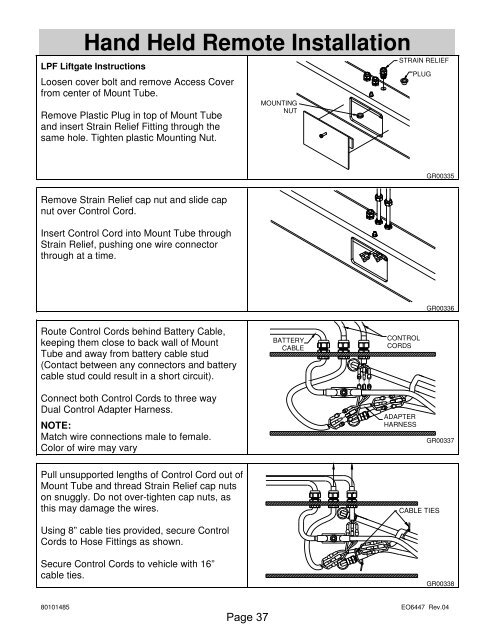
Hand Held Remote <strong>Installation</strong>LPF Liftgate InstructionsLoosen cover bolt and remove Access Coverfrom center of Mount Tube.Remove Plastic Plug in top of Mount Tubeand insert Strain Relief Fitting through thesame hole. Tighten plastic Mounting Nut.MOUNTINGNUTSTRAIN RELIEFPLUGGR00335Remove Strain Relief cap nut and slide capnut over Control Cord.Insert Control Cord into Mount Tube throughStrain Relief, pushing one wire connectorthrough at a time.GR00336Route Control Cords behind Battery Cable,keeping them close to back wall of MountTube and away from battery cable stud(Contact between any connectors and batterycable stud could result in a short circuit).BATTERYCABLECONTROLCORDSConnect both Control Cords to three wayDual Control Adapter Harness.NOTE:Match wire connections male to female.Color of wire may varyADAPTERHARNESSGR00337Pull unsupported lengths of Control Cord out ofMount Tube and thread Strain Relief cap nutson snuggly. Do not over-tighten cap nuts, asthis may damage the wires.CABLE TIESUsing 8” cable ties provided, secure ControlCords to Hose Fittings as shown.Secure Control Cords to vehicle with 16”cable ties.GR0033880101485 EO6447 Rev.04Page 37