Installation Manual HLF-25, 30, 40, & 50 - Waltco
Installation Manual HLF-25, 30, 40, & 50 - Waltco
Installation Manual HLF-25, 30, 40, & 50 - Waltco
- No tags were found...

Create successful ePaper yourself
Turn your PDF publications into a flip-book with our unique Google optimized e-Paper software.
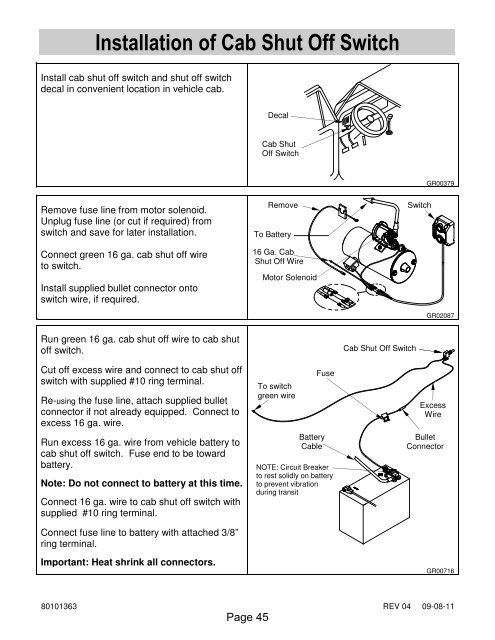
<strong>Installation</strong> of Cab Shut Off SwitchInstall cab shut off switch and shut off switchdecal in convenient location in vehicle cab.DecalCab ShutOff SwitchGR00379Remove fuse line from motor solenoid.Unplug fuse line (or cut if required) fromswitch and save for later installation.Connect green 16 ga. cab shut off wireto switch.Install supplied bullet connector ontoswitch wire, if required.RemoveTo Battery16 Ga. CabShut Off WireMotor SolenoidSwitchGR02087Run green 16 ga. cab shut off wire to cab shutoff switch.Cut off excess wire and connect to cab shut offswitch with supplied #10 ring terminal.Re-using the fuse line, attach supplied bulletconnector if not already equipped. Connect toexcess 16 ga. wire.Run excess 16 ga. wire from vehicle battery tocab shut off switch. Fuse end to be towardbattery.Note: Do not connect to battery at this time.Connect 16 ga. wire to cab shut off switch withsupplied #10 ring terminal.Connect fuse line to battery with attached 3/8”ring terminal.Important: Heat shrink all connectors.To switchgreen wireBatteryCableFuseNOTE: Circuit Breakerto rest solidly on batteryto prevent vibrationduring transitCab Shut Off SwitchExcessWireBulletConnectorGR0071680101363 REV 04 09-08-11Page 45