PT-AE8000U PT-AT6000E PT-AE8000EA PT ... - Panasonic
PT-AE8000U PT-AT6000E PT-AE8000EA PT ... - Panasonic
PT-AE8000U PT-AT6000E PT-AE8000EA PT ... - Panasonic
Create successful ePaper yourself
Turn your PDF publications into a flip-book with our unique Google optimized e-Paper software.
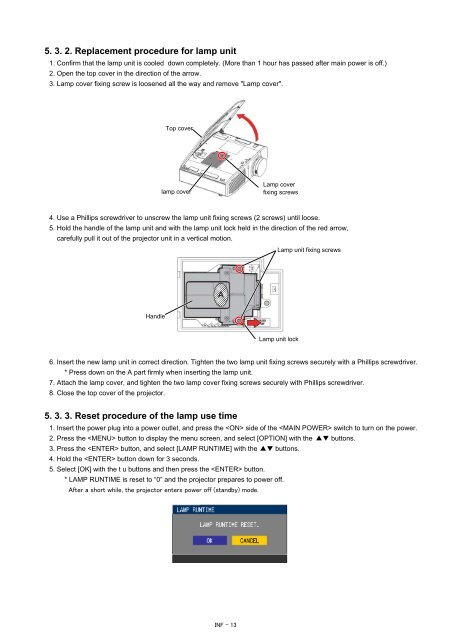
5. 3. 2. Replacement procedure for lamp unit1. Confirm that the lamp unit is cooled down completely. (More than 1 hour has passed after main power is off.)2. Open the top cover in the direction of the arrow.3. Lamp cover fixing screw is loosened all the way and remove "Lamp cover".Top coverlamp coverLamp coverfixing screws4. Use a Phillips screwdriver to unscrew the lamp unit fixing screws (2 screws) until loose.5. Hold the handle of the lamp unit and with the lamp unit lock held in the direction of the red arrow,carefully pull it out of the projector unit in a vertical motion.Lamp unit fixing screwsAHandleLamp unit lock6. Insert the new lamp unit in correct direction. Tighten the two lamp unit fixing screws securely with a Phillips screwdriver.* Press down on the A part firmly when inserting the lamp unit.7. Attach the lamp cover, and tighten the two lamp cover fixing screws securely with Phillips screwdriver.8. Close the top cover of the projector.5. 3. 3. Reset procedure of the lamp use time1. Insert the power plug into a power outlet, and press the side of the switch to turn on the power.2. Press the button to display the menu screen, and select [O<strong>PT</strong>ION] with the ▲▼ buttons.3. Press the button, and select [LAMP RUNTIME] with the ▲▼ buttons.4. Hold the button down for 3 seconds.5. Select [OK] with the t u buttons and then press the button.* LAMP RUNTIME is reset to “0” and the projector prepares to power off.After a short while, the projector enters power off (standby) mode.INF - 13


