

PT-AE8000U PT-AT6000E PT-AE8000EA PT ... - Panasonic
PT-AE8000U PT-AT6000E PT-AE8000EA PT ... - Panasonic
PT-AE8000U PT-AT6000E PT-AE8000EA PT ... - Panasonic

Create successful ePaper yourself
Turn your PDF publications into a flip-book with our unique Google optimized e-Paper software.
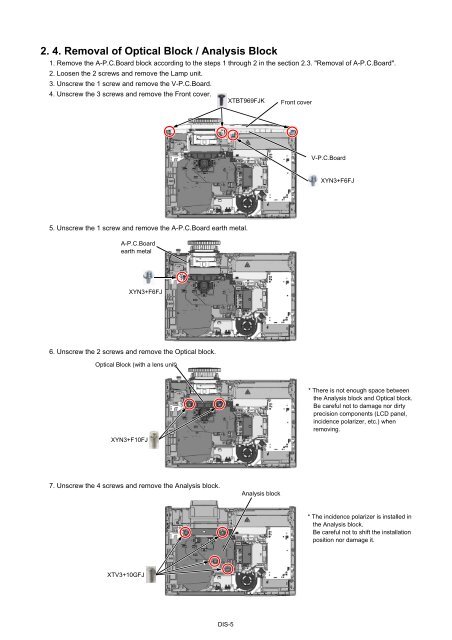
2. 4. Removal of Optical Block / Analysis Block1. Remove the A-P.C.Board block according to the steps 1 through 2 in the section 2.3. "Removal of A-P.C.Board".2. Loosen the 2 screws and remove the Lamp unit.3. Unscrew the 1 screw and remove the V-P.C.Board.4. Unscrew the 3 screws and remove the Front cover.XTBT969FJK Front coverV-P.C.BoardXYN3+F6FJ5. Unscrew the 1 screw and remove the A-P.C.Board earth metal.A-P.C.Boardearth metalXYN3+F6FJ6. Unscrew the 2 screws and remove the Optical block.Optical Block (with a lens unit)XYN3+F10FJ* There is not enough space betweenthe Analysis block and Optical block.Be careful not to damage nor dirtyprecision components (LCD panel,incidence polarizer, etc.) whenremoving.7. Unscrew the 4 screws and remove the Analysis block.Analysis block* The incidence polarizer is installed inthe Analysis block.Be careful not to shift the installationposition nor damage it.XTV3+10GFJDIS-5


