Introductory Exercises for GIS Using ArcMap & ArcCatalog
Introductory Exercises for GIS Using ArcMap & ArcCatalog
Introductory Exercises for GIS Using ArcMap & ArcCatalog

You also want an ePaper? Increase the reach of your titles
YUMPU automatically turns print PDFs into web optimized ePapers that Google loves.
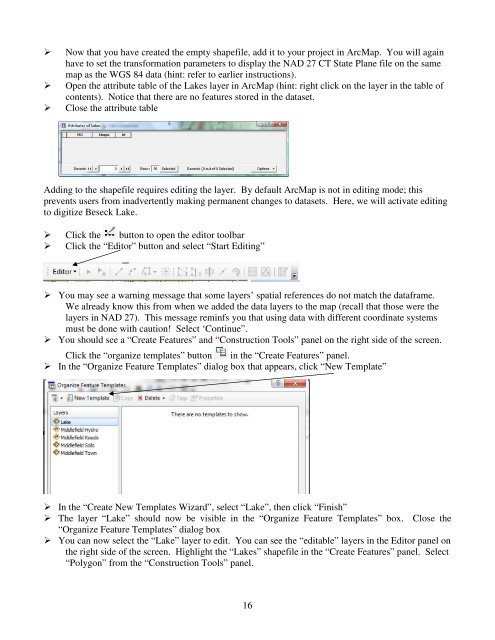
Now that you have created the empty shapefile, add it to your project in <strong>ArcMap</strong>. You will againhave to set the trans<strong>for</strong>mation parameters to display the NAD 27 CT State Plane file on the samemap as the WGS 84 data (hint: refer to earlier instructions).Open the attribute table of the Lakes layer in <strong>ArcMap</strong> (hint: right click on the layer in the table ofcontents). Notice that there are no features stored in the dataset.Close the attribute tableAdding to the shapefile requires editing the layer. By default <strong>ArcMap</strong> is not in editing mode; thisprevents users from inadvertently making permanent changes to datasets. Here, we will activate editingto digitize Beseck Lake. Click the button to open the editor toolbar Click the “Editor” button and select “Start Editing” You may see a warning message that some layers’ spatial references do not match the dataframe.We already know this from when we added the data layers to the map (recall that those were thelayers in NAD 27). This message reminfs you that using data with different coordinate systemsmust be done with caution! Select ‘Continue”. You should see a “Create Features” and “Construction Tools” panel on the right side of the screen.Click the “organize templates” button in the “Create Features” panel. In the “Organize Feature Templates” dialog box that appears, click “New Template” In the “Create New Templates Wizard”, select “Lake”, then click “Finish” The layer “Lake” should now be visible in the “Organize Feature Templates” box. Close the“Organize Feature Templates” dialog box You can now select the “Lake” layer to edit. You can see the “editable” layers in the Editor panel onthe right side of the screen. Highlight the “Lakes” shapefile in the “Create Features” panel. Select“Polygon” from the “Construction Tools” panel.16