- Page 1 and 2:
MSPTutorials and TopicsVersion 4.5.
- Page 3 and 4:
Table of ContentsCopyright and Trad
- Page 5 and 6:
Table of ContentsExercise 3 .......
- Page 8 and 9:
Table of ContentsVarying parameters
- Page 10 and 11:
IntroductionWith the addition of th
- Page 12:
IntroductionThe Max/MSP Examples fo
- Page 15 and 16:
How Digital Audio Works• The fluc
- Page 17 and 18:
How Digital Audio WorksBecause the
- Page 19 and 20:
How Digital Audio Worksthough, the
- Page 21 and 22:
How Digital Audio Worksnumbers from
- Page 23 and 24:
How Digital Audio Worksthreshold. A
- Page 25 and 26:
How Digital Audio WorksIn this case
- Page 27 and 28:
How Digital Audio Worksquality”)
- Page 29 and 30:
How Digital Audio WorksManipulating
- Page 31 and 32:
How MSP WorksMax patches and theMSP
- Page 33 and 34:
How MSP WorksMax patches and theMSP
- Page 35 and 36:
How MSP WorksMax patches and theMSP
- Page 37 and 38:
Audio I/OAudio input andoutput with
- Page 39 and 40:
Audio I/OAudio input andoutput with
- Page 41 and 42:
Audio I/OAudio input andoutput with
- Page 43 and 44:
Audio I/OAudio input andoutput with
- Page 45 and 46:
Audio I/OAudio input andoutput with
- Page 47 and 48:
Audio I/OAudio input andoutput with
- Page 49 and 50:
Audio I/OAudio input andoutput with
- Page 51 and 52:
Audio I/OAudio input andoutput with
- Page 53 and 54:
Audio I/OAudio input andoutput with
- Page 55 and 56:
Audio I/OAudio input andoutput with
- Page 57 and 58:
Tutorial 1: Fundamentals—Test ton
- Page 59 and 60:
Tutorial 1Fundamentals:Test toneWav
- Page 61 and 62:
Tutorial 1Fundamentals:Test tonesou
- Page 63 and 64:
Tutorial 2Fundamentals:Adjustable o
- Page 65 and 66:
Tutorial 2Fundamentals:Adjustable o
- Page 67 and 68:
Tutorial 2Fundamentals:Adjustable o
- Page 69 and 70:
Tutorial 3Fundamentals:Wavetable os
- Page 71 and 72:
Tutorial 3Fundamentals:Wavetable os
- Page 73 and 74:
Tutorial 3Fundamentals:Wavetable os
- Page 75 and 76:
Tutorial 4Fundamentals:Routing sign
- Page 77 and 78:
Tutorial 4Fundamentals:Routing sign
- Page 79 and 80:
Tutorial 4Fundamentals:Routing sign
- Page 81 and 82:
Tutorial 4Fundamentals:Routing sign
- Page 83:
Tutorial 4Fundamentals:Routing sign
- Page 86 and 87:
Tutorial 5Fundamentals:Turning sign
- Page 88 and 89: Tutorial 5Fundamentals:Turning sign
- Page 90 and 91: Tutorial 5Fundamentals:Turning sign
- Page 92 and 93: Tutorial 5Fundamentals:Turning sign
- Page 94 and 95: Tutorial 6A review of fundamentals1
- Page 96 and 97: Tutorial 6A review of fundamentalsW
- Page 98 and 99: Tutorial 6A review of fundamentalsS
- Page 100 and 101: Tutorial 7Synthesis:Additive synthe
- Page 102 and 103: Tutorial 7Synthesis:Additive synthe
- Page 104 and 105: Multiplying signalsTutorial 8: Synt
- Page 106 and 107: Tutorial 8Synthesis:Tremolo and rin
- Page 108 and 109: Tutorial 9: Synthesis—Amplitude m
- Page 110 and 111: Tutorial 9Synthesis:Amplitude modul
- Page 112 and 113: Tutorial 10: Synthesis—Vibrato an
- Page 114 and 115: Elements of FM synthesisTutorial 11
- Page 116 and 117: Tutorial 11Synthesis:Frequency modu
- Page 118 and 119: Tutorial 11Synthesis:Frequency modu
- Page 120 and 121: Tutorial 12Synthesis:WaveshapingThe
- Page 122 and 123: Tutorial 12Synthesis:Waveshaping•
- Page 124 and 125: Sound input: adc~Tutorial 13: Sampl
- Page 126 and 127: Tutorial 13Sampling:Recording and p
- Page 128 and 129: Tutorial 13Sampling:Recording and p
- Page 130 and 131: Playing samples with groove~Tutoria
- Page 132 and 133: Tutorial 14Sampling:Playback with l
- Page 134 and 135: Tutorial 15Sampling:Variable-length
- Page 136 and 137: Tutorial 15Sampling:Variable-length
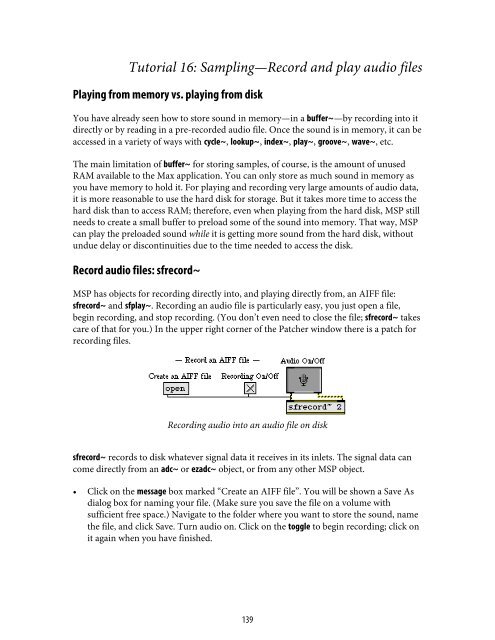
- Page 140 and 141: Tutorial 16Sampling:Record and play
- Page 142 and 143: Tutorial 16Sampling:Record and play
- Page 144 and 145: Tutorial 17Sampling reviewThe compu
- Page 146 and 147: Tutorial 17Sampling reviewThe keyst
- Page 148 and 149: Tutorial 18: MIDI control—Mapping
- Page 150 and 151: Tutorial 18MIDI Control:Mapping MID
- Page 152 and 153: Tutorial 18MIDI Control:Mapping MID
- Page 154 and 155: Implementing standard MIDI messages
- Page 156 and 157: Tutorial 19MIDI Control:Synthesizer
- Page 158 and 159: Tutorial 19MIDI Control:Synthesizer
- Page 160 and 161: Tutorial 19MIDI Control:Synthesizer
- Page 162 and 163: Tutorial 20: MIDI control—Sampler
- Page 164 and 165: Tutorial 20MIDI Control:SamplerThis
- Page 166 and 167: Tutorial 20MIDI Control:SamplerNote
- Page 168 and 169: Tutorial 20MIDI Control:SamplerSumm
- Page 170 and 171: Tutorial 21MIDI Control:Using the p
- Page 172 and 173: Tutorial 21MIDI Control:Using the p
- Page 174 and 175: Tutorial 21MIDI Control:Using the p
- Page 176 and 177: Tutorial 21MIDI Control:Using the p
- Page 178 and 179: Panning for localization and distan
- Page 180 and 181: Tutorial 22MIDI Control:PanningIn c
- Page 182 and 183: Tutorial 22MIDI Control:PanningTher
- Page 184 and 185: Tutorial 22MIDI Control:Panning•
- Page 186 and 187: Tutorial 23Analysis:Viewing signal
- Page 188 and 189:
Tutorial 23Analysis:Viewing signal
- Page 190 and 191:
Tutorial 23Analysis:Viewing signal
- Page 192 and 193:
Tutorial 24: Analysis—Oscilloscop
- Page 194 and 195:
Tutorial 24Analysis:Oscilloscopedif
- Page 196 and 197:
Tutorial 25Analysis:Using the FFTAl
- Page 198 and 199:
Tutorial 25Analysis:Using the FFTIt
- Page 200 and 201:
Tutorial 25Analysis:Using the FFTAs
- Page 202 and 203:
Tutorial 26Frequency domain signalp
- Page 204 and 205:
Tutorial 26Frequency domain signalp
- Page 206 and 207:
Tutorial 26Frequency domain signalp
- Page 208 and 209:
Tutorial 26Frequency domain signalp
- Page 210 and 211:
Tutorial 26Frequency domain signalp
- Page 212 and 213:
Tutorial 26Frequency domain signalp
- Page 214 and 215:
Tutorial 26Frequency domain signalp
- Page 216 and 217:
Tutorial 26Frequency domain signalp
- Page 218 and 219:
Tutorial 26Frequency domain signalp
- Page 220 and 221:
Effects achieved with delayed signa
- Page 222 and 223:
Tutorial 27Processing:Delay linesEq
- Page 224 and 225:
Tutorial 28Processing:Delay lines w
- Page 226 and 227:
Tutorial 28Processing:Delay lines w
- Page 228 and 229:
Tutorial 29Processing:FlangeWhile t
- Page 230 and 231:
Tutorial 29Processing:Flangedemonst
- Page 232 and 233:
Tutorial 30: Processing—ChorusThe
- Page 234 and 235:
Tutorial 30Processing:ChorusMultipl
- Page 236 and 237:
Tutorial 31: Processing—Comb filt
- Page 238 and 239:
Tutorial 31Processing:Comb filterTh
- Page 240 and 241:
Tutorial 31Processing:Comb filterco
- Page 242 and 243:
The dsp objectControlling and autom
- Page 244 and 245:
Indexfeedback in a delay line......
- Page 246:
Index246


