DocuSign for Microsoft Dynamics 2013 Quick Start Guide
DocuSign for Microsoft Dynamics 2013 Quick Start Guide
DocuSign for Microsoft Dynamics 2013 Quick Start Guide

You also want an ePaper? Increase the reach of your titles
YUMPU automatically turns print PDFs into web optimized ePapers that Google loves.
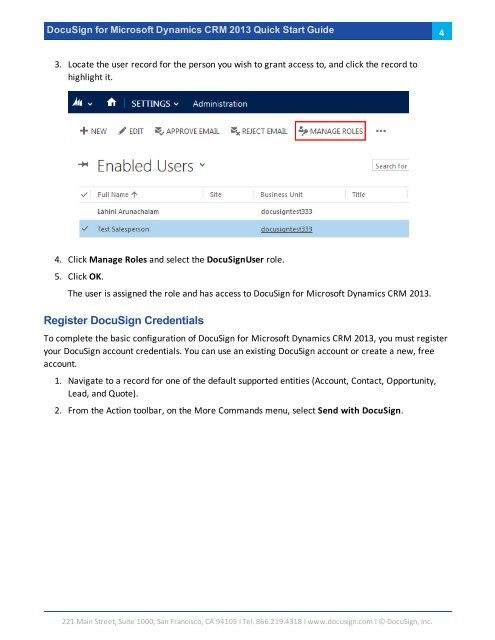
<strong>DocuSign</strong> <strong>for</strong> <strong>Microsoft</strong> <strong>Dynamics</strong> CRM <strong>2013</strong> <strong>Quick</strong> <strong>Start</strong> <strong>Guide</strong>43. Locate the user record <strong>for</strong> the person you wish to grant access to, and click the record tohighlight it.4. Click Manage Roles and select the <strong>DocuSign</strong>User role.5. Click OK.The user is assigned the role and has access to <strong>DocuSign</strong> <strong>for</strong> <strong>Microsoft</strong> <strong>Dynamics</strong> CRM <strong>2013</strong>.Register <strong>DocuSign</strong> CredentialsTo complete the basic configuration of <strong>DocuSign</strong> <strong>for</strong> <strong>Microsoft</strong> <strong>Dynamics</strong> CRM <strong>2013</strong>, you must registeryour <strong>DocuSign</strong> account credentials. You can use an existing <strong>DocuSign</strong> account or create a new, freeaccount.1. Navigate to a record <strong>for</strong> one of the default supported entities (Account, Contact, Opportunity,Lead, and Quote).2. From the Action toolbar, on the More Commands menu, select Send with <strong>DocuSign</strong>.221 Main Street, Suite 1000, San Francisco, CA 94105 Ι Tel. 866.219.4318 Ι www.docusign.com Ι © <strong>DocuSign</strong>, Inc.