Liebert Mini-Mate2, 8 Ton - Emerson Network Power
Liebert Mini-Mate2, 8 Ton - Emerson Network Power
Liebert Mini-Mate2, 8 Ton - Emerson Network Power
Create successful ePaper yourself
Turn your PDF publications into a flip-book with our unique Google optimized e-Paper software.
15<br />
Site Preparation and Installation<br />
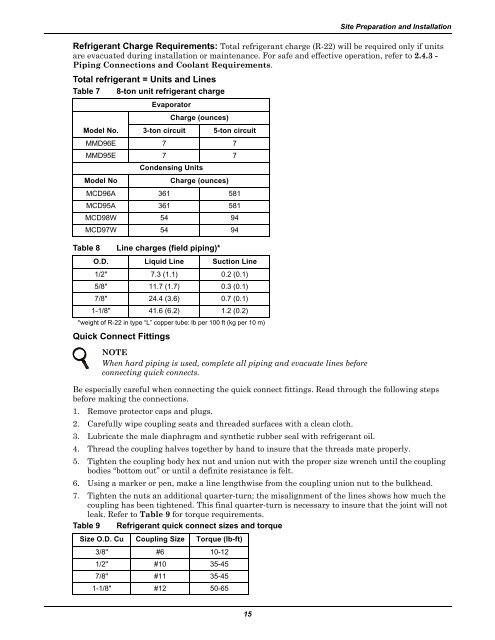
Refrigerant Charge Requirements: Total refrigerant charge (R-22) will be required only if units<br />
are evacuated during installation or maintenance. For safe and effective operation, refer to 2.4.3 -<br />
Piping Connections and Coolant Requirements.<br />
Total refrigerant = Units and Lines<br />
Table 7 8-ton unit refrigerant charge<br />
Evaporator<br />
Charge (ounces)<br />
Model No. 3-ton circuit 5-ton circuit<br />
MMD96E 7 7<br />
MMD95E 7<br />
Condensing Units<br />
7<br />
Model No Charge (ounces)<br />
MCD96A 361 581<br />
MCD95A 361 581<br />
MCD98W 54 94<br />
MCD97W 54 94<br />
Table 8 Line charges (field piping)*<br />
O.D. Liquid Line Suction Line<br />
1/2" 7.3 (1.1) 0.2 (0.1)<br />
5/8" 11.7 (1.7) 0.3 (0.1)<br />
7/8" 24.4 (3.6) 0.7 (0.1)<br />
1-1/8" 41.6 (6.2) 1.2 (0.2)<br />
*weight of R-22 in type “L” copper tube: lb per 100 ft (kg per 10 m)<br />
Quick Connect Fittings<br />
NOTE<br />
When hard piping is used, complete all piping and evacuate lines before<br />
connecting quick connects.<br />
Be especially careful when connecting the quick connect fittings. Read through the following steps<br />
before making the connections.<br />
1. Remove protector caps and plugs.<br />
2. Carefully wipe coupling seats and threaded surfaces with a clean cloth.<br />
3. Lubricate the male diaphragm and synthetic rubber seal with refrigerant oil.<br />
4. Thread the coupling halves together by hand to insure that the threads mate properly.<br />
5. Tighten the coupling body hex nut and union nut with the proper size wrench until the coupling<br />
bodies “bottom out” or until a definite resistance is felt.<br />
6. Using a marker or pen, make a line lengthwise from the coupling union nut to the bulkhead.<br />
7. Tighten the nuts an additional quarter-turn; the misalignment of the lines shows how much the<br />
coupling has been tightened. This final quarter-turn is necessary to insure that the joint will not<br />
leak. Refer to Table 9 for torque requirements.<br />
Table 9 Refrigerant quick connect sizes and torque<br />
Size O.D. Cu Coupling Size Torque (lb-ft)<br />
3/8" #6 10-12<br />
1/2" #10 35-45<br />
7/8" #11 35-45<br />
1-1/8" #12 50-65


