
You also want an ePaper? Increase the reach of your titles
YUMPU automatically turns print PDFs into web optimized ePapers that Google loves.
Make Office Better<br />
Expert tips for every program<br />
POWERPOINT<br />
Preview your presentation and<br />
rearrange your slides faster<br />
While playing your slideshow<br />
from the beginning is the best<br />
way to present it, it’s not<br />
necessarily the best way to check your<br />
presentation because you can’t rearrange<br />
slides if you feel that you need to.<br />
A better alternative is to use<br />
PowerPoint’s Reading View option to<br />
preview and check your presentation.<br />
To do that, click the Reading View icon<br />
at the bottom right of PowerPoint. Your<br />
presentation will start playing in full<br />
screen and you can use the left and<br />
right arrow keys to navigate between<br />
slides (just as if you were playing your<br />
slideshow). Even better, you can<br />
rearrange slides quickly in this mode.<br />
To do that, click the icon with four<br />
small squares (to the left of the Reading<br />
View icon <strong>–</strong> see screenshot above). Your<br />
slides will now appear as tiles. Simply<br />
click and drag the tiles to rearrange them,<br />
then click the Reading View icon again to<br />
switch back to that mode.<br />
EXCEL<br />
Speed up navigation within a<br />
longer spreadsheet<br />
If you have an Excel sheet with<br />
data running across hundreds<br />
of lines, then getting to the top<br />
or bottom using only the arrow keys<br />
on your keyboard can be very time<br />
consuming. Th is is because those keys<br />
only jump one cell at a time. A faster way<br />
to speed up the navigating process using<br />
your keyboard is to keep the Ctrl key<br />
pressed, then press and hold the up (or<br />
down) arrow key. Th is will jump across<br />
multiple rows at a much quicker speed,<br />
making the process faster. You can also<br />
use the Ctrl+ (left or right) arrow key<br />
combination to move in that direction.<br />
WORD<br />
Use images as bullets points<br />
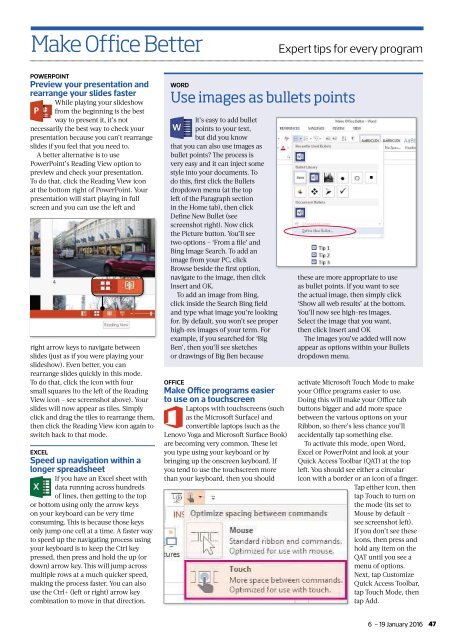
It’s easy to add bullet<br />
points to your text,<br />
but did you know<br />
that you can also use images as<br />
bullet points? Th e process is<br />
very easy and it can inject some<br />
style into your documents. To<br />
do this, fi rst click the Bullets<br />
dropdown menu (at the top<br />
left of the Paragraph section<br />
in the Home tab), then click<br />
Defi ne New Bullet (see<br />
screenshot right). Now click<br />
the Picture button. You’ll see<br />
two options <strong>–</strong> ‘From a fi le’ and<br />
Bing Image Search. To add an<br />
image from your PC, click<br />
Browse beside the fi rst option,<br />
navigate to the image, then click<br />
Insert and OK.<br />
To add an image from Bing,<br />
click inside the Search Bing fi eld<br />
and type what image you’re looking<br />
for. By default, you won’t see proper<br />
high-res images of your term. For<br />
example, if you searched for ‘Big<br />
Ben’, then you’ll see sketches<br />
or drawings of Big Ben because<br />
OFFICE<br />
Make Office programs easier<br />
to use on a touchscreen<br />
Laptops with touchscreens (such<br />
as the Microsoft Surface) and<br />
convertible laptops (such as the<br />
Lenovo Yoga and Microsoft Surface Book)<br />
are becoming very common. Th ese let<br />
you type using your keyboard or by<br />
bringing up the onscreen keyboard. If<br />
you tend to use the touchscreen more<br />
than your keyboard, then you should<br />
these are more appropriate to use<br />
as bullet points. If you want to see<br />
the actual image, then simply click<br />
‘Show all web results’ at the bottom.<br />
You’ll now see high-res images.<br />
Select the image that you want,<br />
then click Insert and OK<br />
Th e images you’ve added will now<br />
appear as options within your Bullets<br />
dropdown menu.<br />
activate Microsoft Touch Mode to make<br />
your Office programs easier to use.<br />
Doing this will make your Office tab<br />
buttons bigger and add more space<br />
between the various options on your<br />
Ribbon, so there’s less chance you’ll<br />
accidentally tap something else.<br />
To activate this mode, open Word,<br />
Excel or PowerPoint and look at your<br />
Quick Access Toolbar (QAT) at the top<br />
left. You should see either a circular<br />
icon with a border or an icon of a fi nger.<br />
Tap either icon, then<br />
tap Touch to turn on<br />
the mode (its set to<br />
Mouse by default <strong>–</strong><br />
see screenshot left).<br />
If you don’t see these<br />
icons, then press and<br />
hold any item on the<br />
QAT until you see a<br />
menu of options.<br />
Next, tap Customize<br />
Quick Access Toolbar,<br />
tap Touch Mode, then<br />
tap Add.<br />
6 <strong>–</strong> 19 <strong>January</strong> <strong>2016</strong> 47