- Page 1:
- ISO 9001 CATALOG 13 ~1 SPAENAUR A
- Page 4 and 5:
, ' '· I . ~ I l " .•. 4 .... ,
- Page 6 and 7:
Nous sommes pret a vous servir •
- Page 8 and 9:
It's Easy to Buy from Spaenaur How
- Page 10 and 11:
Assortments and Storage Products As
- Page 12 and 13:
Inch Pouces LARGE SIZE Assortments
- Page 14 and 15:
Inch Pouces EMPTY PLASTIKITS 176-E
- Page 16 and 17:
Inch and Metric Pouces et Métrique
- Page 18 and 19:
Inch and Metric Pouces et Métrique
- Page 20 and 21:
Inch and Metric Pouces et Métrique
- Page 22 and 23:
Inch and Metric Pouces et Métrique
- Page 24 and 25:
Inch and Metric Pouces et Métrique
- Page 26 and 27:
Inch and Metric Pouces et Métrique
- Page 28 and 29:
Inch and Metric Pouces et Métrique
- Page 30 and 31:
Inch and Metric Pouces et Métrique
- Page 32 and 33:
Inch and Metric Pouces et Métrique
- Page 34 and 35:
Inch and Metric Pouces et Métrique
- Page 36 and 37:
Inch and Metric Pouces et Métrique
- Page 38 and 39:
Inch and Metric Pouces et Métrique
- Page 40 and 41:
(*814-498T) *Replacement Insert Tra
- Page 42 and 43:
(*814-698T) (*Replacement Insert Tr
- Page 44 and 45:
Plastic Compartment Boxes Boîtes p
- Page 46 and 47:
... DRAWER CABINETS continued Heavy
- Page 48 and 49:
... DRAWER CABINETS continued Heavy
- Page 50 and 51:
Heavy Duty Welded Steel STORAGE BIN
- Page 52 and 53:
Storage Units In addition to a wide
- Page 54 and 55:
Heavy Duty Welded Steel Storage Bin
- Page 56 and 57:
Durham Literature Racks provide a c
- Page 58 and 59:
Tool Storage Systems Système d'emm
- Page 60 and 61:
Storage/Assortment Cases Trousse d'
- Page 62 and 63:
Storage Cases Méthode d'emmagasina
- Page 64 and 65:
SCREWS & BOLTS (General Data) Donn
- Page 66 and 67:
B “LONG-LOK” «Long-Lok» LOCKI
- Page 68 and 69:
B Machine Screws - Slot Drive Vis m
- Page 70 and 71:
B Machine Screws - Slot Drive Vis m
- Page 72 and 73:
B Machine Screws - Slot Drive Vis m
- Page 74 and 75:
Assortments Assortiments Inch Pouce
- Page 76 and 77:
Assortments • Plastikits Plastiki
- Page 78 and 79:
Machine Screws - Slot Drive Vis mé
- Page 80 and 81:
B Machine Screws - Slot Drive Vis m
- Page 82 and 83:
Machine Screws - Slot Drive Vis mé
- Page 84 and 85:
B Machine Screws - Slot Drive Vis m
- Page 86 and 87:
B Machine Screws - Slot Drive Vis m
- Page 88 and 89:
B Machine Screws - Slot Drive Vis m
- Page 90 and 91:
Nylon Metal-Core Screws Vis en nylo
- Page 92 and 93:
B Machine Screws - Phillips Drive V
- Page 94 and 95:
B Assortments - Machine Screws Asso
- Page 96 and 97:
B Machine Screws - Phillips Drive V
- Page 98 and 99:
Machine Screws Square Socket Drive
- Page 100 and 101:
B Machine Screws Combination Sq. So
- Page 102 and 103:
B Machine Screws - Slot Drive Vis m
- Page 104 and 105:
B Machine Screws - Slot Drive Vis m
- Page 106 and 107:
B Machine Screws - Slot Drive Vis m
- Page 108 and 109:
B Machine Screws - Slot Drive Vis m
- Page 110 and 111:
Machine Screws - Slot Drive Vis mé
- Page 112 and 113:
B Machine Screws - Slot Drive Vis m
- Page 114 and 115:
Machine Screws - Slot Drive Vis mé
- Page 116 and 117:
Machine Screws - Slot Drive Vis mé
- Page 118 and 119:
B Machine Screws - Slot Drive Vis m
- Page 120 and 121:
B Machine Screws - Slot Drive Vis m
- Page 122 and 123:
B Machine Screws - Slot Drive Vis m
- Page 124 and 125:
B Machine Screws - Slot Drive Vis m
- Page 126 and 127:
B Regular Size ASSORTMENTS ASSORTIM
- Page 128 and 129:
B Machine Screws - Phillips Drive V
- Page 130 and 131:
B Machine Screws - Phillips Drive V
- Page 132 and 133:
B Threaded Inserts for Wood Pièces
- Page 134 and 135:
• Joint Connector Nuts Écrous po
- Page 136 and 137:
Wood Screws - Slot Drive Vis à boi
- Page 138 and 139:
B Wood Screws - Slot Drive Vis à b
- Page 140 and 141:
Wood Screws - Square Socket Drive V
- Page 142 and 143:
B Wood Screws - Square Socket Drive
- Page 144 and 145:
B Wood Screws - Torx ® Drive Vis
- Page 146 and 147:
B Wood Screws - Square Socket Drive
- Page 148 and 149:
B Wood Screws - Square Socket Drive
- Page 150 and 151:
B Wood Screws - Square Socket Drive
- Page 152 and 153:
B Concrete Fastening System Inch Sy
- Page 154 and 155:
B Concrete Fastening System Systèm
- Page 156 and 157:
Inch Pouces SPECIAL ASSORTMENT ASSO
- Page 158 and 159:
Inch Pouces Hardened STEEL Inch Siz
- Page 160 and 161:
CATALOG 13 Inch Pouces Hardened STE
- Page 162 and 163:
CATALOG 13 Inch Pouces ASS'T. DIA.
- Page 164 and 165:
CATALOG 13 Inch Pouces INCH Sizes N
- Page 166 and 167:
Metric Métrique TORX ® DRIVE - Ta
- Page 168 and 169:
Inch Pouces SPECIAL ASSORTMENT - AS
- Page 170 and 171:
Inch Pouces Hardened STEEL ZINC PLA
- Page 172 and 173:
Inch Pouces 410 HEX WASHER HEAD L P
- Page 174 and 175:
Inch Pouces TEKS ® Self-Drilling S
- Page 176 and 177:
Inch Pouces STAINLESS STEEL TAPPING
- Page 178 and 179:
Inch Pouces Priced Singly ASSORTMEN
- Page 180 and 181:
Inch Pouces Thread-Cutting Screws V
- Page 182 and 183:
Inch Pouces RECOMMENDED PILOT HOLE
- Page 184 and 185:
CATALOG 13 Inch Pouces FLORTORX SCR
- Page 186 and 187: CATALOG 13 Inch Pouces STEEL SPAENA
- Page 188 and 189: CATALOG 13 Inch and Metric Pouces e
- Page 190 and 191: CATALOG 13 Inch Pouces SECURITY HEX
- Page 192 and 193: Inch Pouces SECURITY PHILLIPS DRIVE
- Page 194 and 195: Inch Pouces TORX ® TAMPER-RESISTAN
- Page 196 and 197: CATALOG 13 Inch Pouces Machine Scre
- Page 198 and 199: Inch and Metric Pouces et Métrique
- Page 200 and 201: Inch Pouces STEEL PHILLIPS DRIVE (C
- Page 202 and 203: Inch Pouces STEEL “SEMS” Machin
- Page 204 and 205: Inch Pouces STEEL Case-hardened to
- Page 206 and 207: Metric Métrique STEEL “SEMS” A
- Page 208 and 209: Metric Métrique Automotive and Spe
- Page 210 and 211: B Bumper-Bar Bolts Boulons de barre
- Page 212 and 213: Self-Clinching Fasteners Attaches a
- Page 214 and 215: B Self-Clinching Studs Goujons auto
- Page 216 and 217: B Weld Screws Vis à souder E G 120
- Page 218 and 219: B Weld Screws Vis à souder 120° R
- Page 220 and 221: Weld Pins Goupille à souder ® Inc
- Page 222 and 223: B Hexagon Cap Screws Boulons de pr
- Page 224 and 225: B HEXAGON Cap Screws Boulons de pr
- Page 226 and 227: B HEXAGON Cap Screws Boulons de pr
- Page 228 and 229: B HEXAGON Cap Screws Boulons de pr
- Page 230 and 231: Heavy Hex Structural Bolts Boulons
- Page 232 and 233: B HEXAGON Cap Screws Boulons de pr
- Page 234 and 235: B HEXAGON Cap Screws Boulons de pr
- Page 238 and 239: B HEXAGON Bolts Boulons HEXAGONAUX
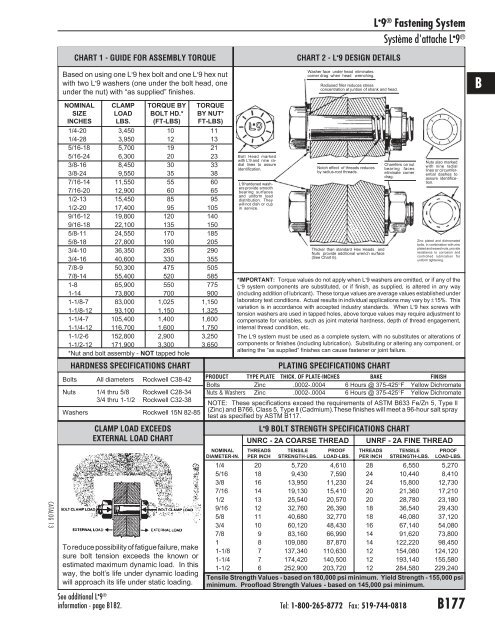
- Page 240 and 241: B L • 9 ® Fastening System Syst
- Page 242 and 243: L • 9 ® Fastening System Systèm
- Page 244 and 245: B HEXAGON Cap Screws Boulons de pr
- Page 246 and 247: B HEXAGON Cap Screws Boulons de pr
- Page 248 and 249: HEXAGON Cap Screws Boulons de préc
- Page 250 and 251: B HEXAGON Cap Screws Boulons de pr
- Page 252 and 253: B HEXAGON Cap Screws Boulons de pr
- Page 254 and 255: B HEXAGON Cap Screws Boulons de pr
- Page 256 and 257: B HEXAGON Cap Screws Boulons de pr
- Page 258 and 259: HEXAGON Cap Screws Boulons de préc
- Page 260 and 261: HEXAGON Cap Screws Boulons de préc
- Page 262 and 263: B HEXAGON Cap Screws Boulons de pr
- Page 264 and 265: B HEXAGON Cap Screws Boulons de pr
- Page 266 and 267: HEXAGON Cap Screws Boulons de préc
- Page 268 and 269: B HEXAGON Cap Screws Boulons de pr
- Page 270 and 271: Torque Data - 1960 Series ® Donné
- Page 272 and 273: CATALOG 13 Inch ® Pouces continued
- Page 274 and 275: Inch Pouces ® Assortments Assortim
- Page 276 and 277: B Hex Socket Cap Screws Vis à têt
- Page 278 and 279: Hex Socket Cap Screws Vis à tête
- Page 280 and 281: Hex Socket Cap Screws Boulons de pr
- Page 282 and 283: Hex Socket Cap Screws Boulons de pr
- Page 284 and 285: B Hex Socket Cap Screws Boulons de
- Page 286 and 287:
Hex Socket Cap Screws Boulons de pr
- Page 288 and 289:
A B Hex Socket Set Screws Vis de pr
- Page 290 and 291:
A B Hex Socket Set Screws Vis de pr
- Page 292 and 293:
A B Hex Socket Set Screws Vis de pr
- Page 294 and 295:
B Hex Socket Cap Screws Vis à têt
- Page 296 and 297:
B Hex Socket Cap Screws Vis à têt
- Page 298 and 299:
B Hex Socket Cap Screws Boulons de
- Page 300 and 301:
B Hex Socket Cap Screws Vis à têt
- Page 302 and 303:
B “PELLETIZED” Hex Socket Cap S
- Page 304 and 305:
B Hex Socket Cap Screws Vis à têt
- Page 306 and 307:
Hex Socket Shoulder Screws Vis à
- Page 308 and 309:
B Countr-Bor Screws Vis «Countr-Bo
- Page 310 and 311:
Hex Socket Cap Screws Vis à tête
- Page 312 and 313:
Hex Socket Cap Screws Vis à tête
- Page 314 and 315:
B Hex Socket Cap Screws Vis à têt
- Page 316 and 317:
B Hex Socket Cap Screws Vis à têt
- Page 318 and 319:
Hex Socket Cap Screws Vis à tête
- Page 320 and 321:
Metric Métrique Hex Socket Cap Scr
- Page 322 and 323:
Metric Métrique Hex Socket Cap Scr
- Page 324 and 325:
Metric Métrique Hex Socket Cap Scr
- Page 326 and 327:
Metric Métrique Hex Socket Cap Scr
- Page 328 and 329:
Metric Métrique Hex Socket Cap Scr
- Page 330 and 331:
Metric Métrique DIN 7991 Fully Thr
- Page 332 and 333:
Hex Socket Cap Screws Vis à 6 pans
- Page 334 and 335:
CATALOG 13 Metric Métrique ALLOY S
- Page 336 and 337:
Metric Métrique METRIC BLUE ® HIG
- Page 338 and 339:
Metric Métrique Cross-Drilled Hex
- Page 340 and 341:
Metric Métrique Hex Nuts Écrous h
- Page 342 and 343:
Metric Métrique METRIC BLUE ® HIG
- Page 344 and 345:
Inch Pouces ALLOY STEEL DIA. THD. L
- Page 346 and 347:
Inch Pouces STEEL Not Plated CUP PO
- Page 348 and 349:
Inch Pouces Hex Socket Set Screws V
- Page 350 and 351:
Inch Pouces NYLON TIP - BOUT DE NYL
- Page 352 and 353:
Inch Pouces HEX SOCKET SET SCREWS w
- Page 354 and 355:
CATALOG 13 Inch Pouces NYLON (Natur
- Page 356 and 357:
Metric Métrique METRIC SLOTTED GRU
- Page 358 and 359:
Metric Métrique CUP POINT A2 STAIN
- Page 360 and 361:
Metric Métrique FLAT POINT DIAMETE
- Page 362 and 363:
Metric Métrique STEEL Not Plated P
- Page 364 and 365:
Inch Pouces Threads BA - British As
- Page 366 and 367:
CATALOG 13 Inch Pouces See page B89
- Page 368 and 369:
Inch Pouces STEEL GRADE 5 NOT PLATE
- Page 370 and 371:
CATALOG 13 Metric Métrique METRIC
- Page 372 and 373:
Inch Pouce Steel ELEVATOR BOLTS Not
- Page 374 and 375:
Inch Pouce STEEL Plow Bolts No. 3 R
- Page 376 and 377:
Inch Pouce U-Bolts Boulons en U CAT
- Page 378 and 379:
Inch Pouce 304 STAINLESS STEEL EYE
- Page 380 and 381:
CATALOG 13 Metric Métrique Regular
- Page 382 and 383:
Inch Pouces Rod Ends with Bearings
- Page 384 and 385:
Inch Pouces STAINLESS STEEL WROUGHT
- Page 386 and 387:
Inch Pouces STAINLESS STEEL Type 30
- Page 388 and 389:
Inch Pouces HOOK Fitting Drop Forge
- Page 390 and 391:
Inch Pouces 18-8 STAINLESS STEEL TH
- Page 392 and 393:
Metric Métrique MALLEABLE IRON WIN
- Page 394 and 395:
CATALOG 13 Inch and Metric Pouces e
- Page 396 and 397:
B Threaded Rods Tiges filetées STE
- Page 398 and 399:
Threaded Rods Tiges filetées Inch
- Page 400 and 401:
Non-ferrousThreaded Rods Tiges file
- Page 402 and 403:
Threaded Rod Tiges filetées Metric
- Page 404 and 405:
Threaded Studs Goujons filetées In
- Page 406 and 407:
Tool Post Screws Vis pour étrier I
- Page 408 and 409:
B T-Slot & Flange Nuts Écrous et
- Page 410 and 411:
T-Slot Bolts & Nuts Boulons et écr
- Page 412 and 413:
Washers Rondelles Metric Métrique
- Page 414 and 415:
Nuts, Inserts & Internally Threaded
- Page 416 and 417:
Inch Pouces INCH CAP SCREW SIZES ST
- Page 418 and 419:
CATALOG 13 Inch Pouces COUPLING NUT
- Page 420 and 421:
Inch Pouces ASME/ANSI B18.2.2 CORRO
- Page 422 and 423:
Metric Métrique ISO Metric Propert
- Page 424 and 425:
Metric Métrique 10 ISO Metric Prop
- Page 426 and 427:
Metric Métrique HEXAGON LOW NUTS C
- Page 428 and 429:
Metric Métrique HEXAGON LOW NUTS C
- Page 430 and 431:
Metric Métrique Slotted Hexagon Nu
- Page 432 and 433:
Inch Pouces Slip-on ® Lock Nut Uni
- Page 434 and 435:
Metric Métrique Hexagon Nuts Écro
- Page 436 and 437:
Metric Métrique STEEL Metric Sizes
- Page 438 and 439:
Inch Pouces STEEL Cadmium Plated HU
- Page 440 and 441:
Inch and Metric Pouces et Métrique
- Page 442 and 443:
Inch Pouces Nylon Insert Hex Locknu
- Page 444 and 445:
Inch Pouces Hexagon Nuts Écrous he
- Page 446 and 447:
Metric Métrique NYLON INSERT HEX L
- Page 448 and 449:
Metric Métrique Nylon Insert Lockn
- Page 450 and 451:
Inch Pouces STEEL TOP DISTORTION, P
- Page 452 and 453:
Inch Pouces STEEL REGULAR FLANGE SI
- Page 454 and 455:
CATALOG 13 Inch and Metric Pouces e
- Page 456 and 457:
Inch Pouces LOCKING FEATURE F 45°
- Page 458 and 459:
Inch and Metric Pouces et Métrique
- Page 460 and 461:
Inch Pouces ®˜ Locknuts Écrous i
- Page 462 and 463:
Inch Pouces ® Weld Nuts Écrous à
- Page 464 and 465:
Inch and Metric Pouces et Métrique
- Page 466 and 467:
CATALOG 13 Inch and Metric Pouces e
- Page 468 and 469:
Inch Pouces Wing Nuts Écrous à or
- Page 470 and 471:
Metric Métrique Wing Nuts Écrous
- Page 472 and 473:
Inch and Metric Pouces et Métrique
- Page 474 and 475:
Metric Métrique METRIC - CAP and D
- Page 476 and 477:
Inch Pouces T-NUTS PLAIN STEEL Roun
- Page 478 and 479:
Inch and Metric Pouces et Métrique
- Page 480 and 481:
Inch Pouces CAPPED and SOLID ONE PI
- Page 482 and 483:
Inch Pouces ® Security Hardware Qu
- Page 484 and 485:
Inch Pouces Rapid Assembly Post and
- Page 486 and 487:
Tinnerman ® Section Index Index po
- Page 488 and 489:
CATALOG 13 Tel: 1-800-265-8772 Fax:
- Page 490 and 491:
Tinnerman ® brand fasteners Attach
- Page 492 and 493:
Inch Pouces Tinnerman ® brand fast
- Page 494 and 495:
Inch Pouces FLAT-TYPE and Zip-on Fi
- Page 496 and 497:
Inch Pouces J-TYPE Fasteners C X P
- Page 498 and 499:
Inch Pouces J-TYPE Fasteners C X P
- Page 500 and 501:
Inch Pouces U-TYPE Fasteners C X P
- Page 502 and 503:
Inch Pouces U-TYPE Fasteners C X P
- Page 504 and 505:
Inch Pouces U-TYPE Fasteners C X P
- Page 506 and 507:
Inch Pouces U-TYPE Fasteners C X P
- Page 508 and 509:
Inch Pouces U-TYPE Fasteners C X P
- Page 510 and 511:
Inch Pouces U-TYPE Fasteners (Speci
- Page 512 and 513:
Inch Pouces U-TYPE Fasteners (Speci
- Page 514 and 515:
Inch Pouces STANDARD NUT RETAINERS
- Page 516 and 517:
Inch Pouces STANDARD NUT RETAINERS
- Page 518 and 519:
Inch Pouces U-TYPE NUT RETAINERS A
- Page 520 and 521:
Inch Pouces PUSH-ON TYPE Fasteners
- Page 522 and 523:
Inch Pouces PUSH-ON TYPE Fasteners
- Page 524 and 525:
Inch Pouces PUSH-ON TYPE Fasteners
- Page 526 and 527:
Inch Pouces PUSH-ON TYPE Fasteners
- Page 528 and 529:
Inch Pouces PUSH-ON TYPE Fasteners
- Page 530 and 531:
Inch Pouces Tinnerman ® brand fast
- Page 532 and 533:
Inch Pouces TUBULAR TYPE Fasteners
- Page 534 and 535:
Inch Pouces TUBULAR TYPE Fasteners
- Page 536 and 537:
Inch Pouces DART TYPE Fasteners (Sp
- Page 538 and 539:
Inch Pouces U-TYPE Fasteners (Stand
- Page 540 and 541:
Inch Pouces SPECIAL PURPOSE Fastene
- Page 542 and 543:
Inch Pouces CABLE, WIRE, ROD & TUBE
- Page 544 and 545:
Inch Pouces CAP TYPE PUSH-ON Plasti
- Page 546 and 547:
Inch Pouces Tinnerman ® brand fast
- Page 548 and 549:
Metric Métrique Tinnerman ® brand
- Page 550 and 551:
Inch Pouces Spring Nuts Écrous à
- Page 552 and 553:
Inch and Metric Pouces et Métrique
- Page 554 and 555:
Push-On Hex Nuts Écrous hexagonale
- Page 556 and 557:
Inch and Metric Pouces et Métrique
- Page 558 and 559:
CATALOG 13 Inch Pouces Design 1 Des
- Page 560 and 561:
Inch and Metric Pouces et Métrique
- Page 562 and 563:
Inch Pouces Screw Anchors (Winged)
- Page 564 and 565:
Inch Pouces NYLON ANCHORS Use with
- Page 566 and 567:
CATALOG 13 Inch Pouces 1. Place #2
- Page 568 and 569:
CATALOG 13 Inch Pouces EXPANDET ®
- Page 570 and 571:
Inch Pouces RED HEAD WEDGE ANCHORS
- Page 572 and 573:
Metric Métrique Projection Bolt Ty
- Page 574 and 575:
Inch Pouce Bolt not included. ALLOY
- Page 576 and 577:
CATALOG 13 Inch Pouces ••• ad
- Page 578 and 579:
Inch Pouces Self-Clinching Nuts Sel
- Page 580 and 581:
Metric Métrique PEM ® Self-Clinch
- Page 582 and 583:
Inch and Metric Pouces et Métrique
- Page 584 and 585:
CATALOG 13 Inch and Metric Pouces e
- Page 586 and 587:
CATALOG 13 Inch and Metric Pouces e
- Page 588 and 589:
Inch and Metric Pouces et Métrique
- Page 590 and 591:
Inch and Metric Pouces et Métrique
- Page 592 and 593:
Inch and Metric Pouces et Métrique
- Page 594 and 595:
Inch and Metric Pouces et Métrique
- Page 596 and 597:
Inch and Metric AVK Industrial Prod
- Page 598 and 599:
Inch and Metric Pouces et Métrique
- Page 600 and 601:
Inch and Metric Pouces et Métrique
- Page 602 and 603:
CATALOG 13 Inch Pouces See chart on
- Page 604 and 605:
CATALOG 13 Inch Pouces See chart on
- Page 606 and 607:
CATALOG 13 Inch and Metric Pouces e
- Page 608 and 609:
Inch and Metric Pouces et Métrique
- Page 610 and 611:
Rivet Nut/Stud Power Tools Outils p
- Page 612 and 613:
C Fasteners Attaches Design 1 Screw
- Page 614 and 615:
Dodge ® Inserts Piéces filetées
- Page 616 and 617:
Barb-Sert ® «Barb-Sert ® » Inch
- Page 618 and 619:
C "E-Z Lok" Press Inserts Douilles
- Page 620 and 621:
C Rivet Nuts Écrous à Rivets Blin
- Page 622 and 623:
C Rivet Nut Header Tools Écrous Ri
- Page 624 and 625:
Rivet Nuts Écrous à Rivets Metric
- Page 626 and 627:
C Rivet Nut Header Tools Écrous no
- Page 628 and 629:
Inch and Metric Pouces et Métrique
- Page 630 and 631:
General Application Procedures Mode
- Page 632 and 633:
C Thread Repair Inserts Pièces fil
- Page 634 and 635:
C Thread Repair Inserts Pièces fil
- Page 636 and 637:
C Thread Repair Inserts Pièces fil
- Page 638 and 639:
C Thread Repair Inserts Pièces fil
- Page 640 and 641:
Thread Repair Inserts Pièces filet
- Page 642 and 643:
Washers Rondelles Flat Washers Rond
- Page 644 and 645:
Inch Pouces Steel Fender Washers Lo
- Page 646 and 647:
Inch Pouces cont'd. Additional Stee
- Page 648 and 649:
Inch Pouces “STANDARD” 316 Stai
- Page 650 and 651:
“STANDARD” SPAENAUR No. BOLT SI
- Page 652 and 653:
CATALOG 13 Inch Pouces SPAENAUR No.
- Page 654 and 655:
Metric Métrique ~DIN 125B ~ ISO 70
- Page 656 and 657:
CATALOG 13 Metric Métrique Metric
- Page 658 and 659:
Metric Métrique Metric Flat Washer
- Page 660 and 661:
Metric Métrique DIN 1440 ~ DIN EN
- Page 662 and 663:
Metric Métrique Sealing Rings Anne
- Page 664 and 665:
Inch Pouces Stainless - Aluminum -
- Page 666 and 667:
Metric Métrique Spring (Split) Loc
- Page 668 and 669:
Metric Métrique Spring (Split) Loc
- Page 670 and 671:
Metric Métrique Spring (Split) Loc
- Page 672 and 673:
Inch Pouces ASSORTMENT ASSORTIMENT
- Page 674 and 675:
Metric Métrique METRIC STYLES DIN
- Page 676 and 677:
Metric Métrique Tooth Lockwasher A
- Page 678 and 679:
VIBRATION PROOF FASTENERS R Data Sh
- Page 680 and 681:
Inch and Metric Pouces et Métrique
- Page 682 and 683:
Predictable performance for rated l
- Page 684 and 685:
INTRODUCTION TO COST-SAVING, SPACE-
- Page 686 and 687:
Dynamic Loading & Fatigue Life Dyna
- Page 688 and 689:
CATALOG 13 The tolerances shown on
- Page 690 and 691:
CATALOG 13 Nominal Dia. Bolt stress
- Page 692 and 693:
CATALOG 13 Inch Pouces …Continued
- Page 694 and 695:
CATALOG 13 Inch Pouces AK Series FO
- Page 696 and 697:
CATALOG 13 Metric Métrique Priced
- Page 698 and 699:
Metric Métrique NOMENCLATURE P = l
- Page 700 and 701:
Metric Métrique NOMENCLATURE P = l
- Page 702 and 703:
Metric Métrique NOMENCLATURE P = l
- Page 704 and 705:
Metric Métrique NOMENCLATURE P = l
- Page 706 and 707:
Inch Pouces LIVE LOAD FLANGE AND GA
- Page 708 and 709:
Inch Pouces WAVE SPRING TENSION WAS
- Page 710 and 711:
Metric Métrique Spring Tension Was
- Page 712 and 713:
Inch Pouce Rubber Washers Rondelles
- Page 714 and 715:
CATALOG 13 Inch Pouce NYLTITE ROLLE
- Page 716 and 717:
CATALOG 13 Inch Pouce Material: 6/6
- Page 718 and 719:
Inch and Metric Pouce et Métrique
- Page 720 and 721:
Inch Pouce SHIM RINGS WITH KEYWAY S
- Page 722 and 723:
CATALOG 13 Inch Pouce BLUE TEMPERED
- Page 724 and 725:
Inch Pouce Steel - Zinc Plated Unit
- Page 726 and 727:
Inch Pouce Steel - Zinc Plated Unit
- Page 728 and 729:
Inch Pouce ALIGNING SHIMS FOR START
- Page 730 and 731:
Solid Steel Rivets Rivets pleins en
- Page 732 and 733:
Solid Aluminum Rivets Rivets solide
- Page 734 and 735:
Solid Tinners’ Rivets Rivets soli
- Page 736 and 737:
Steel Shallow Tubular Rivets Rivets
- Page 738 and 739:
Steel Tubular Rivets Rivets tubulai
- Page 740 and 741:
E Steel Tubular Rivets Rivets tubul
- Page 742 and 743:
E Split Rivets Rivets fendu Split R
- Page 744 and 745:
Shallow Tubular Rivets Rivets tubul
- Page 746 and 747:
Pop ® Rivets Rivets «Pop ® » AL
- Page 748 and 749:
Pop ® Rivets Rivets «Pop ® » AL
- Page 750 and 751:
E Pop ® Rivets Rivets «Pop ® »
- Page 752 and 753:
Inch Pouces STEEL Dome Head Open-en
- Page 754 and 755:
Inch Pouces Pop ® Rivets Rivets «
- Page 756 and 757:
Inch Pouces Priced Singly ASSORTMEN
- Page 758 and 759:
CATALOG 13 Inch Pouces POP ® 5000
- Page 760 and 761:
Inch Pouces 'POP' PowerLink 30 A Re
- Page 762 and 763:
Inch Pouces 360° Swivel Head SPAEN
- Page 764 and 765:
Inch Pouces Structural — Self-plu
- Page 766 and 767:
Inch Pouces “Cherry” Rivet Pull
- Page 768 and 769:
CATALOG 13 Inch Pouces Nominal SPAE
- Page 770 and 771:
Inch Pouces ALUMINUM UNIT G L PACKA
- Page 772 and 773:
Inch Pouces UNIT PACKAGE 500 RIVETS
- Page 774 and 775:
Inch Pouces Nylon Drive Rivets High
- Page 776 and 777:
Inch Pouces Cotter Pins Goupilles f
- Page 778 and 779:
We source from 1,200 domestic and i
- Page 780 and 781:
Metric Métrique Metric Cotter Pins
- Page 782 and 783:
Metric Métrique Metric Cotter Pins
- Page 784 and 785:
Inch Pouces Hitch Pin Clips Agrafes
- Page 786 and 787:
Inch Pouces Hitch Pin Clips Agrafes
- Page 788 and 789:
Metric Métrique Hitch Pin Clips Ag
- Page 790 and 791:
Metric Métrique 301/302 Stainless
- Page 792 and 793:
Metric Métrique Metric Type B Spri
- Page 794 and 795:
Inch Pouces Hair Pin Cotters Goupil
- Page 796 and 797:
Inch Pouces Hitch Pin Clips Agrafes
- Page 798 and 799:
Inch Pouces FAST-POSITIVE SAFETY LO
- Page 800 and 801:
Inch and Metric Pouces et Métrique
- Page 802 and 803:
Metric Métrique Safety Lynch Pins
- Page 804 and 805:
CATALOG 13 Metric Métrique Lynch P
- Page 806 and 807:
Inch Pouces C D B E STYLE A to 7/16
- Page 808 and 809:
CATALOG 13 Inch Pouces STEEL Materi
- Page 810 and 811:
Inch Pouces Quick Release Pins Quic
- Page 812 and 813:
Inch Pouces C-1008/C-1018 Grade STE
- Page 814 and 815:
Inch Pouces 300 Series STAINLESS ST
- Page 816 and 817:
Inch Pouces P.C. 699 STEEL DROP FOR
- Page 818 and 819:
Inch and Metric Pouces et Métrique
- Page 820 and 821:
Metric Métrique Dowel Pins Goupill
- Page 822 and 823:
Metric Métrique Dowel Pins Goupill
- Page 824 and 825:
Inch Pouces Taper Pins Goupilles co
- Page 826 and 827:
Taper Pins Goupilles coniques Metri
- Page 828 and 829:
Taper Pins Goupilles coniques Metri
- Page 830 and 831:
Dowel Pins Goupilles cylindriques M
- Page 832 and 833:
Spring Tension Pins Goupilles tende
- Page 834 and 835:
Spring Tension Pins Goupilles tende
- Page 836 and 837:
Spring Tension Pins Goupilles tende
- Page 838 and 839:
Coiled Spring Pins Goupilles à res
- Page 840 and 841:
Coiled Spring Pins Goupilles à res
- Page 842 and 843:
Coiled Spring Pins Goupilles à res
- Page 844 and 845:
E Woodruff Keys Clavettes «Woodruf
- Page 846 and 847:
E Shaft Keys Clés d’arbre SHAFT
- Page 848 and 849:
Machine Key Stock Barres à clés R
- Page 850 and 851:
E Drill Rod Rounds Acier en rondin
- Page 852 and 853:
Steel Rounds Barres rondes STEEL CO
- Page 854 and 855:
E Shaft Collars and Couplings Annea
- Page 856 and 857:
Internal - Retaining Rings - Extern
- Page 858 and 859:
Internal - Retaining Rings - Extern
- Page 860 and 861:
E Retaining Rings - External Bagues
- Page 862 and 863:
E Retaining Rings - Internal Bagues
- Page 864 and 865:
E Retaining Rings - External Bagues
- Page 866 and 867:
E Retaining Rings - External Bagues
- Page 868 and 869:
E Retaining Rings - Internal Bagues
- Page 870 and 871:
Internal - Retaining Rings - Extern
- Page 872 and 873:
Inch Pouces Crimp-on Retainers Bagu
- Page 874 and 875:
Metric Métrique DIN 6799 Retaining
- Page 876 and 877:
CATALOG 13 Inch Pouces PLIERS for I
- Page 878 and 879:
Inch Pouces Retaining Ring Tools Ou
- Page 880 and 881:
F Furniture Glides Patins pour pied
- Page 882 and 883:
Furniture Glides Patins pour pieds
- Page 884 and 885:
Leg Levelers Patins pour pieds de m
- Page 886 and 887:
Furniture Glides Patins pour pieds
- Page 888 and 889:
Thread Adapters Adaptateurs de file
- Page 890 and 891:
F Furniture Glides Patins pour pied
- Page 892 and 893:
Corrugated Fasteners / Mending Plat
- Page 894 and 895:
F Catches / Swivel Plates Fermeture
- Page 896 and 897:
Clips & Hangers, Etc. Pinces & croc
- Page 898 and 899:
Hose, Tube and Wiring Components Co
- Page 900 and 901:
Inch Pouces LS: 9/16" (14 mm) wide
- Page 902 and 903:
Metric Métrique ® Heavy Duty Hose
- Page 904 and 905:
Metric Métrique Hose Clamps Collie
- Page 906 and 907:
Inch Pouces ASSORTMENT ASSORTIMENT
- Page 908 and 909:
Inch Pouces 2-EAR CLAMP ASSORTMENTS
- Page 910 and 911:
Inch Pouces SPRING-GRIP HOSE CLAMPS
- Page 912 and 913:
Inch Pouces Colour: Natural, Clear
- Page 914 and 915:
Inch Pouces Miniature Nylon Fitting
- Page 916 and 917:
Inch Pouces Miniature Barbed Tees D
- Page 918 and 919:
Inch Pouces QUICK DISCONNECT LUER F
- Page 920 and 921:
Inch Pouces C-973 White Nylon HOSE
- Page 922 and 923:
Inch Pouces Locking Cable Ties Coll
- Page 924 and 925:
Inch Pouces Tubing & Wiring Fastene
- Page 926 and 927:
Inch Pouces Tubing & Wiring Fastene
- Page 928 and 929:
Inch Pouces Lightweight - Insulated
- Page 930 and 931:
Inch Pouces “HALF” CLIPS W Tubi
- Page 932 and 933:
Inch Pouces T-CLIPS Fastening Syste
- Page 934 and 935:
Inch Pouces TM Braided Expandable S
- Page 936 and 937:
CATALOG 13 Metric Métrique ASSORTM
- Page 938 and 939:
Inch Pouces Steel ROUND STEEL SPACE
- Page 940 and 941:
Inch Pouces NYLON 6/6 Printed Circu
- Page 942 and 943:
Metric Métrique METRIC Threaded He
- Page 944 and 945:
CATALOG 13 Metric Métrique Steel /
- Page 946 and 947:
Solderless and Soldering Terminals
- Page 948 and 949:
Insulated Solderless Terminals Born
- Page 950 and 951:
Insulated Solderless Terminals Coss
- Page 952 and 953:
Solderless Terminals Cosses sans so
- Page 954 and 955:
Assortments / Tools Assortiments /
- Page 956 and 957:
G Heat Shrink Connectors Connecteur
- Page 958 and 959:
Battery Terminals Terminaux de Batt
- Page 960 and 961:
Wiring Lugs & Splices Ergots et Ép
- Page 962 and 963:
G Connector Housings .093"/.062" Lo
- Page 964 and 965:
.062" (1,58 mm) Connector Housings
- Page 966 and 967:
.093" 2,36 mm Connector Housings Lo
- Page 968 and 969:
KK ® Modular Interconnecting Syste
- Page 970 and 971:
For the Electronics Engineer! Pour
- Page 972 and 973:
For the Electronics Engineer! Pour
- Page 974 and 975:
Fittings, Springs and Auto Trim Har
- Page 976 and 977:
Inch Pouces Plug Buttons Bouchons F
- Page 978 and 979:
Inch Pouces High Thrust Air Nozzles
- Page 980 and 981:
Inch Pouces STRAIGHT THREAD MAGNETI
- Page 982 and 983:
Metric Métrique DIN 906 Hexagon So
- Page 984 and 985:
Inch Pouces HEX. 5/8" 1/4" All Fitt
- Page 986 and 987:
Inch Pouces STAINLESS STEEL INCH Gr
- Page 988 and 989:
Metric Métrique M1 LUBRICATING NIP
- Page 990 and 991:
Inch Pouces STEEL INCH Sizes See Pa
- Page 992 and 993:
Inch Pouces Utility Spring Assortme
- Page 994 and 995:
CATALOG 13 Inch Pouces *Sizes avail
- Page 996 and 997:
Inch Pouces Moulding Fasteners Atta
- Page 998 and 999:
Inch Pouces Moulding Fasteners Atta
- Page 1000 and 1001:
Inch Pouces " MB-81 (4728594) 1 "
- Page 1002 and 1003:
Inch Pouces Clips & Fasteners Pince
- Page 1004 and 1005:
Inch Pouces THROTTLE ROD CLIPS Clip
- Page 1006 and 1007:
Inch Pouces Auto Glass Shop Items A
- Page 1008 and 1009:
Inch Pouces C-1089 Windshield Revea
- Page 1010 and 1011:
Inch Pouces Headlight Adjusting Scr
- Page 1012 and 1013:
Inch Pouces Headlamp Screws, etc. -
- Page 1014 and 1015:
Inch Pouces NYLON - License Fastene
- Page 1016 and 1017:
Inch Pouces FLEXIBLE CLEAR “VINYL
- Page 1018 and 1019:
Nylon 6/6 Hole Plugs Bouchons insta
- Page 1020 and 1021:
Anti-Vibration Mounts Amortisseurs
- Page 1022 and 1023:
J Anti-Vibration Mounts Amortisseur
- Page 1024 and 1025:
Bolt-on Vibration Mounts and Bumper
- Page 1026 and 1027:
Anti-Vibration Mounts Amortisseurs
- Page 1028 and 1029:
J Anti-Vibration Mounts Amortisseur
- Page 1030 and 1031:
Anti-Vibration Mounts Amortisseurs
- Page 1032 and 1033:
Anti-Vibration Mounts Amortisseurs
- Page 1034 and 1035:
Anti-vibration Leveling Mounts Amor
- Page 1036 and 1037:
Anti-vibration Leveling Mounts Amor
- Page 1038 and 1039:
Anti-Vibration Mounts Amortisseurs
- Page 1040 and 1041:
Anti-Vibration Mounts Amortisseurs
- Page 1042 and 1043:
Anti-Vibration Mounts Amortisseurs
- Page 1044 and 1045:
Tube Caps Chapeaux de tubes Inch Po
- Page 1046 and 1047:
Tube Caps Chapeaux de tubes Inch Po
- Page 1048 and 1049:
J Tapered Caps & Plugs Chapeaux et
- Page 1050 and 1051:
Pull Plugs Bouchons à tirette Inch
- Page 1052 and 1053:
Snap-In Plugs Type 1 & 2 Bouchons i
- Page 1054 and 1055:
J Nylon Plug Buttons Bouchons en ny
- Page 1056 and 1057:
Standard Threaded Caps Capuchons no
- Page 1058 and 1059:
Threaded Pipe Plugs Bouchons filet
- Page 1060 and 1061:
J Decorative Screw Cover Caps Capuc
- Page 1062 and 1063:
Mushroom and Stem Bumpers Butoirs t
- Page 1064 and 1065:
Rubber Bumpers — General Purpose
- Page 1066 and 1067:
Plug Bumpers Butoirs bouchons Mater
- Page 1068 and 1069:
Plug Bumpers Butoirs bouchons Inch
- Page 1070 and 1071:
Rubber Bumpers Boutoirs en caoutcho
- Page 1072 and 1073:
J Crutch, Stool and Furniture Tips
- Page 1074 and 1075:
Rubber Washers Rondelles en Caoutch
- Page 1076 and 1077:
Inch Pouces Material: Hardness: Col
- Page 1078 and 1079:
CATALOG 13 Inch Pouces " " " " C B
- Page 1080 and 1081:
Inch Pouces Bell-Mouth Nylon Strain
- Page 1082 and 1083:
Inch and Metric Pouces et Métrique
- Page 1084 and 1085:
Inch Pouces Material: SBR unless ot
- Page 1086 and 1087:
CATALOG 13 Inch Pouces …Continued
- Page 1088 and 1089:
Inch Pouces Miscellaneous Rubber It
- Page 1090 and 1091:
Inch Pouces Plastic Knobs Boutons e
- Page 1092 and 1093:
Inch Pouces Plastic Knobs Boutons e
- Page 1094 and 1095:
Inch Pouces Plastic Knobs Boutons e
- Page 1096 and 1097:
Inch Pouces Plastic Handles Poigné
- Page 1098 and 1099:
Inch Pouces Plastic Handles Poingé
- Page 1100 and 1101:
a C L H Inch Pouces CRANK HANDLE Fe
- Page 1102 and 1103:
J Plastic Knobs Boutons en plastiqu
- Page 1104 and 1105:
O-Ring Seals Joints toriques «O-Ri
- Page 1106 and 1107:
O-Ring Seals Joints toriques «O-Ri
- Page 1108 and 1109:
O-Ring Seals of Viton Joints toriqu
- Page 1110 and 1111:
J O-Ring Seals Joints toriques «O-
- Page 1112 and 1113:
O-Ring Seals Joints toriques «O-Ri
- Page 1114 and 1115:
Rubber and Plastic Extrusions Extru
- Page 1116 and 1117:
Inch Pouce Extruded Channels Canaux
- Page 1118 and 1119:
Inch Pouce "WEDGE-TITE" WEDGE INSER
- Page 1120 and 1121:
Inch Pouce Extruded Special Shapes
- Page 1122 and 1123:
Inch Pouce Extruded Special Shapes
- Page 1124 and 1125:
Inch Pouce Door Seals Collants (por
- Page 1126 and 1127:
Inch Pouce DUAL DUROMETER SPONGE AN
- Page 1128 and 1129:
Inch Pouce Trim Bordures QUICKEDGE
- Page 1130 and 1131:
Inch Pouce Flexible Weatherstrips B
- Page 1132 and 1133:
Inch Pouce Channel Lining and Weath
- Page 1134 and 1135:
Inch Pouce Substance & Structure Th
- Page 1136 and 1137:
Inch Pouce STICKER-TITE Self-Sealin
- Page 1138 and 1139:
Inch Pouce P.V.C. “SEAL-KING” (
- Page 1140 and 1141:
Inch Pouces Wrap ® ’n Seal Indus
- Page 1142 and 1143:
Inch Pouces Auto Glass Shop Items A
- Page 1144 and 1145:
Inch Pouces Auto Glass Shop Items A
- Page 1146 and 1147:
Inch Pouces VINYL SOFT-FOOT ANTI-F
- Page 1148 and 1149:
Inch Pouces L U X U R F O A M “LU
- Page 1150 and 1151:
Multi-Purpose Handles & Locks Poign
- Page 1152 and 1153:
Multi-Purpose Handles & Locks Poign
- Page 1154 and 1155:
L Multi-Purpose Handles & Locks Poi
- Page 1156 and 1157:
Universal Door Handles Poignées de
- Page 1158 and 1159:
Multi-Purpose Handles & Locks Poign
- Page 1160 and 1161:
Multi-Purpose Handles & Locks Poign
- Page 1162 and 1163:
Quarter-Turn Cabinet Latches Poign
- Page 1164 and 1165:
Multi-Purpose Handles and Locks Poi
- Page 1166 and 1167:
Catches Loquets MAGNETIC CATCH and
- Page 1168 and 1169:
Clamp Fasteners Agrafes à bascule
- Page 1170 and 1171:
Clamp Fasteners Agrafes à bascule
- Page 1172 and 1173:
Clamp Fasteners Agrafes à bascule
- Page 1174 and 1175:
Clamp Fasteners Agrafes à bascule
- Page 1176 and 1177:
Clamp Fasteners Agrafes à bascule
- Page 1178 and 1179:
Clamp Fasteners Agrafes à bascule
- Page 1180 and 1181:
Clamp Fasteners Agrafes à bascule
- Page 1182 and 1183:
L Push Button Fastener Attache pous
- Page 1184 and 1185:
50F Quarter Turn Fastener Attache
- Page 1186 and 1187:
L Quarter Turn Fasteners Attaches
- Page 1188 and 1189:
Quarter Turn Fasteners Attaches à
- Page 1190 and 1191:
Door Hardware Items Articles de qui
- Page 1192 and 1193:
Door Hardware Items Articles de qui
- Page 1194 and 1195:
Door Hardware Items Articles de qui
- Page 1196 and 1197:
L Multi-Purpose Handles & Cams Poig
- Page 1198 and 1199:
Padlockable Handle Poignée verroui
- Page 1200 and 1201:
Door Hardware Quincaillerie pour le
- Page 1202 and 1203:
L Door Hardware Items Articles de q
- Page 1204 and 1205:
Latches Loquets ® Inch Pouces SLEE
- Page 1206 and 1207:
Latches Loquets Push Latch ® Inch
- Page 1208 and 1209:
Latches Loquets Inch Pouces This st
- Page 1210 and 1211:
Slam Latches Cliquets à claquer Fl
- Page 1212 and 1213:
Slam Latches Cliquets à claquer In
- Page 1214 and 1215:
Slam Latches Cliquets à claquer Ba
- Page 1216 and 1217:
Slam Latches Cliquets à claquer Th
- Page 1218 and 1219:
Cab Door Hardware Quincaillerie pou
- Page 1220 and 1221:
Cab Door Hardware Quincaillerie pou
- Page 1222 and 1223:
Flush-Mounted Paddle Handle Latches
- Page 1224 and 1225:
L Van Door Hardware Quincaillerie p
- Page 1226 and 1227:
Van Door Hardware Quincaillerie pou
- Page 1228 and 1229:
L Van Door Hardware Quincaillerie p
- Page 1230 and 1231:
Door Hardware Items Articles de qui
- Page 1232 and 1233:
Door Hardware Items Articles de qui
- Page 1234 and 1235:
Van Door Hardware Quincaillerie pou
- Page 1236 and 1237:
Van Hardware Quincaillerie pour fou
- Page 1238 and 1239:
Folding Seat Brackets and Step Appu
- Page 1240 and 1241:
Van Hardware Qunicaillerie pour fou
- Page 1242 and 1243:
"Reach-in" Refrigerator Locks Serru
- Page 1244 and 1245:
Van Door Hardware Quincaillerie pou
- Page 1246 and 1247:
L Van Door Hardware Quincaillerie p
- Page 1248 and 1249:
Cam Lift Hinges Pentures de relevag
- Page 1250 and 1251:
Strap Hinges Pentures en acier HEAV
- Page 1252 and 1253:
Steel Strap Hinges Pentures en acie
- Page 1254 and 1255:
Steel Hinges Charnières en acier I
- Page 1256 and 1257:
Steel Hinges Charnières en acier D
- Page 1258 and 1259:
Plastic Hinges Charnières en plast
- Page 1260 and 1261:
Hinges Charnières 2-29/32" (74 mm)
- Page 1262 and 1263:
L Continuous Hinges Charnières con
- Page 1264 and 1265:
Hinges Charnières Inch Pouces Hing
- Page 1266 and 1267:
Hood Clamps Attache-capots NOTE: De
- Page 1268 and 1269:
Hood Fastener Straps Attaches à sa
- Page 1270 and 1271:
We Are Proud To Represent …the Le
- Page 1272 and 1273:
Adjustable Grip Latches Cliquets à
- Page 1274 and 1275:
T-handle Latch Mid-size series 10
- Page 1276 and 1277:
INSTALLATION FOR SPRING COMPRESSION
- Page 1278 and 1279:
CATALOG 13 Single-hole Mount Large
- Page 1280 and 1281:
Lift and Turn ® Latches Cliquets
- Page 1282 and 1283:
Flush Sealed Latch • Use in NEMA-
- Page 1284 and 1285:
Grabber Door Catch Mounts inside yo
- Page 1286 and 1287:
CATALOG 13 Slam-action Keylatch-in
- Page 1288 and 1289:
Paddle Latches Miniature Size • I
- Page 1290 and 1291:
; ; ;;; CATALOG 13 Pocket Pull ® F
- Page 1292 and 1293:
CATALOG 13 Concealed Pulls • A pu
- Page 1294 and 1295:
Dual Lock ® Butt-Joint Panel Latch
- Page 1296 and 1297:
;;; Soft Latch ® Draw Latch • Al
- Page 1298 and 1299:
Over-centre Draw Latch Assembly - S
- Page 1300 and 1301:
Versa Latch ® Tension Latch Small
- Page 1302 and 1303:
Adjustable Draw Latch Multiple size
- Page 1304 and 1305:
~~UTHCd Designer Series Draw Latch
- Page 1306 and 1307:
Draw Latches Cliquets d'attelage 10
- Page 1308 and 1309:
Link Lock ® Rotary Action Latch La
- Page 1310 and 1311:
Link Lock ® Rotary Action Latch Sm
- Page 1312 and 1313:
Concealed Hinges… Provide good lo
- Page 1314 and 1315:
CATALOG 13 Metal Lift-Off Hinges
- Page 1316 and 1317:
Friction Adjustable Hinges For free
- Page 1318 and 1319:
Swell Latches Heavy Duty Version
- Page 1320 and 1321:
Swell Action Latches • Latches in
- Page 1322 and 1323:
Series 82 Selection Guide To select
- Page 1324 and 1325:
Series 82 Sealing Washer Cupped Qua
- Page 1326 and 1327:
Quarter Turn Fasteners Attaches à
- Page 1328 and 1329:
Spring Loaded Plunger • Provides
- Page 1330 and 1331:
VELCRO ® Fasteners Attaches «VELC
- Page 1332 and 1333:
VELCRO ® Fasteners Attaches «VELC
- Page 1334 and 1335:
VELCRO ® Fasteners Attaches «VELC
- Page 1336 and 1337:
VELCRO ® Buckles and Hardware Bouc
- Page 1338 and 1339:
VELCRO ® Buckles and Hardware Bouc
- Page 1340 and 1341:
M Slide Fasteners Fermetures à gli
- Page 1342 and 1343:
Bungee Cords Corde élastique Inch
- Page 1344 and 1345:
Elastic Cable / TowStraps and Rope
- Page 1346 and 1347:
M Hardware - for Shockcord, etc. Qu
- Page 1348 and 1349:
Rubber Tie-downs Fixations en caout
- Page 1350 and 1351:
Tie-Downs Fixations PROTECT YOUR IN
- Page 1352 and 1353:
Inch Pouces SYNTHETIC ROPE IN HANDY
- Page 1354 and 1355:
Inch Pouces Needles, etc. Aiguilles
- Page 1356 and 1357:
Inch and Metric Pouces et Métrique
- Page 1358 and 1359:
Metric Métrique Delrin 500 Strap B
- Page 1360 and 1361:
Metric Métrique Metric Self-lockin
- Page 1362 and 1363:
Metric Métrique Metric SNAP CATCH
- Page 1364 and 1365:
Inch Pouces Plastic Buckles & Faste
- Page 1366 and 1367:
Inch Pouces SNAP FASTENERS Flanged
- Page 1368 and 1369:
Inch Pouces Fastener Tools Outils d
- Page 1370 and 1371:
Inch Pouce Fabric & Leather Fastene
- Page 1372 and 1373:
CATALOG 13 Inch Pouce SHEET BRASS G
- Page 1374 and 1375:
M Standardized Brass Eyelets Oeille
- Page 1376 and 1377:
Upholsterers’ Tools Outils de tap
- Page 1378 and 1379:
Upholsters’ Tools Outils de tapis
- Page 1380 and 1381:
Upholstery Tufting Buttons Boutons,
- Page 1382 and 1383:
Cushion Springs and Clips Ressorts
- Page 1384 and 1385:
Decorative Upholstery Nails Clous d
- Page 1386 and 1387:
Stainless Steel Nails Clous en acie
- Page 1388 and 1389:
Metal Rings Anneaux métalliques SP
- Page 1390 and 1391:
M Metal “Dee” Rings and Clips A
- Page 1392 and 1393:
M Hardware Miscellaneous Quincaille
- Page 1394 and 1395:
Snaps, Hooks, etc. Mousquetons, cro
- Page 1396 and 1397:
Buckles, Snaps, Hooks, etc. Boucles
- Page 1398 and 1399:
Wire Rope Clips, Clamps, Thimbles a
- Page 1400 and 1401:
Wire Rope Câble métallique Inch P
- Page 1402 and 1403:
Inch Pouces Grade 30 Clevis Slip Ho
- Page 1404 and 1405:
Quick Connecting Links Maillon à b
- Page 1406 and 1407:
Plastic Chain and Attachments Chaî
- Page 1408 and 1409:
Hazet ® Tools Outils Hazet ® Nut
- Page 1410 and 1411:
® Hex Nut-Drivers Functional dimen
- Page 1412 and 1413:
® Double Open-End Wrenches ISO 108
- Page 1414 and 1415:
® Combination Box and Open-End Wre
- Page 1416 and 1417:
® Double-Hex Box Wrenches DIN 897,
- Page 1418 and 1419:
® Flat Chisels Chrome-Vanadium Mat
- Page 1420 and 1421:
® Grip Pliers Especially designed
- Page 1422 and 1423:
® Pullers Special Steel Galvanized
- Page 1424 and 1425:
® Offset Screwdrivers DIN 5200 Chr
- Page 1426 and 1427:
® Screwdrivers For Slotted Screws
- Page 1428 and 1429:
® Stud Extractors Chrome-Vanadium
- Page 1430 and 1431:
® Hex Socket Chrome-Vanadium 1/4"
- Page 1432 and 1433:
® 167 x 97 x 37 mm 1/4" Socket Set
- Page 1434 and 1435:
® 6 Point Sockets 3/8 inch 6 Point
- Page 1436 and 1437:
® Phillips Socket Sockets Chrome-V
- Page 1438 and 1439:
® 3/8 inch 344 x 188 x 56 mm 6 Poi
- Page 1440 and 1441:
® 6 Point Sockets DIN 3124, ISO 27
- Page 1442 and 1443:
® Speeder DIN 3122, ISO 3315 Chrom
- Page 1444 and 1445:
® Spark Plug Socket with Universal
- Page 1446 and 1447:
® XZN Sockets 1/2 inch Sockets Chr
- Page 1448 and 1449:
® 320 x 128 x 58 mm Hex Sockets 1/
- Page 1450 and 1451:
® Ratchet Head Chrome-Vanadium 3/4
- Page 1452 and 1453:
® Extensions DIN 3123, ISO 3316 Ch
- Page 1454 and 1455:
® Diagonal Cutters Special Steel F
- Page 1456 and 1457:
® Lockring Pliers Spring Steel Rev
- Page 1458 and 1459:
® Automatic Wire Stripper For soli
- Page 1460 and 1461:
® Ball Peen Hammers Chrome-Vanadiu
- Page 1462 and 1463:
® Hex Head Wrench Set DIN 911, ISO
- Page 1464 and 1465:
® Screwdriver Bits Screwdriver Bit
- Page 1466 and 1467:
® CATALOG 13 Adapters Chrome-Vanad
- Page 1468 and 1469:
® Standard Torque Wrench SYSTEM 50
- Page 1470 and 1471:
® Trimming Knife (protected by des
- Page 1472 and 1473:
Hand Tools Outils portatifs Allen
- Page 1474 and 1475:
Inch and Metric Pouces et Métrique
- Page 1476 and 1477:
Inch and Metric Pouces et Métrique
- Page 1478 and 1479:
CATALOG 13 Inch Pouces KEY FIT TABL
- Page 1480 and 1481:
Metric Métrique HEX KEYS Metric DI
- Page 1482 and 1483:
Metric Métrique DIN 911 METRIC HEX
- Page 1484 and 1485:
Inch Pouces Key Wrenches of ALLOY S
- Page 1486 and 1487:
Eliminator Socket Sets «Eliminator
- Page 1488 and 1489:
Eliminator Socket Sets «Eliminator
- Page 1490 and 1491:
Eliminator Socket Sets «Eliminator
- Page 1492 and 1493:
Torque Wrenchs Clefs á torsion Inc
- Page 1494 and 1495:
Socket Sets Ensembles de douilles S
- Page 1496 and 1497:
Socket Sets Ensembles de douilles M
- Page 1498 and 1499:
Socket Sets Ensembles de douilles S
- Page 1500 and 1501:
Super Palmster «Super Palmster» S
- Page 1502 and 1503:
P Hex Bits Mèches hexagonales Inse
- Page 1504 and 1505:
TORX ® DRIVE Bits Mèches «TORX
- Page 1506 and 1507:
Screwdrivers Tournevis Inch Pouces
- Page 1508 and 1509:
Insert Bit Kit Trousse d'embouts In
- Page 1510 and 1511:
Screwdrivers Tournevis A wide range
- Page 1512 and 1513:
Screwdrivers Tournevis Screwdriver
- Page 1514 and 1515:
Uni-Driver ® «Uni-Driver ® » RA
- Page 1516 and 1517:
P Straight Shank Jobbers’ Drills
- Page 1518 and 1519:
High Speed Drills Forets rapides en
- Page 1520 and 1521:
P Rotary Masonry Drill Forets rotat
- Page 1522 and 1523:
Countersinks Fraises Countersinks y
- Page 1524 and 1525:
High Speed Straight Shank Jobbers
- Page 1526 and 1527:
Jobbers’ Straight Shank Twist Dri
- Page 1528 and 1529:
Twist Drills For Wood Forets hélic
- Page 1530 and 1531:
Extra Long Twist Drills Forets extr
- Page 1532 and 1533:
Twist Drills With Morse Taper Shank
- Page 1534 and 1535:
Masonry Drills Forets pour maçonne
- Page 1536 and 1537:
Precisions - Countersinks Fraise de
- Page 1538 and 1539:
Milling Cutters Fraises Metric Mét
- Page 1540 and 1541:
Reamers Alésoirs Metric Métrique
- Page 1542 and 1543:
Reamers Alésoirs Metric Métrique
- Page 1544 and 1545:
Reamers Alésoirs METRIC QUICK ACTI
- Page 1546 and 1547:
CATALOG 13 STD. SET TYPE 0420 Taper
- Page 1548 and 1549:
Inch Pouces Tap Terminology Termino
- Page 1550 and 1551:
CATALOG 13 Inch Pouces TAPS HIGH SP
- Page 1552 and 1553:
Inch and Metric Pouces et Métrique
- Page 1554 and 1555:
Metric Métrique STRAIGHT FLUTE MET
- Page 1556 and 1557:
Metric Métrique STRAIGHT FLUTE MET
- Page 1558 and 1559:
Metric Métrique Hand or Machine Ta
- Page 1560 and 1561:
Inch Pouces Pipe Taps and Dies Tara
- Page 1562 and 1563:
Metric Métrique Round Dies Écrous
- Page 1564 and 1565:
Metric Métrique METRIC FINE THREAD
- Page 1566 and 1567:
CATALOG 13 Metric Métrique METRIC
- Page 1568 and 1569:
Inch and Metric Pouce et Métrique
- Page 1570 and 1571:
Inch and Metric Pouce et Métrique
- Page 1572 and 1573:
Inch and Metric Pouce et Métrique
- Page 1574 and 1575:
Inch Pouce Feeler Gauges Jauges d'
- Page 1576 and 1577:
Inch and Metric Pouce et Métrique
- Page 1578 and 1579:
Inch Pouce Measuring Devices Dispos
- Page 1580 and 1581:
Inch and Metric Pouces et Métrique
- Page 1582 and 1583:
Inch and Metric Pouces et Métrique
- Page 1584 and 1585:
Metric Métrique Adjustable Spanner
- Page 1586 and 1587:
CATALOG 13 Metric Métrique DIN 181
- Page 1588 and 1589:
CATALOG 13 Metric Métrique A/F SPA
- Page 1590 and 1591:
Inch Pouces Box Wrenches 12 Point,
- Page 1592 and 1593:
CATALOG 13 Inch and Metric Pouces e
- Page 1594 and 1595:
Inch Pouces Identification Tools Ou
- Page 1596 and 1597:
CATALOG 13 Inch Pouces A WHOLE TOOL
- Page 1598 and 1599:
Inch Pouces Locking "C" Clamps Brid
- Page 1600 and 1601:
Inch Pouce SPAENAUR No. 876-381 Hea
- Page 1602 and 1603:
Inch Pouces Toggle Action Clamps Ag
- Page 1604 and 1605:
Inch Pouces RED HEAD PUSH-PULL TYPE
- Page 1606 and 1607:
Inch Pouces Professional Hacksaw St
- Page 1608 and 1609:
Inch Pouces NEEDLE FILE SET File se
- Page 1610 and 1611:
TYPE 1 For Use with METAL, STAINLES
- Page 1612 and 1613:
Wire Wheel Brushes Use on Angle Gri
- Page 1614 and 1615:
Hammers Marteaux Ballpeen Hammer St
- Page 1616 and 1617:
Hammers Marteaux Round Face Bumping
- Page 1618 and 1619:
Body Shop Tools Outils pour atelier
- Page 1620 and 1621:
Body Shop Tools Outils pour atelier
- Page 1622 and 1623:
Body Shop Tools Outils pour atelier
- Page 1624 and 1625:
® P reverse action joint rivet for
- Page 1626 and 1627:
High Performance Plier for the Prof
- Page 1628 and 1629:
High Performance Plier for the Prof
- Page 1630 and 1631:
High Performance Plier for the Prof
- Page 1632 and 1633:
High Performance Plier for the Prof
- Page 1634 and 1635:
High Performance Plier for the Prof
- Page 1636 and 1637:
High Performance Plier for the Prof
- Page 1638 and 1639:
High Performance Plier for the Prof
- Page 1640 and 1641:
Special Selection for the Electroni
- Page 1642 and 1643:
High Performance Plier for the Prof
- Page 1644 and 1645:
High Performance Plier for the Prof
- Page 1646 and 1647:
High Performance Plier for the Prof
- Page 1648 and 1649:
ULLMAN DEVICES ® Magnet Pick-up To
- Page 1650 and 1651:
ULLMAN DEVICES ® UTILITY PACKING H
- Page 1652 and 1653:
ULLMAN DEVICES ® Inch Pouces MAGNE
- Page 1654 and 1655:
Loctite ® Products Produits Loctit
- Page 1656 and 1657:
Cyanoacrylate Adhesives Adhésifs d
- Page 1658 and 1659:
CATALOG 13 Loctite offers a complet
- Page 1660 and 1661:
Thread Sealing Scellage des filets
- Page 1662 and 1663:
Threadlocking Blocage de filets CAT
- Page 1664 and 1665:
Coatings Revêtements CATALOG 13 CO
- Page 1666 and 1667:
CATALOG 13 Spaenaur Mfg. Product No
- Page 1668 and 1669:
CATALOG 13 Spaenaur Mfg. Product No
- Page 1670 and 1671:
CATALOG 13 Spaenaur Mfg. Product No
- Page 1672 and 1673:
Flooring & Grout Couvre-sols & coul
- Page 1674 and 1675:
Gasketing and Sealing Matériaux d'
- Page 1676 and 1677:
CATALOG 13 Spaenaur Mfr. Temp. Prod
- Page 1678 and 1679:
Wearing Compounds Composés d'usure
- Page 1680 and 1681:
Cleaners Agents de nettoyage CLEANE
- Page 1682 and 1683:
CATALOG 13 PRISM Surface Insensitiv
- Page 1684 and 1685:
Comparative Charts Tableau de compa
- Page 1686 and 1687:
Metric System of Measurements Syst
- Page 1688 and 1689:
Torque Conversion Chart Tableau de
- Page 1690 and 1691:
R Thread Size Comparison Chart Tabl
- Page 1692 and 1693:
Inch Series Head Dimension Chart Di
- Page 1694 and 1695:
TAPPING SCREWS Selector Guide Guide
- Page 1696 and 1697:
R Approximate Hole Sizes in Sheet M
- Page 1698 and 1699:
Corrosion Guide Guide de corrosion
- Page 1700 and 1701:
Corrosion Guide Guide de corrosion
- Page 1702 and 1703:
Plastics Properties Chart Tableau d
- Page 1704 and 1705:
DIN/ISO Illustrated Index Index ill
- Page 1706 and 1707:
DIN/ISO Illustrated Index Index ill
- Page 1708 and 1709:
DIN/ISO Illustrated Index Index ill
- Page 1710 and 1711:
DIN/ISO Illustrated Index Index ill
- Page 1712 and 1713:
DIN/ISO Illustrated Index Index ill
- Page 1714 and 1715:
Standard Terms and Conditions of Sa
- Page 1716 and 1717:
APPLICATION FOR CREDIT FAX FORM TO
- Page 1718 and 1719:
Version 1.5 April 2, 2015 RAMPA ©
- Page 1720 and 1721:
Version 1.5 April 2, 2015 INSERTS L
- Page 1722 and 1723:
Version 1.5 April 2, 2015 RAMPA-INS
- Page 1724 and 1725:
Version 1.5 April 2, 2015 RAMPA-INS
- Page 1726 and 1727:
Version 1.5 April 2, 2015 RAMPA-INS
- Page 1728 and 1729:
Version 1.5 April 2, 2015 RAMPA-REP
- Page 1730 and 1731:
Version 1.5 April 2, 2015 RAMPA-CON
- Page 1732 and 1733:
Version 1.5 April 2, 2015 VX SELECT
- Page 1734 and 1735:
Version 1.5 April 2, 2015 RAMPA-FLA
- Page 1736 and 1737:
Version 1.5 April 2, 2015 CAP NUTS
- Page 1738 and 1739:
Version 1.5 April 2, 2015 CROSS DOW
- Page 1740 and 1741:
Version 1.5 April 2, 2015 TOOLS RAM
- Page 1742 and 1743:
Version 1.5 April 2, 2015 RAMPA-ALL
- Page 1744 and 1745:
Version 1.5 April 2, 2015 7 8 9 10
- Page 1746 and 1747:
Version 1.5 April 2, 2015 ABOUT US
- Page 1748 and 1749:
Inch Pouce U-Bolt with Nuts Low Car
- Page 1750 and 1751:
RoHS Compliant and Legacy Part Numb
- Page 1752 and 1753:
RoHS Compliant and Legacy Part Numb
- Page 1754 and 1755:
RoHS Compliant and Legacy Part Numb
- Page 1756 and 1757:
RoHS Compliant and Legacy Part Numb
- Page 1758 and 1759:
RoHS Compliant and Legacy Part Numb
- Page 1760 and 1761:
RoHS Compliant and Legacy Part Numb
- Page 1762 and 1763:
RoHS Compliant and Legacy Part Numb
- Page 1764 and 1765:
RoHS Compliant and Legacy Part Numb
- Page 1766 and 1767:
RoHS Compliant and Legacy Part Numb
- Page 1768 and 1769:
RoHS Compliant and Legacy Part Numb
- Page 1770 and 1771:
RoHS Compliant and Legacy Part Numb
- Page 1772 and 1773:
RoHS Compliant and Legacy Part Numb
- Page 1774 and 1775:
RoHS Compliant and Legacy Part Numb
- Page 1776 and 1777:
RoHS Compliant and Legacy Part Numb
- Page 1778 and 1779:
RoHS Compliant and Legacy Part Numb
- Page 1780 and 1781:
RoHS Compliant and Legacy Part Numb
- Page 1782 and 1783:
RoHS Compliant and Legacy Part Numb
- Page 1784 and 1785:
RoHS Compliant and Legacy Part Numb
- Page 1786 and 1787:
RoHS Compliant and Legacy Part Numb
- Page 1788 and 1789:
RoHS Compliant and Legacy Part Numb
- Page 1790 and 1791:
RoHS Compliant and Legacy Part Numb
- Page 1792 and 1793:
RoHS Compliant and Legacy Part Numb
- Page 1794 and 1795:
RoHS Compliant and Legacy Part Numb
- Page 1796 and 1797:
RoHS Compliant and Legacy Part Numb
- Page 1798 and 1799:
RoHS Compliant and Legacy Part Numb
- Page 1800 and 1801:
RoHS Compliant and Legacy Part Numb
- Page 1802 and 1803:
RoHS Compliant and Legacy Part Numb
- Page 1804 and 1805:
RoHS Compliant and Legacy Part Numb
- Page 1806 and 1807:
RoHS Compliant and Legacy Part Numb
- Page 1808 and 1809:
RoHS Compliant and Legacy Part Numb
- Page 1810 and 1811:
RoHS Compliant and Legacy Part Numb
- Page 1812 and 1813:
RoHS Compliant and Legacy Part Numb
- Page 1814 and 1815:
RoHS Compliant and Legacy Part Numb
- Page 1816 and 1817:
RoHS Compliant and Legacy Part Numb
- Page 1818 and 1819:
RoHS Compliant and Legacy Part Numb
- Page 1820 and 1821:
RoHS Compliant and Legacy Part Numb
- Page 1822 and 1823:
RoHS Compliant and Legacy Part Numb
- Page 1824 and 1825:
RoHS Compliant and Legacy Part Numb
- Page 1826 and 1827:
RoHS Compliant and Legacy Part Numb
- Page 1828 and 1829:
RoHS Compliant and Legacy Part Numb
- Page 1830 and 1831:
RoHS Compliant and Legacy Part Numb
- Page 1832 and 1833:
RoHS Compliant and Legacy Part Numb
- Page 1834 and 1835:
RoHS Compliant and Legacy Part Numb
- Page 1836 and 1837:
RoHS Compliant and Legacy Part Numb
- Page 1838 and 1839:
RoHS Compliant and Legacy Part Numb
- Page 1840 and 1841:
RoHS Compliant and Legacy Part Numb
- Page 1842 and 1843:
RoHS Compliant and Legacy Part Numb
- Page 1844 and 1845:
RoHS Compliant and Legacy Part Numb
- Page 1846 and 1847:
RoHS Compliant and Legacy Part Numb
- Page 1848 and 1849:
RoHS Compliant and Legacy Part Numb
- Page 1850 and 1851:
RoHS Compliant and Legacy Part Numb
- Page 1852 and 1853:
RoHS Compliant and Legacy Part Numb
- Page 1854 and 1855:
RoHS Compliant and Legacy Part Numb
- Page 1856 and 1857:
RoHS Compliant and Legacy Part Numb
- Page 1858 and 1859:
RoHS Compliant and Legacy Part Numb
- Page 1860 and 1861:
RoHS Compliant and Legacy Part Numb
- Page 1862 and 1863:
RoHS Compliant and Legacy Part Numb
- Page 1864 and 1865:
RoHS Compliant and Legacy Part Numb
- Page 1866 and 1867:
RoHS Compliant and Legacy Part Numb
- Page 1868 and 1869:
RoHS Compliant and Legacy Part Numb
- Page 1870 and 1871:
RoHS Compliant and Legacy Part Numb
- Page 1872 and 1873:
RoHS Compliant and Legacy Part Numb
- Page 1874 and 1875:
RoHS Compliant and Legacy Part Numb
- Page 1876 and 1877:
RoHS Compliant and Legacy Part Numb
- Page 1878 and 1879:
RoHS Compliant and Legacy Part Numb
- Page 1880 and 1881:
RoHS Compliant and Legacy Part Numb
- Page 1882 and 1883:
RoHS Compliant and Legacy Part Numb
- Page 1884 and 1885:
RoHS Compliant and Legacy Part Numb
- Page 1886 and 1887:
RoHS Compliant and Legacy Part Numb
- Page 1888 and 1889:
RoHS Compliant and Legacy Part Numb
- Page 1890 and 1891:
RoHS Compliant and Legacy Part Numb
- Page 1892 and 1893:
RoHS Compliant and Legacy Part Numb
- Page 1894 and 1895:
RoHS Compliant and Legacy Part Numb
- Page 1896 and 1897:
RoHS Compliant and Legacy Part Numb
- Page 1898 and 1899:
RoHS Compliant and Legacy Part Numb
- Page 1900 and 1901:
RoHS Compliant and Legacy Part Numb
- Page 1902 and 1903:
RoHS Compliant and Legacy Part Numb
- Page 1904 and 1905:
RoHS Compliant and Legacy Part Numb
- Page 1906 and 1907:
RoHS Compliant and Legacy Part Numb
- Page 1908 and 1909:
RoHS Compliant and Legacy Part Numb
- Page 1910 and 1911:
RoHS Compliant and Legacy Part Numb
- Page 1912 and 1913:
RoHS Compliant and Legacy Part Numb
- Page 1914 and 1915:
RoHS Compliant and Legacy Part Numb
- Page 1916 and 1917:
RoHS Compliant and Legacy Part Numb
- Page 1918 and 1919:
RoHS Compliant and Legacy Part Numb
- Page 1920 and 1921:
RoHS Compliant and Legacy Part Numb
- Page 1922 and 1923:
RoHS Compliant and Legacy Part Numb
- Page 1924 and 1925:
RoHS Compliant and Legacy Part Numb
- Page 1926 and 1927:
RoHS Compliant and Legacy Part Numb
- Page 1928 and 1929:
RoHS Compliant and Legacy Part Numb
- Page 1930 and 1931:
RoHS Compliant and Legacy Part Numb
- Page 1932 and 1933:
RoHS Compliant and Legacy Part Numb
- Page 1934 and 1935:
RoHS Compliant and Legacy Part Numb
- Page 1936 and 1937:
RoHS Compliant and Legacy Part Numb
- Page 1938 and 1939:
RoHS Compliant and Legacy Part Numb
- Page 1940 and 1941:
RoHS Compliant and Legacy Part Numb
- Page 1942 and 1943:
RoHS Compliant and Legacy Part Numb
- Page 1944 and 1945:
RoHS Compliant and Legacy Part Numb
- Page 1946 and 1947:
RoHS Compliant and Legacy Part Numb
- Page 1948 and 1949:
RoHS Compliant and Legacy Part Numb
- Page 1950 and 1951:
RoHS Compliant and Legacy Part Numb
- Page 1952 and 1953:
RoHS Compliant and Legacy Part Numb
- Page 1954 and 1955:
RoHS Compliant and Legacy Part Numb
- Page 1956 and 1957:
RoHS Compliant and Legacy Part Numb
- Page 1958 and 1959:
RoHS Compliant and Legacy Part Numb
- Page 1960 and 1961:
RoHS Compliant and Legacy Part Numb
- Page 1962 and 1963:
RoHS Compliant and Legacy Part Numb
- Page 1964 and 1965:
RoHS Compliant and Legacy Part Numb
- Page 1966 and 1967:
RoHS Compliant and Legacy Part Numb
- Page 1968 and 1969:
RoHS Compliant and Legacy Part Numb
- Page 1970 and 1971:
RoHS Compliant and Legacy Part Numb
- Page 1972 and 1973:
RoHS Compliant and Legacy Part Numb
- Page 1974 and 1975:
RoHS Compliant and Legacy Part Numb
- Page 1976 and 1977:
RoHS Compliant and Legacy Part Numb
- Page 1978 and 1979:
RoHS Compliant and Legacy Part Numb
- Page 1980 and 1981:
RoHS Compliant and Legacy Part Numb
- Page 1982 and 1983:
RoHS Compliant and Legacy Part Numb
- Page 1984 and 1985:
RoHS Compliant and Legacy Part Numb
- Page 1986 and 1987:
RoHS Compliant and Legacy Part Numb
- Page 1988 and 1989:
RoHS Compliant and Legacy Part Numb
- Page 1990 and 1991:
RoHS Compliant and Legacy Part Numb
- Page 1992 and 1993:
RoHS Compliant and Legacy Part Numb
- Page 1994 and 1995:
RoHS Compliant and Legacy Part Numb
- Page 1996 and 1997:
RoHS Compliant and Legacy Part Numb
- Page 1998 and 1999:
RoHS Compliant and Legacy Part Numb
- Page 2000 and 2001:
RoHS Compliant and Legacy Part Numb
- Page 2002 and 2003:
RoHS Compliant and Legacy Part Numb
- Page 2004 and 2005:
RoHS Compliant and Legacy Part Numb
- Page 2006 and 2007:
RoHS Compliant and Legacy Part Numb
- Page 2008 and 2009:
RoHS Compliant and Legacy Part Numb
- Page 2010 and 2011:
RoHS Compliant and Legacy Part Numb
- Page 2012 and 2013:
RoHS Compliant and Legacy Part Numb
- Page 2014 and 2015:
RoHS Compliant and Legacy Part Numb
- Page 2016 and 2017:
RoHS Compliant and Legacy Part Numb
- Page 2018 and 2019:
RoHS Compliant and Legacy Part Numb
- Page 2020 and 2021:
Inch Pouce cedar deck screws - squa
- Page 2022 and 2023:
SAVE big over LOCTITE ® , with VIB
- Page 2024:
~~ SPAENAUR Head Office & Main Dist


