cvs 2400 series smart positioner product description - CVS Controls
cvs 2400 series smart positioner product description - CVS Controls
cvs 2400 series smart positioner product description - CVS Controls

You also want an ePaper? Increase the reach of your titles
YUMPU automatically turns print PDFs into web optimized ePapers that Google loves.
Installing YT-<strong>2400</strong>L with Bracket<br />
1. It is necessary to make a proper bracket to<br />
attach onto the actuator yoke.<br />
The most important notes in making the bracket<br />
are as follows:<br />
A) YT-<strong>2400</strong>L feedback lever should be level at<br />
50% of the valve stroke (Refer to point #7)<br />
B) Feedback lever connection bar of the actuator<br />
clamp should be connected at the position that the<br />
valve and stroke numbers engraved on the<br />
feedback lever match. (Refer to point #8)<br />
If the bracket meets the above conditions,<br />
installation of the YT-<strong>2400</strong>L is simple.<br />
2. Assemble the YT-<strong>2400</strong>L and bracket with<br />
supplied bolts.<br />
Installing YT-<strong>2400</strong>L with Bracket<br />
3. After assembling the YT-<strong>2400</strong>L attach it using<br />
the bolt holes of the actuator yoke. Do not tighten<br />
bolts completely - there must be some space<br />
remaining.<br />
4. Install the bar connected to the YT-<strong>2400</strong><br />
feedback lever on the actuator clamp. The slot<br />
length between the YT-<strong>2400</strong>L feedback lever is<br />
6.5mm, so the diameter of the connection bar<br />
should be less than 6.3mm.<br />
5. Temporarily connect the air filter regulator to<br />
the actuator temporarily. Set the supply pressure<br />
of the air filter regulator to ensure that the actuator<br />
clamp is positioned at 50% of the valve stroke.<br />
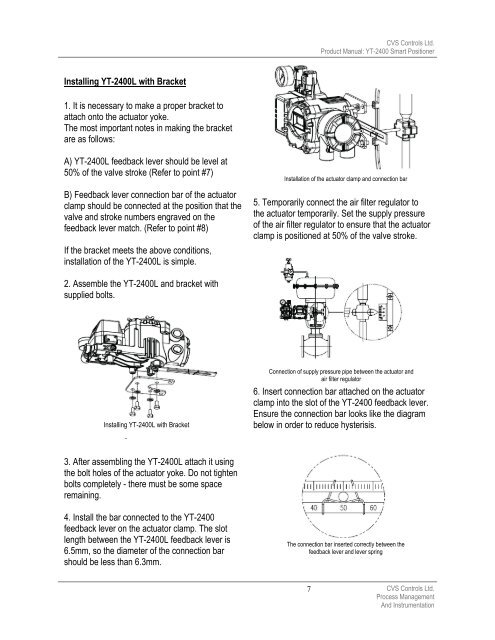
6. Insert connection bar attached on the actuator<br />
clamp into the slot of the YT-<strong>2400</strong> feedback lever.<br />
Ensure the connection bar looks like the diagram<br />
below in order to reduce hysterisis.<br />
7<br />
<strong>CVS</strong> <strong>Controls</strong> Ltd.<br />
Product Manual: YT-<strong>2400</strong> Smart Positioner<br />
Installation of the actuator clamp and connection bar<br />
Connection of supply pressure pipe between the actuator and<br />
air filter regulator<br />
The connection bar inserted correctly between the<br />
feedback lever and lever spring<br />
<strong>CVS</strong> <strong>Controls</strong> Ltd.<br />
Process Management<br />
And Instrumentation