Total Installer May-June 2019

Create successful ePaper yourself
Turn your PDF publications into a flip-book with our unique Google optimized e-Paper software.
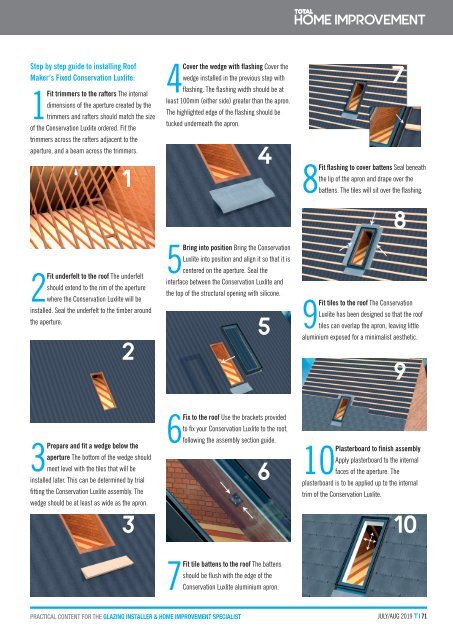
Step by step guide to installing Roof<br />
Maker’s Fixed Conservation Luxlite:<br />
1Fit trimmers to the rafters The internal<br />
dimensions of the aperture created by the<br />
trimmers and rafters should match the size<br />
of the Conservation Luxlite ordered. Fit the<br />
trimmers across the rafters adjacent to the<br />
aperture, and a beam across the trimmers.<br />
1<br />
2Fit underfelt to the roof The underfelt<br />
should extend to the rim of the aperture<br />
where the Conservation Luxlite will be<br />
installed. Seal the underfelt to the timber around<br />
the aperture.<br />
2<br />
4Cover the wedge with flashing Cover the<br />
wedge installed in the previous step with<br />
flashing. The flashing width should be at<br />
least 100mm (either side) greater than the apron.<br />
The highlighted edge of the flashing should be<br />
tucked underneath the apron.<br />
4<br />
5Bring into position Bring the Conservation<br />
Luxlite into position and align it so that it is<br />
centered on the aperture. Seal the<br />
interface between the Conservation Luxlite and<br />
the top of the structural opening with silicone.<br />
5<br />
7<br />
8Fit flashing to cover battens Seal beneath<br />
the lip of the apron and drape over the<br />
battens. The tiles will sit over the flashing.<br />
8<br />
9Fit tiles to the roof The Conservation<br />
Luxlite has been designed so that the roof<br />
tiles can overlap the apron, leaving little<br />
aluminium exposed for a minimalist aesthetic.<br />
9<br />
3Prepare and fit a wedge below the<br />
aperture The bottom of the wedge should<br />
meet level with the tiles that will be<br />
installed later. This can be determined by trial<br />
fitting the Conservation Luxlite assembly. The<br />
wedge should be at least as wide as the apron.<br />
3<br />
6Fix to the roof Use the brackets provided<br />
to fix your Conservation Luxlite to the roof,<br />
following the assembly section guide.<br />
6<br />
to finish assembly<br />
Apply plasterboard to the internal<br />
10Plasterboard<br />
faces of the aperture. The<br />
plasterboard is to be applied up to the internal<br />
trim of the Conservation Luxlite.<br />
10<br />
7Fit tile battens to the roof The battens<br />
should be flush with the edge of the<br />
Conservation Luxlite aluminium apron.<br />
PRACTICAL CONTENT FOR THE GLAZING INSTALLER & HOME IMPROVEMENT SPECIALIST<br />
JULY/AUG <strong>2019</strong> TI71