Jewellery World Magazine - May 2021

Create successful ePaper yourself
Turn your PDF publications into a flip-book with our unique Google optimized e-Paper software.
7<br />
Check the profile of your punch<br />
on a ring shank by rolling it<br />
around, then continue shaping<br />
the groove if it doesn’t fit neatly enough.<br />
You could also use a round needle file<br />
for the final shaping.<br />
8<br />
Remove all tool marks from the<br />
working surface of the punch with<br />
emery paper. The better the finish<br />
you achieve on the tool, the better your<br />
ring shank will look and will require less<br />
finishing work.<br />
9<br />
The punch now needs to be<br />
hardened.<br />
Heat the punch up until it is bright<br />
red then quench it in water. Quenching<br />
in oil will give a better result but it does<br />
come with a fire hazard risk and it’s not<br />
really necessary for small jobs like this.<br />
The working end of the punch will now<br />
be hardened, but it will also be brittle<br />
and may crack during use.<br />
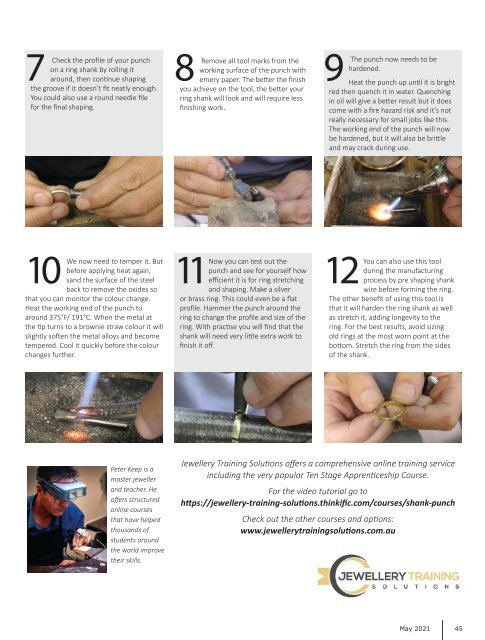
10<br />
We now need to temper it. But<br />
before applying heat again,<br />
sand the surface of the steel<br />
back to remove the oxides so<br />
that you can monitor the colour change.<br />
Heat the working end of the punch to<br />
around 375°F/ 191°C. When the metal at<br />
the tip turns to a brownie straw colour it will<br />
slightly soften the metal alloys and become<br />
tempered. Cool it quickly before the colour<br />
changes further.<br />
11efficient it is for ring stretching<br />
Now you can test out the<br />
punch and see for yourself how<br />
and shaping. Make a silver<br />
or brass ring. This could even be a flat<br />
profile. Hammer the punch around the<br />
ring to change the profile and size of the<br />
ring. With practise you will find that the<br />
shank will need very little extra work to<br />
finish it off.<br />
12<br />
You can also use this tool<br />
during the manufacturing<br />
process by pre shaping shank<br />
wire before forming the ring.<br />
The other benefit of using this tool is<br />
that it will harden the ring shank as well<br />
as stretch it, adding longevity to the<br />
ring. For the best results, avoid sizing<br />
old rings at the most worn point at the<br />
bottom. Stretch the ring from the sides<br />
of the shank.<br />
Peter Keep is a<br />
master jeweller<br />
and teacher. He<br />
offers structured<br />
online courses<br />
that have helped<br />
thousands of<br />
students around<br />
the world improve<br />
their skills.<br />
<strong>Jewellery</strong> Training Solutions offers a comprehensive online training service<br />
including the very popular Ten Stage Apprenticeship Course.<br />
For the video tutorial go to<br />
https://jewellery-training-solutions.thinkific.com/courses/shank-punch<br />
Check out the other courses and options:<br />
www.jewellerytrainingsolutions.com.au<br />
<strong>May</strong> <strong>2021</strong> 45